Mango and Kiwi Popsicle recipe Vegan gluten free Popsicle Shreya Tiwari's recipe Polkapuffs recipes Shreya Tiwari photography

Mango Kiwi Popsicles

The sweltering heat…sticky, humid afternoons and my loss of appetite πŸ˜‘πŸ˜‘ yeah…I do manage to skip meals very easily. Somehow, I never tend to feel all that hungry too… but it’s the thirst and constant craving for something chilled that keeps me running to the refrigerator every few minutes πŸ˜‚ Chilled, ice cold water and I have a very, very long relationship….more like a love and hate relationship…because I love it and it tends to give me throat issues every now and then…hence the hate bit πŸ˜‚πŸ˜‚πŸ˜œπŸ˜œπŸ˜œ

Mango and Kiwi Popsicle recipe Vegan gluten free Popsicle Shreya Tiwari's recipe Polkapuffs recipes Shreya Tiwari photography

It doesn’t make any difference to me! Lol! Anyways…it’s the chilled stuff that keeps me going in summers. And, people who follow the blog regularly know that I have been posting a lot of ice creams and Popsicles since the summers have started….I even shared a recipe of a lovely, exotic drink, my Rose and Pineapple CoolerΒ . It is one of the most refreshing drinks that I have ever put together, obviously after my Tropical ice tea!😍

Mango and Kiwi Popsicle recipe Vegan gluten free Popsicle Shreya Tiwari's recipe Polkapuffs recipes Shreya Tiwari photography

Since it’s the summers, mangoes can’t be far away…can they!? Juicy, ripe and so sweet…they are my go to snack these days. A couple or more of chopped Alphonso (always Alphonso) mangoes and that’s my lunch pretty much sorted (I adda couple drops lemon juice and a few torn mint leaves), it’s so refreshing and helps me push through my work for another couple of hours during the long afternoons….sigh!! Yeah, summers do make me lazy and processing picture after picture can take a lot out of me…πŸ˜‚πŸ˜‚πŸ€£

Anyways… talking about tropical stuff always reminds me of Kiwis, they are another of my most favourite tropical fruits…. and I always have a few in my refrigerator…they pair well with almost every other fruit (read making a quick fruit salad thingy) and look too pretty if you need to add them as a quick garnish for drinks or mocktails….which reminds me….you must go take a look at my Kiwi mojito Popsicle πŸ‘ŒπŸΌ You’ll be making it even before logging out of the blog 😁

Mango and Kiwi Popsicle recipe Vegan gluten free Popsicle  Shreya Tiwari's recipe Polkapuffs recipes Shreya Tiwari photography

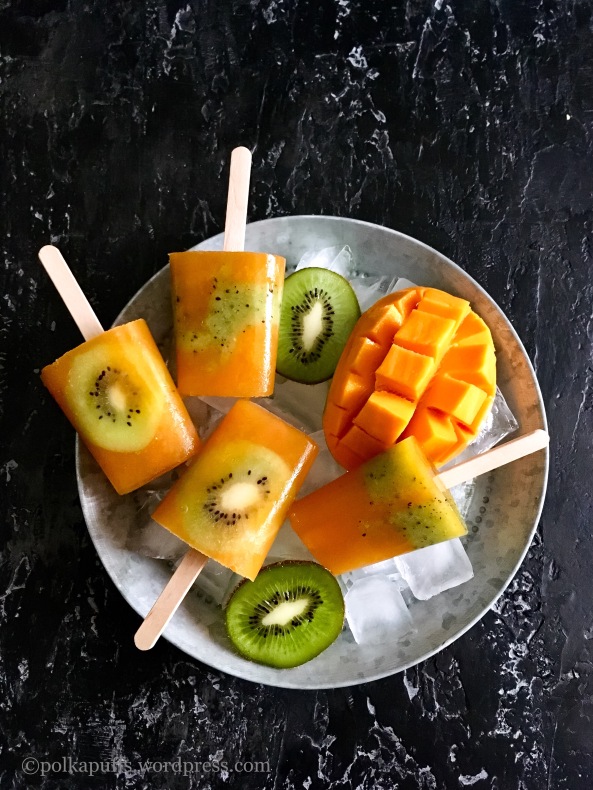
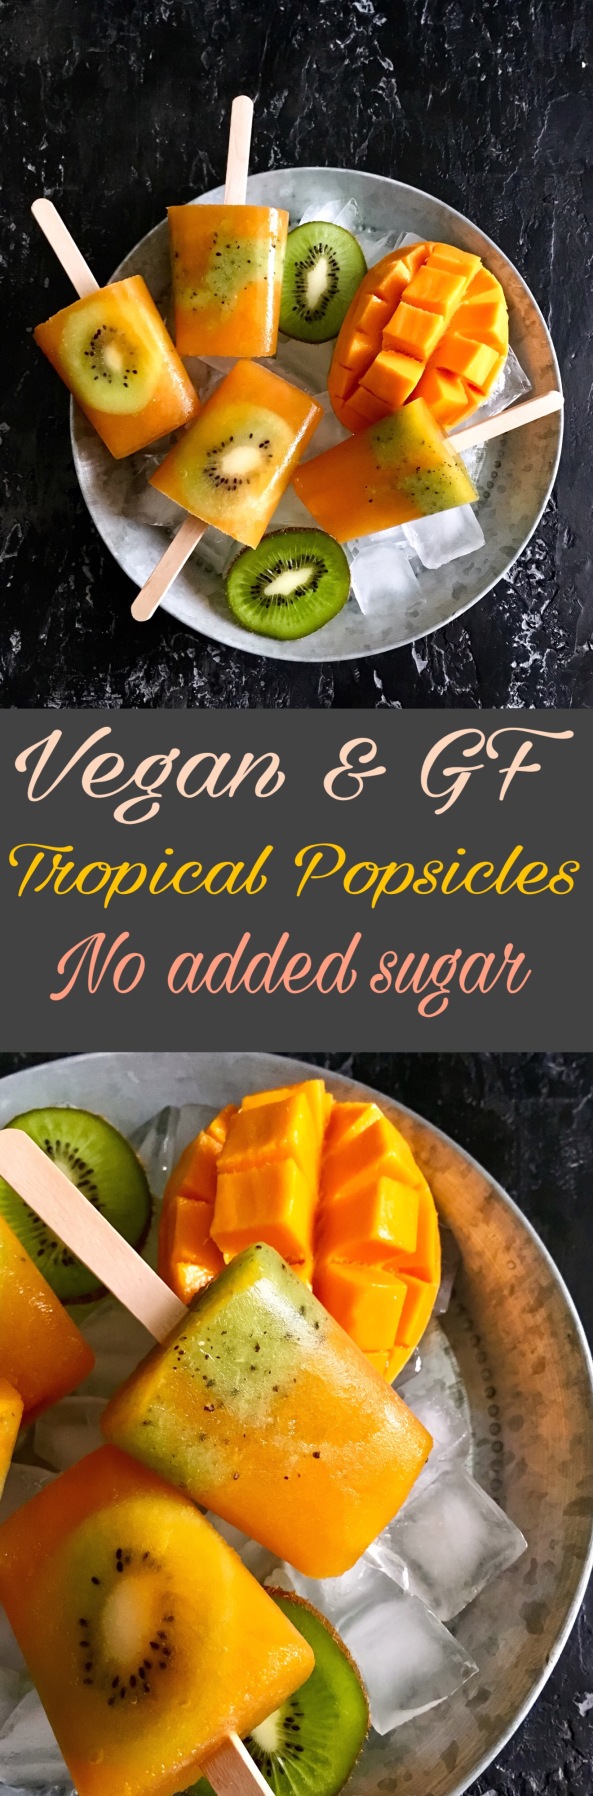
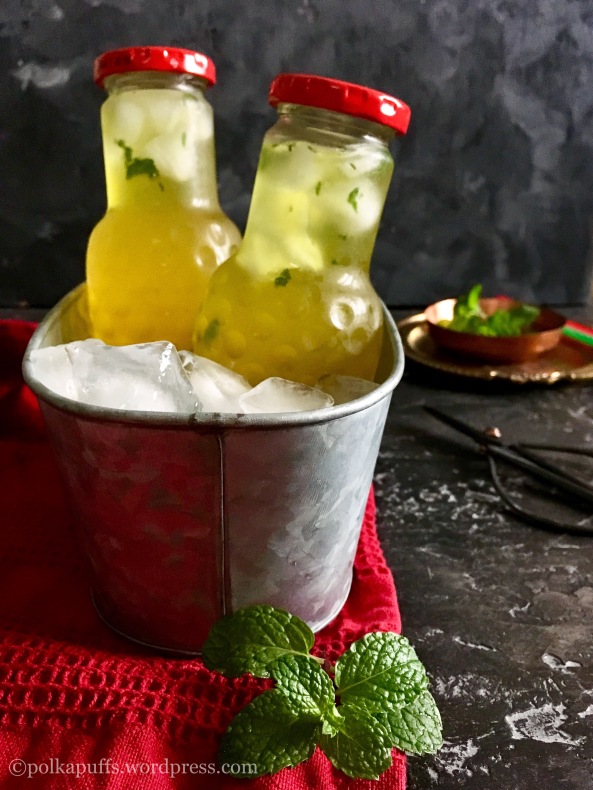
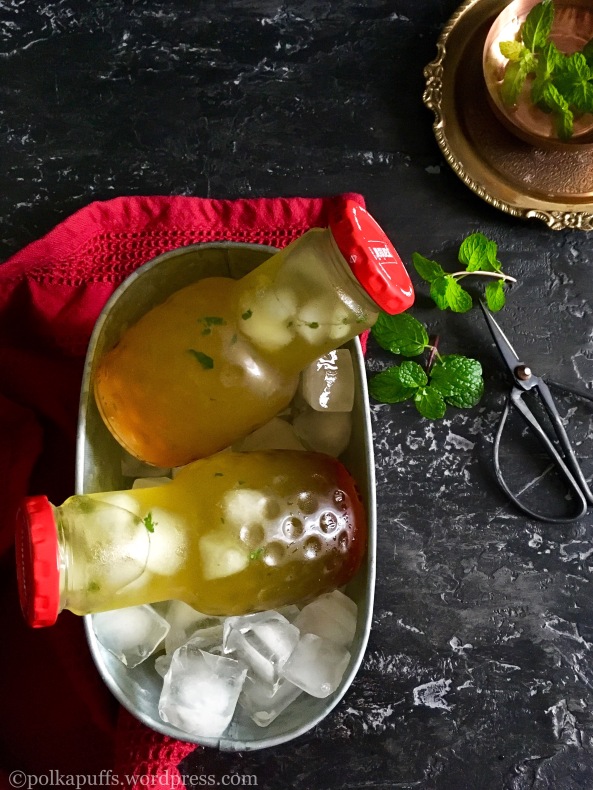
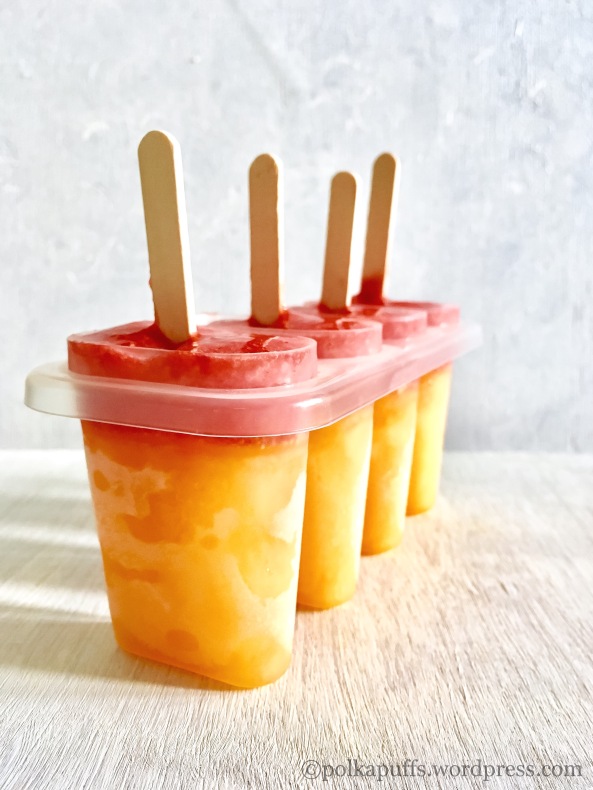
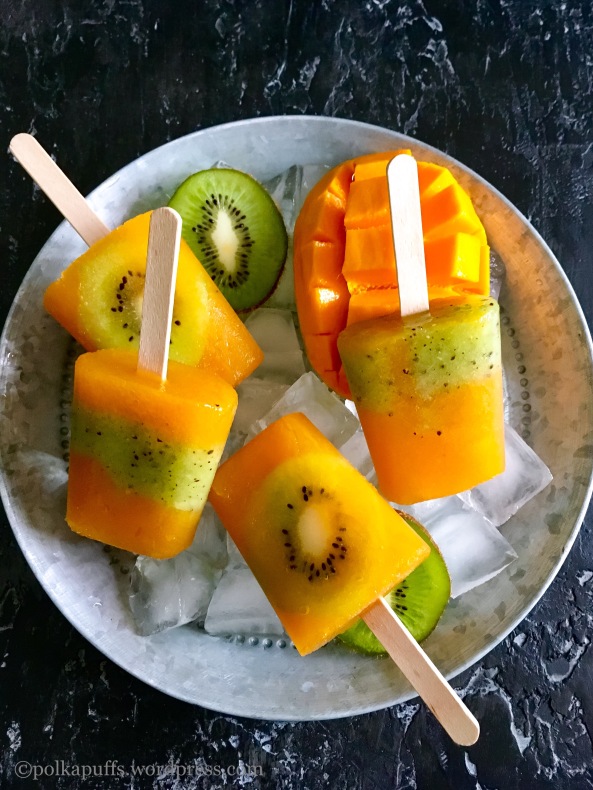
So what do I do when I have to clear out my refrigerator over the weekend to make room for fresh produce…I look at all the leftover bits of sliced mangoes and some kiwis sitting at the back of the refrigerator…I think frozen goodies to take me through my misery of the week ahead that is going to need a tad bit of extra efforts….phew! Popsicles….my mind jumps at the prospect of the very thought! Hahha….but a girl needs to make her snacks healthy, doesn’t she!? What more can I add to these beauties to ensure that….well, enough said…check out the recipe below and go make yourself some….call it a Mango Kiwi Popsicle or tropical smoothie Popsicle 😍

Yiled: 4 Popsicles

Equipment: a blender, Popsicle mound, measuring cups, ice cream sticks.

Ingredients:

3/4 cup fresh mango pulp (I used Alphonso mangoes, they have a beautiful colour and the taste is unmatched)

1/4 cup fresh tender coconut water

2 slices Kiwi (use green or golden kiwi as per your choice)

2-3 tbsp Kiwi fruit pulp (use green or golden Kiwi as per your choice)

Method:

In a blender jar, add coconut water along with mango pulp and give it a whiz.

Now, pour half of this mixture into each Popsicle mould, fill them only about to the 1/4 th capacity. We will use the remaining half for the next step. Place the moulds in the freezerΒ for setting the pulp, for about 2-3 hours.

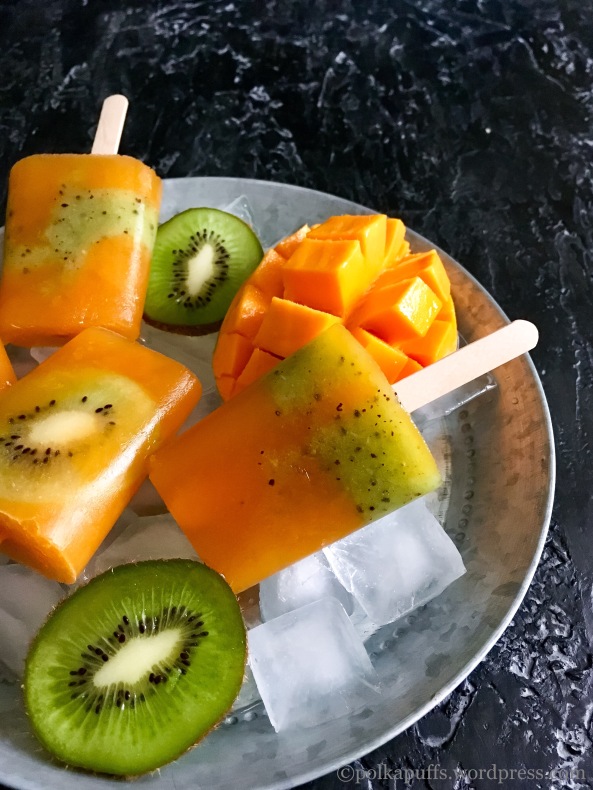
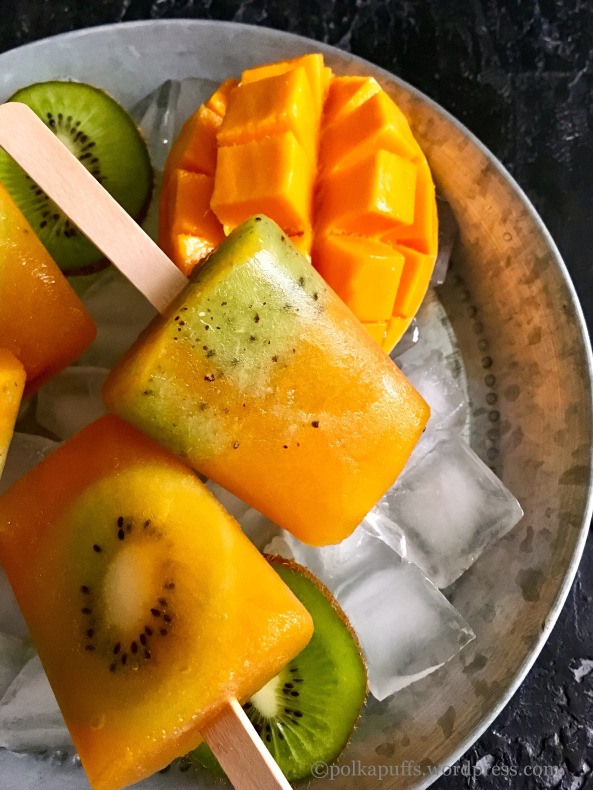
Then remove the moulds with the set pulp. I have added kiwi slices in the first 2 mounds and kiwi pulp in the remaining two moulds. Then pour remaining mango-coconut mixture into all 4 moulds (the kiwi and mango pulp blend into each other very naturally and I think it looks pretty too) and add an ice cream stick into each mould. Place them in the freezer to set for another 4-5 hours.

That’s it, once they have frozen completely, to serve them, dip the lower halfs of the moulds into water for 1-2 minutes, gently tug at the ice-cream sticks and pull out each Popsicle. One of the healthiest ways to enjoy frozen treats without added colours or artificial sweetners. 😊

Mango and Kiwi Popsicle recipe Vegan gluten free Popsicle  Shreya Tiwari's recipe Polkapuffs recipes Shreya Tiwari photography

They look so delicious… do make these and let us know how you like them!

Love,

ShreyaπŸ’–

 
For more such deliciousness, follow me on –

Pinterest ID : https://www.pinterest.com/emarald_icon123/

Facebook page : https://www.facebook.com/pages/PolkaPuffs/334992336689991

Instagram : https://instagram.com/polkapuffs/

Vegan & GF tropical Popsicles No added sugar


Vegetarian lo mein recipe Chow-mien recipe How to make street style Schezwan noodles Polkapuffs recipes Shreya Tiwari photography Vegan noodle recipe Schezwan noodle recipe

Schezwan Noodles | Indo Chinese Street Food

We IndiansΒ love our ‘desi’ Indo-Chinese….we may pretend to appreciteΒ the gourmet, Asian-style spreads at the most sought after restaurants…but you’ll find us literally stuffing our faces with these street style noodles…or fried rice and some cornflour laden, soy sauce soaked manchurian gravies more often than notπŸ˜πŸ˜πŸ˜πŸ˜‚ and I am no different, I am in love with our ‘desi’ Chinese which is absolutely no where close to the authentic cuisine but what the heck?! It’s just too yummy to part with….and it’s one of my favourite things in the whole wide world πŸ€— There! I said it!

Vegetarian lo mein recipe Chow-mien recipe How to make street style Schezwan noodles Polkapuffs recipes Shreya Tiwari photography Vegan noodle recipe Schezwan noodle recipe

So, having said that…what would you expect from me if I have a few packets of Hakka noodles sitting in my pantry and one hungry husband on a weekend ….with no plans to step out because the man ain’t in the mood to drive 😩 I make some street vendor style Schezwan Noodles…spicy….loaded with veggies…full of flavours and absolutely lip-smacking good😍😍😍 besides, it gets done in about 30 minutes…what’s not to loveπŸ‘ŒπŸΌ

Vegetarian lo mein recipe Chow-mien recipe How to make street style Schezwan noodles Polkapuffs recipes Shreya Tiwari photography Vegan noodle recipe Schezwan noodle recipe

Actually, it’s better than your favourite take-out as this is healthier because of the veggies and I’ve added very little oil. Spicese, yes…added a whole lot of spices while making it as we prefer it to be hot! 😁 So, if you’ve been a person who starts sneezing and coughing at the first bite of anything spicy…tone this recipe down a couple of notches and you’ll survive πŸ˜‰ I have used my homemade Schezwan sauce here and I did serve this with some quick Schezwan paneer….basically, everything was Schezwan πŸ˜‘πŸ€” how’d that happen?! 😜

Enough said! Start cooking…pronto!

Yield: serves 2-3

Equipment: a large heavy bottomed wok, measuring cup/ spoons, a pair of tongs.

Ingredients:

2 packets of Hakka Noodles (boiled as per the instructions on the package)

1+1/2 cups julienned carrots

1 cup julienned cabbage

1 cup julienned capsicum

1 cup finely sliced red onion

1/2 cup finely chopped spring onion whites

1/2 cup finely chopped spring onion greens

salt to taste

1/4 cup Schezwan sauce

3 tbsp oil

1 tsp noodle Masala (Indian grocery stores carry it, else skip it and add black pepper powder)

3 tsp finely chopped garlic

1 tsp finely chopped ginger

2 tbsp soy sauce

1 tbsp red chilli sauce

1 tsp vinegar

3 nos. whole red chillies

1 tbsp tomato ketchup (optional)

Method:

In the wok, heat oil until nice and hot. Then add the ginger, garlic, whole red chillies and spring onion whites. SautΓ© these on high flame until the garlic turns golden. Then add all the veggies along with salt and noodle Masala (black pepper). Keep mixing well and sautΓ©ing onΒ high flame for the next 2-3 minutes.

Next, add the sauces – Schezwan, soy, chilli. Add vinegar and ketchup too. SautΓ© for another 2 minutes. Now tip inΒ the boiled noodles (ensure that the noodles are al-dentΓ¨). Use tongs to mix the veggies with the noodles and be gentle. You don’t want to break any of those gorgeous noodles. Once everything is looking good, add the spring onion greens and give them a last mix. That’s it, serve them piping hot! DoneπŸ˜‰

You can add any veggies if your choice or add Proteins of your choice…like shredded chicken or some sautΓ©ed prawns if you like seafood.

Vegetarian lo mein recipe Chow-mien recipe How to make street style Schezwan noodles Polkapuffs recipes Shreya Tiwari photography Vegan noodle recipe Schezwan noodle recipe

Doesn’t that make you drool?! πŸ˜ƒ …you should make someπŸ‘†πŸΌ

Love,

ShreyaπŸ’–


For more such deliciousness, follow me on –

Pinterest ID : https://www.pinterest.com/emarald_icon123/

Facebook page : https://www.facebook.com/pages/PolkaPuffs/334992336689991

Instagram : https://instagram.com/polkapuffs/

Vegetable Lo-Mein spicy and Vegan Meals under 30 mins Asian noodle recipe Polkapuffs

Pressure cooker cake recipe PolkaPuffs recipe Chocolate sponge cake in pressure cooker Eggless chocolate cake in pressure cooker Vegan chocolate cake recipe Bake a cake in the pressure cooker

Eggless Chocolate Sponge Cake in Pressure Cooker | Vegan Chocolate Sponge Cake Recipe

I am back with another easy pressure cooker cake recipe! Yayy! Yayy….because it’s eggless this time! Yup….I know most of my beloved readers out there wanted to learn to bake an eggless cake in the pressure cooker the last time when I’d posted my Mom’s Vanilla Sponge Cake in the Pressure Cooker recipe….. I also know that I am a bit late than I thought I would be…but better late than never, right!? πŸ˜„ A ONE BOWL WONDER….

Pressure cooker cake recipe PolkaPuffs recipe Chocolate sponge cake in pressure cooker Eggless chocolate cake in pressure cooker Vegan chocolate cake recipe Bake a cake in the pressure cooker

The best thing about this cake is that it can be baked as well. So, it ain’t necessary that you must bake it in a pressure cooker only. I use the same recipe to bake some muffins in my OTG from the leftover batter as this cake baked in the pressure cooker….and this what it looked like…perfect flat top! You can frost it like a pro!

Pressure cooker cake recipe PolkaPuffs recipe Chocolate sponge cake in pressure cooker Eggless chocolate cake in pressure cooker Vegan chocolate cake recipe Bake a cake in the pressure cooker

It was just perfect…this is my go to recipe whenever I am planning on an eggless, vegan chocolate cake😍 I had discovered this recipe long ago..although it had butter originally but I have been using oil …and it stayed with me. Works like a charm….perfect texture!

Pressure cooker cake recipe PolkaPuffs recipe Chocolate sponge cake in pressure cooker Eggless chocolate cake in pressure cooker Vegan chocolate cake recipe Bake a cake in the pressure cooker

I have used this recipe even for a proper frosted cake. It’s easy to slice in layers and frost well as the crumbs do not just fall off either. It stays fresh for 2-3 days at room temperature too.

Pressure cooker cake recipe PolkaPuffs recipe Chocolate sponge cake in pressure cooker Eggless chocolate cake in pressure cooker Vegan chocolate cake recipe Bake a cake in the pressure cooker

Since I’ve raved so much about it…it’s only fair we look at recipe nowπŸ˜€

Yield: a 6β€³ square cake (in pressure cooker) and 4 medium cupcakes (baked)

Equipment: a mixing bowl, measuring cups/ spoons, baking tin, a large pressure cooker, a spare steel bowl, a cooling rack, parchment paper/ baking paper.

Ingredients:

1 + 1/2 cup All purpose flour (Maida)

1 cup + 2 tbsp powdered sugar

1/4 cup cocoa powder

1 tsp baking soda

1/4 tsp salt

1 tsp baking powder

1/3 cup oil (I used regular cooking oil)

1 cup warm water

1 tbsp lemon juice / vinegar

1/2 tsp vanilla extract

Method :

Line the cake tin with baking paper/ parchment paper. Dust it with a bit of flour.

Pressure cooker cake recipe PolkaPuffs recipe Chocolate sponge cake in pressure cooker Eggless chocolate cake in pressure cooker Vegan chocolate cake recipe Bake a cake in the pressure cooker

In a large mixing bowl sift together flour, powdered sugar, cocoa powder, baking soda, baking powder, cocoa powder and salt.

Next, add lemon juice, oil, vanilla extract, warm water. Mix everything well but do not over mix the ingredients as that results in a heavy cake.

Heat the pressure cooker on high flame for 10 mins. Place a stand/ bowl or plate inside at the bottom. DON’T ADD WATER IN THE COOKER.

Pressure cooker cake recipe PolkaPuffs recipe Chocolate sponge cake in pressure cooker Eggless chocolate cake in pressure cooker Vegan chocolate cake recipe Bake a cake in the pressure cooker

Fill the batter in the ready tin upto half its capacity and place the tin in the heated pressure cooker on the bowl/ stand kept at the base. Cover the pressure cooker with it lid but remove its gasket and weight. Bake on medium flame for 40-45 mins.

Pressure cooker cake recipe PolkaPuffs recipe Chocolate sponge cake in pressure cooker Eggless chocolate cake in pressure cooker Vegan chocolate cake recipe Bake a cake in the pressure cookerIMG_7011

Do a toothpick test and check if the cake is ready after 40 mins, it should come out with a few moist crumbs, if your cake is ready then remove from the cooker using kitchen tongs and cool the tin on cooling rack for 15-20 mins before unmoulding the cake.

If the cake in undercooked, then let it cook for another 10 mins. It should be ready by then. Slice and serve.

To bake the muffins, fill each muffin mould upto 3/4 th of it’s capacity. Then, I pre-heated the oven @180’c for 10 mins. Next, I  baked the muffins for 20-22 mins @180’c. (Each oven works differently so please adjust the baking time and temperature). Do take a toothpick test. Cool them for 15 mins on a cooling fack before unmoulding. Enjoy!

This cake keeps well in an airtight box for 2-3 days.

Pressure cooker cake recipe PolkaPuffs recipe Chocolate sponge cake in pressure cooker Eggless chocolate cake in pressure cooker Vegan chocolate cake recipe Bake a cake in the pressure cooker

Make this soon…because it hardly takes any time! Sounds cheesy…well…I can’t help it!! πŸ˜‚

Love,

ShreyaπŸ’—

Vegan Chocolate Cake in pressure cooker

Rose and Pineapple Cooler

I can live on cool drinks all year long…πŸ˜‰ Being a teetotaller couple, we are constantly looking forward to trying some new flavours of mocktails and coolers…and more often than not we come across great findsπŸ‘ŒπŸ˜š

Speaking of great finds, I also find it interesting to try and make a new flavour combination right in the comfort of my kitchen! Earlier, I have shared the recipe of tropical iced tea which was a total hit! I make it every summer and we can’t get enough of itπŸ˜€ I keep myself and the hubby hydrated as we sip on some of the most delicious homemade coolers. I have been told by people who have tried my Fruity Green Tea cooler, that it was one of the best ways to enjoy their green tea!

Rose and Pineapple cooler Non alcoholic summer mocktail Pineapple cooler recipe Polkapuffs recipes Shreya tiwari Rose and Pineapple cooler Non alcoholic summer mocktail Pineapple cooler recipe Polkapuffs recipes Shreya tiwari photography Rose mocktail Rose mocktail

Coming to this gorgeous beauty that has gotten you all parched is my take on two amazing flavours…tropical Pineapple and the very exotic Rose. Rose, on it’s own is very cooling. I have combined it’s flavours with the sweet and slightly tangy juices of local Pineapples and added my twist to it….😁 The resulting cooler/ mocktail is a bit spicy, has the freshness of summer mint and is loaded with ice! Just the thing you need in these sweltering afternoons.

Rose and Pineapple cooler Non alcoholic summer mocktail Pineapple cooler recipe Polkapuffs recipes Shreya tiwari photography Rose mocktail

Let’s get started….

Yield: serves 2

Equipment: mortar-pestle, measuring cups/ spoons, mixing spoons, 2 glass/ bottles of your choice to serve the drink.

Ingredients:

1+1/2 cup fresh or canned pineapple juice

4 tsp rose syrup

9-10 fresh mint leaves

1/2 tsp chaat masala (Indian spice mix easily available in Indian Grocery/ Food Stores. If you can’t find chaat Masala, replace this ingredient with some salt and pepper to taste)**

1/4 tsp ginger juice (grate some ginger and squeeze the juice to add to the mocktail)

ice cubes as needed

Method:

Muddle together mint leaves, chaat Masala** and ginger juice together in the mortar-pestle.

Add two tsp rose syrup in each of the 2 serving glasses/ bottles.

Top the rose syrup up with 1-2 tsp of the mint leaves, ginger juice and chaat Masala** mixture.

Add ice cubes. Lastly, pour the Pineapple juice. The flavours will combine on their own, however, you can give them a quick stir. Garnish the drink with a sprig of mint! Enjoy!

Rose and Pineapple cooler Non alcoholic summer mocktail Pineapple cooler recipe Polkapuffs recipes Shreya tiwari photography Rose mocktail

Love,

Shreya❀️

Rose and Pineapple Cooler | Vegan

Spicy Arrabbiata Sauce – Glutenfree and Vegan

It’s always better to have a go to pasta sauce recipe…this one here, happens to be mine😊 Especially during these hot summers days….when cooking up a storm isn’t exactly someone’s dream…having this ready in the refrigerator or the freezer can be a lifesaver! πŸ˜„

Spicy Arrabbiata Sauce - Glutenfree and Vegan Recipe for easy arrabbiata sauce Italian arrabbiata sauce recipe Polkapuffs recipes Shreya tiwari food photography Macro I in arrabbiata sauce Glutenfree recipe for arrabbiata sauce Vegan arrabbiata sauce

There are days when I go through the entire ritual of sautΓ©ing some exotic veggies like some American sweet corn, broccoli, some snow peas and a bit of bell pepper along with some crushed garlic to go with my pasta…and then are days when all I want to do is dump the sauce with some boiled pasta and give it a quick stir and I serve it without any fancy-shmancy garnishing…just a bit of grated cheese and I am all sortedπŸ€—

And hence, happens my quick macaroni with some spicy, vegan-Glutenfree arrabbiata sauce! Just like that….and obviously it’s one of my favourite mealsπŸ‘ŒπŸΌπŸ˜

Spicy Arrabbiata Sauce - Glutenfree and Vegan Recipe for easy arrabbiata sauce Italian arrabbiata sauce recipe Polkapuffs recipes Shreya tiwari food photography Macro I in arrabbiata sauce Glutenfree recipe for arrabbiata sauce Vegan arrabbiata sauce

This sauce can also be used for topping up your bruschetta along with some slices of olives or just some crumbled feta cheese…..some capers, if like little bursts of salty..briny flavours….see..I have given you some ideas for your next girls’ night in…or if you’re a dude reading this here…make a bruschetta platter for your buddies as you watch the latest season of IPL ’17….or impress a lady friend with your sauve kitchen movesπŸ˜‰

I use this sauce for my chip-n-dip platters on movie nights with my fella…it’s healthy and definitely delicious! Follow this easy recipe for some healthy Wholewheat crackers to go with this sauce.

**Coming to how you would go about storing this sauce. I make a slightly larger batch and refrigerate it and it stays fresh for almost 10-12 days. I don’t add salt while this sauce especially when the purpose is to store it. To freeze, simply cool the sauce and pack them in small ziplock pouches and freeze them. The freezer sauce needs to be thawed at room temperature for about an hour before using it. Always remember to season it using the stored sauce. When making the sauce for immediate consumption, then do add salt as per taste.

Now, on to the recipe….

Yield: serves 2-3 persons

Equipment: a heavy bottomed saucepan, measuring cups/ spoons, a ladle, hand blender.

Ingredients:

3 cups blanched and roughly chopped tomatoes (choose ripe tomatoes)

3/4 cup finely chopped onions

salt to taste (I used sea salt)

freshly cracked black pepper to taste

4 tbsp olive oil

3-4 cloves of garlic, crushed

a few fresh basil leaves (or use dried)

2 tsp chilli flakes

1 tsp dried oregano

1/2 tsp dried rosemary

some warm water if needed to correct the consistency

Method:

Heat oil in the pan, once it is hot enough, add crushed garlic and onions. Sweat these until the onions turn translucent and the garlic turns a bit golden. Then go in the roughly chopped chopped blanched tomatoes.

Keep the flame on low, season with salt, chilli flakes, cracked black pepper, rosemary and oregano. Keep stirring these together for a few minutes to ensure the flavours blend well. Add some warm water at this stage to correct the consistency (I added about 3/4 cup), mix well and cover with a lid and let the sauce cook for about 10 mins on low flame.

Open the lid after 10 minutes, the sauce should be done by now. Turn off the flame, let the sauce cool off a bit. Then using a hand blender, blend the sauce as much as you prefer. I like my sauce a bit chunky so I don’t go overboard with the blending.

If you are making a pasta dish immediately, just add this entire sauce to about 2 cups of boiled macaroni or penne and give them a good toss. Garnish with some finely chopped fresh basil leaves and some grated cheese!

**scroll above to read about how to store this sauce.

Spicy Arrabbiata Sauce - Glutenfree and Vegan Recipe for easy arrabbiata sauce Italian arrabbiata sauce recipe Polkapuffs recipes Shreya tiwari food photography Macro I in arrabbiata sauce Glutenfree recipe for arrabbiata sauce Vegan arrabbiata sauce

Do try this sauce soon…you know what? This even works as a great pizza sauceπŸ˜‰πŸ˜‰

Love,

ShreyaπŸ’–

Spicy Arrabbiata Sauce Glutenfree and Vegan


Sindhi Kadhi and Karare Aloo and a lazy lunch scene

Weekends are for slow starts… we truly believe that! Nothing makes me rush through my weekends…I simply choose not to get fussed and bothered about much. I pretty much hit the snooze button on Fridays…say around noon 😜 and try to finish all my commitments before Friday..😜 Trust me, no one can even catch me on the cell! Besides, it’s just the two of us….the boons of being a couple with no kids ….no responsibilities! I mean, weΒ love kids…but I guess this works for us betterπŸ‘ŒπŸΌ

Karare Aloo recipe UP style Aloo ki bhujia recipe Sindhi kadhi recipe Polkapuffs recipes Shreya Tiwari recipes

So when I decide to cook on a weekend…that’s if I do plan on cooking on weekends..I look for comfort food apart from being quick and absolutely fuss-free. Yes, I am not a kitchen person when I am on the snooze-mode. More of a couch potato…..who literally loves her potatoes 😍 Hence, I will share a very delicious recipe from my Mom’s kitchen of Aloo ki Bhujia or as my hubby chooses to call it, Karare Aloo πŸ‘Œ (No onion no garlic). Such basic ingredients with absolutely stunning flavours. I can practically live on this! This recipe is typically a U.P. Style of preparation…but one can find variants of the same being madeΒ across India.

Karare Aloo recipe UP style Aloo ki bhujia recipe Sindhi kadhi recipe Polkapuffs recipes Shreya Tiwari recipes

Sindhi Kadhi….again a personal favourite since childhood, I can have it by the gallon! Give me some steamed rice …a bit of my Mom’s Karare Aloo along with a few ladlefuls of her lip smacking, tangy Sindhi Kadhi…and I’ll probably love you forever! πŸ˜‚…yeah…my love sounds cheap…but it’s really difficult to make a teeny space in myΒ heart…..so it’s not a bad deal actually!

Karare Aloo recipe UP style Aloo ki bhujia recipe Sindhi kadhi recipe Polkapuffs recipes Shreya Tiwari recipes

Look how luscious this kadhi looks….a roasted chickpea flour base is given lots of flavour using tamarind pulp, some whole seeds and dried red chillies add to the punch…..the best part it again had no garlic ….onion, yes, but that is a must for the sweet aRomaΒ that it gives to the kadhi (curry).

A side of some home style onion and tomato salad with lots of lemonΒ juice and a dash of salt along withΒ a glass full of chilled Masala Chaas (not in the pictures above…as I’d already chugged that down whileΒ I shot for this post πŸ˜‰) completes this meal!

Let’s start with the Karare Aloo…

Yield : serves 2

Equipments: a heavy bottom wok, measuring cups/ spoons, a spatula.

Ingredients:

3 nos. large potatoes (peeled, washed and cubed)

4 tbsp mustard oil (this tastes best in mustard but feel free to use any oil of your choice)

a pinch of hing (asafoetida)

1/2 tsp paanch phoran (mixed seeds)Β 

salt to taste

1/2 tsp turmeric pwd

1 tsp each of red chilli pwd, coriander powder, cumin pwd

1/2 tsp amchoor pwd (dry mango pwd)

Method:

Heat mustard oil until it starts smoking** in a heavy bottomed wok. Turn off the flame. Let the smoke subside. Turn on the flame again. Add hing and the paanch phoran. Let these crackle a bit. Add the cubed potatoes. Stir them around in the oil. Add salt and turmeric. SautΓ© for 5 mins.

Add all the other dry spices except amchoor powder. Mix well and let the potatoes cook on low flame. Stir them about occasionally. Let them gently crisp up.

I try not toΒ cover the wok when I am making dry version of any veggies. So here too, I haven’t covered the wok with the lid. The potatoes took about 20 mins to cook out completely. They took another 10-12 minutes of cook time to crisp up on low flame and look like what they do! Add the amchoor powder in the end once the potatoes have crisped up.

You can add Garam Masala too in the end along with the amchoor powder but I avoid that in the summers.

**(Use any other oil in the usual way you heat it for everyday use, only mustard oil needs to be heated really well).

These potatoes are best enjoyed piping hot…from the wok to the plate kind of thing…☺☺

On to the Sindhi Kadhi….just the way my Mom makes it.. disclaimer….it may not be authentic but this is how we have been eating it all these years..if any one out there knows a different or a more authentic version, do let us know and we’dΒ Β love to try it out too☺️ and probablyΒ even publish the same with recipe credits on PolkaPuffs!

Yield: serves 2-3

Equipments: a wok, measuring cups/ spoons, a lid, a ladle.

Ingredients:

1/2 cup chick pea flour (Besan)

water as needed

3 tbsp refined oil

1/2 cup sliced, fried onion

1/2 cup sliced, fried potatoes

1/4 cup sliced, fried okra (bhindi)

salt to taste

1/2 tsp red chilli pwd

4 tbsp fresh tamarind pulp

1/2 tsp turmeric powder

1/4 tsp each methi seeds (fenugreek seeds) and jeera seeds (cumins seeds)

a sprig of curry leaves

a pinch of hing (asafoetida)

2-3 nos. whole dry chillies ( I used ber mirch, the fat, round ones)

Method:

Heat oil in the wok, once it’s hot, add the hing, cumin seeds, fenugreek seeds, whole red chillies and the curry leaves. Once these begin to crackle, add the Besan (chick pea flour) and keep stirring it continuously on low as it may stick at the bottom and burn.

This needs to be roasted with the oil and the other ingredients for a good 6-8 minutes or until the Besan changes it’s colour and gives out an earthy aroma.

Karare Aloo recipe UP style Aloo ki bhujia recipe Sindhi kadhi recipe Polkapuffs recipes Shreya Tiwari recipes

But be careful to keep this on low flame and stir it constantly. OnceΒ it has been roasted, add water as per the consistency you’d like to have for this while serving with rice. I added about 1+3/4 cup as this kadhi thickens a lot as it cooks out. Also, season with salt, red chilli pwd and turmeric powder. Mix well. Cover with a lid and let it come to a boil, that will take about 6-7 mins on medium flame.

Open the lid, add the fried veggies and also the tamarind pulp. Add more water if the kadhi has reduced a lot (I added another 1/4 cup at this stage). Cover once again with the lid and let it cook for a further 10 minutes on low flame.

This is what it looks like once ready. Rich colour and an amazing aroma…mmmm…yum!

IMG_6970

That’s it, turn off the flame and serve it piping hot!

Karare Aloo recipe UP style Aloo ki bhujia recipe Sindhi kadhi recipe Polkapuffs recipes Shreya Tiwari recipes

Meals like these are so so good! Go ahead…do try this out and let us know how you liked it☺

Love,

ShreyaπŸ’—

Sindhi Kadhi | Gluten free Veggie and Chick pea Flour Indian Curry


Strawberry Iced Tea

I know I’ve been away for a few days….was just tied up with a few things….been on the road for a fair bit of time…phew! Yes….summers and traveling around isn’t the best combination but I did manage it after all. Needless to say, I did need an entire week to recoup and get back the usual routine with the blog and everything else…😁😁

Summers and this scorching heat takes out all the energy from your body…it’s very draining! I hate stepping out in the sun 😩…IΒ just prefer sitting at home and wait for the sun to set πŸ˜‚ and sip on some cool drinks…homemade fresh fruity drinks are the best way to hydrate yourself and are wayΒ healthier than those fizzy, sugar laden sodas.

Strawberry Iced Tea Summer cooler recipes Non alcoholic beverages recipes Polkapuffs recipes Fruit based summer drinks Food photography by shreya Tiwari

Yes! My favourite fruit this summer….came to my rescue once again..they are sweet and full flavour so why not use them to make some delicious summer mocktails….I mean, most of you who’ve been regular here are aware that the husband and I, we are teetotallers. So, such fruit based drinks are our best bet against the summers 😜 Speaking of which, have a look at my take on Aam ka Panna (raw mango cooler)

Strawberry Iced Tea Summer cooler recipes Non alcoholic beverages recipes Polkapuffs recipes Fruit based summer drinks Food photography by shreya Tiwari

Lets make some Strawberry Iced Tea….πŸ“πŸ“β˜Ί

Yield: makes 2-3 servings

Equipment: measuring cups/ spoons, a small sauce pan, a potato masher.

Ingredients:

1 +1/2 cup chopped strawberries

4 tbsp sugar (optional, avoid if the strawberries are sweet. Mine were a bit tart hence I used sugar)

3 cup water

2 nos. tea bags (I have used regular tea, no speacial flavour)

ice cubes as needed when serving

Method:

In a saucepan, boil 3 cups of water. Turn off the heat. Add the tea bags and let them steep for about 10 mins. Remove the tea bags and pourΒ the tea from the sauce pan into a jug. Refrigerate the tea for a minimum of 1 hour.

In the meanwhile, in the same sauce pan, add the chopped strawberries along with sugar and cook them together on low heat until Β the strawberries are cooked well and look mushy. Use a masher to mash them as they cook. Take them off the heat. Allow the strawberry compote to cool down completely, then using a hand blender or any other other blender, make a purΓ©e and set that too in the refrigerator until you have to serve the Iced Tea. (I don’t strain the strawberry compote, you can strain it if you prefer).

Assembling:

Add the cooled strawberry purΓ©e to the jug of chilled tea. Add some crushed ice cubes and give it a stir.

To serve:

Fill your favourite glasses/ mason jars with ice cubes and pour the ready Strawberry Iced Tea over them. Place a small strawberry on the top and serve chilled! You can even add a couple of slices of lime as a garnish ☺️ Enjoy!

The strawberry purΓ©e and the cooled tea can be stored in the refrigerator for 1-2 days.

IMG_6671

Love,

Shreya❀

Strawberry Iced Tea


Volcano Popsicles | Strawberry and Orange Popsicles

Yes, I am absolutely obsessed with Popsicles of any and every kind…actually anything icy! I loved chilled things, even in the dead of cold, I could never pass a chance of enjoying a Popsicle! Not ice-cream though, although my blog has many recipes for both, I am more of a Popsicle girlπŸ˜‹πŸ˜‹πŸ˜

If you ask me why not ice-creams…I don’t really have a reason. I just love the juicy and watery flavours of fruit based Popsicles! Always have….always will! They do give me bad throat infections at times but I think they worth every course of anti-biotics I’ve had over the years πŸ˜œπŸ˜œπŸ˜‚

How to make strawberry orange popsicle Volcano Popsicle recipe Summer treat Popsicles with glucose recipe Polkapuffs recipes Food photo by Shreya Tiwari

Don’t they look llike your best mate for every summer afternoon!? I can have them for breakfast, lunch ….dinner!! πŸ˜‰ Besides, making them is a breeze! Just pick whatever flavours you like or if you are like me…choose your fruits….summer fruits like mango, kiwis or even oranges work very well!

How to make strawberry orange popsicle Volcano Popsicle recipe Summer treat Popsicles with glucose recipe Polkapuffs recipes Food photo by Shreya Tiwari

But with this recipe, I will teach you how to make perfect store bought-like texture for these Popsicles. Yes, store bought Popsicles are not full of icicles in them. They are more smooth and have a very even texture, almost like a sorbet but firmer. However, if you wish can follow simple juice and freeze method tooand make Popsicles but they will have icy bits (icicles) in them. I don’t like icicles in my Popsicles and hence this recipe is good for me…I was keen to understand what ingredients goes into the store bought Popsicles, and just on the cover of each popsicle, it is mentioned ‘glucose’….so I’ve done exactly that! Liquid glucose worked so well. Obviously, I adjusted the measurements as the cover never mentioned the proportion and alongside the store bought ones have a fair bit of preservatives too. But I have used just 4 ingredients to make them!

Yield: 4 Popsicles

Equipments: a sauce pan, a juicer (if using homemade juice), measuring cups/ spoons, Popsicle mould, ice cream sticks.

Ingredients:

1/2 cup pulp of fresh strawberries (I did not add sugar, you may if the berries aren’t sweet enough)

200 ml freshly squeezed orange juice (juice of approximately 5-6 oranges)

2 tbsp sugar (I used some for the orange juice as the oranges were a bit tart)

2 tbsp glucose syrup (sweetened, it’s available in any store that stocks all the baking related ingredients) or even corn syrup.

Method:

Keep the mould ready.

In a saucepan, heat orange juice for a few mins. Once it has come to a gentle boil, add the sugar. Mix well using a whisk. Next add the glucose syrup and whisk quickly. Make sure the syrup is mixed very well. Now, turn off the flame and let the orange juice cook down for a few minutes.

Next, fill about 3/4th (approximately 50 ml) of each popsicle mould with the orange juice- glucose mixture. Place the moulds in the freezer and let them set for about 2-3 hours. Remove from the freezer and insert ice-cream sticks in the center of each mould. Freeze again for about 1 hour.

Remove the moulds again from the freezer after an hour, fill each mould to it’s brim with the strawberry pulp. (I didn’t treat the strawberry pulp with the glucose syrup as the pulp doesn’t really have any icicles after freezing).

Freeze the moulds for another 3-4 hours or until the Popsicles are frozen well. To serve, dip the mould in some lukewarm water for 2 mins, gently tug the ice cream sticks and pull out the popsicle from the moulds! Voilà!!! 😍😍 enjoy!!

(Note- adding glucose syrup is optional, we can omit that as well and make basic Popsicles)

How to make strawberry orange popsicle Volcano Popsicle recipe Summer treat Popsicles with glucose recipe Polkapuffs recipes Food photo by Shreya Tiwari

You can follow this recipe for any fruit juice/ pulp in any combination…they are so delicious and absolutely preservative free. They keep well in the freezer for upto a week, but I suggest try to finish them and make fresh batches every few days. It’s so easy πŸ˜„

Love,

ShreyaπŸ’—

Volcano Popsicles Vegan & Glutenfree | Strawberry & Orange Popsicles

Kothmir Wadi | Kothambir Wadi – Maharashtrian Delicacy

I am a proper Mumbai (Bombay) girl…born, raised, educated, worked and then married in Mumbai….when I say home, I always mean Mumbai❀….and saying that obviously means I love…just lurrvvvveeee my Mumbaiya (meaning typical) street food and snacks! The hubby and I visit every happening joint, cafe …etc, etc around our city but having some of the most delicious street food is something we can never give up!

Mumbai isn’t only about Wada Pav and Bombay Pav Bhaji in terms of authentic Maharashtrian snacks. If you have ever been to Maharashtra (any part of the state), you’d be familiar with Kothambir Wadi or Kothmir Wadi (spiced, coriander and chickpea flour nuggets). Kothmir or Kothambir literally means fresh coriander leaves in Marathi and Wadi translates to nuggets. Such an easy language… I am almost too proud that I can speak it rather well…(well, I do make grammatical errors here and there but I never quit speaking the language!) πŸ˜ƒ

Kothmir Wadi recipe How to make kothambir Wadi at home Maharashtrian recipes Polkapuffs

The flavours are fresh and very earthy, green chillies and ginger along with other spices and ingredients make these Wadis lip smacking. Although, these are available in most local shops that sell Wada Pav or bhajias (batter fried onion or potato fritters), I always wanted to make them at home too. I probably wouldn’t have if my hubby wasn’t so crazy about them…

Kothmir Wadi recipe How to make kothambir Wadi at home Maharashtrian recipes Polkapuffs

So I looked up a few recipes and found one which was easy and sounded a whole lot like what we usually got from outside…and they turn out quite good and crisp! I have been making there for over 2 years now…and a glass of hot lemon tea is all that I need to polish these off!

Kothmir Wadi recipe How to make kothambir Wadi at home Maharashtrian recipes Polkapuffs

Besides, making them is no big task either….it takes less than 15 mins of prepping and just another 30 minutes of cooking! Glutenfree (uses chick pea flour along with rice flour) and vegan (has no clarified butter or yogurt), one can easily include them in their special diets without any fuss. Serve them with a dip if choice or have them on it’s own…delish!

Let’s begin….

Yield: 16 small Wadis (nuggets) using a square baking tin of 5″X 5″

Equipment: a mixing bowl, a whisk, measuring cups/ spoons, a pressure cooker/ large pot, a small metal plate, a frying pan, baking tin or any vessel to use for steaming the Wadis (nuggets), a sharp knife, a pair of tong.

Ingredients:

1/2 cup sifted chick-pea flour (besan) 

2 tbsp sifted rice flour (chawal ka atta)

salt to taste

water as needed

1/4 tsp turmeric powder

1/2 tsp red chilli powder

a pinch of hing (asafoetida)

2 tsp chopped green chillies

1 tsp ginger paste

1 tsp toasted white sesame seeds

1 tsp lemon juice

1/2 cup finely chopped fresh coriander leaves

1/4 tsp baking soda

1 tbsp flavour less oil (like canola or sunflower)

To pan fry: (optional, have it steamed if you wish to avoid pan frying. Also, deep frying is yet another option but I tend to avoid deep frying)

4 tbsp oil

Method:

In a mixing bowl, add the sifted flours. Season with salt. Add hing at this point. Whisk well and add little water to make a thick batter. Add the ginger paste, lemon juice, chillies, red chilli powder, turmeric powder, oil, toasted sesame seeds and chopped coriander leaves, whisk again. Add the baking soda and mix gently (don’t whisk). Grease the baking tin with some oil. Pour the batter into the greased tin and set it aside.

Kothmir Wadi recipe How to make kothambir Wadi at home Maharashtrian recipes Polkapuffs

Heat about 2 cups of water in a large pot or pressure cooker. Keep a metal plate at the bottom of the pot/ cooker to use as a  seperator.

Once the water starts boiling a bit, place the tin with the batter inside the pot/ cooker on the separator plate. Cover with a lid if you are using a pot. In case you are using a pressure cooker, remove the weight (whistle) off the lid and then secure the lid on the pressure cooker.

Kothmir Wadi recipe How to make kothambir Wadi at home Maharashtrian recipes Polkapuffs

Cook on low flame for about 15-18 mins. Then turn off the flame  and open the lid carefully. Remove the tin from the pot/ pressure cooker and using a sharp knife check if the batter has cooked, to do that, simply insert the knife in the centre of the tin, if it comes out clean, the batter has cooked (just aswe do for any cake).

Kothmir Wadi recipe How to make kothambir Wadi at home Maharashtrian recipes Polkapuffs

Let this cool down completely. Once it has cooled, run the knife on all four sides of the tin and gently unmould it on a chopping board. Using the same sharp knife, cut it into squares. Keep them aside.

Kothmir Wadi recipe How to make kothambir Wadi at home Maharashtrian recipes Polkapuffs

This is what it looks like post steaming. Have them just as it is..or pan fry.

To pan fry:

Heat 4 tbsp oil in a frying pan, place the squakes in the pan once the oil is hot, keep turning them around and let them crisp up on all sides. Once done, remove on absorbent kitchen paper. Serve them hot with a dip if your choice!

Kothmir Wadi recipe How to make kothambir Wadi at home Maharashtrian recipes Polkapuffs

They keep fresh for a few hours although I have never tried to store them for very long. These make for a great party snack or even as a side dish to go with your meals!

Love,

ShreyaπŸ’–

Adapted from Nisha Madhulika

3 Ingredients Mixed Berries Jam | No Pectin Jam Recipe | Berry Jam Recipe

It’s the ‘very berry’ season in my home!! I am literally swamped with berries of late! I am having strawberries and mulberries for breakfast, lunch…dinner and then some for desserts 😁 and I am loving them! They are so juicy and the colour…oh my.. I have an almost permanent purple stain on my lips because of the mulberries πŸ˜‚πŸ˜‚ but I can’t seem to stop popping them each time I walk past the dining table…and I am never short of excuses to be ‘walking past’!! LoL!

3 ingredient strawberry jam 3 Ingredient mixed berries jam Homemade strawberry jam recipe Polkapuffs recipe No pectin strawberry jam recipe No pectin jam recipe Mulberry jam recipe How to make jam at home without pectin

I mean, look at them beauties…can keep your hands off?! Specially the mulberries….this is just the third, maybe the fourth time in my entire 29 years of existence that I could lay my hands on them…probably I couldn’t have paid much attention to them around me…but this year has been different…I can see them everywhere..beautiful, organic and absolutely delicious! Just as yummy as the juicy red strawberries.

3 ingredient strawberry jam  3 Ingredient mixed berries jam Homemade strawberry jam recipe Polkapuffs recipe No pectin strawberry jam recipe No pectin jam recipe  Mulberry jam recipe  How to make jam at home without pectin

I will share some health benefits of various berries here……I have read a lot about them online and because I prefer eating seasonal produce, I strongly recommend that one must have them but obviously you must consult doctors whenever necessary.

Strawberries:

Improves immune system.

Reduces the chance of contracting eye related ailments and issues.

Helps maintains a healthy heart by keeping Blood Pressure in check.

Reduces risk of of gout, cancer and arthritis.

Reduces cholesterol.

Great anti-oxidant and helps maintain great skin, hair and overall health.

Studies say that one bowl of strawberries a d is just about 50 calories!

Mulberry (Shahtoot): 

Cures certain diseases.

Cures cancer.

Prevents blood clots and heart stroke.

Cleanses blood.

Prevents seasonal cold and flu.

Strengthens kidney and helps cleanse liver.

Keeps blood sugar in check.

3 ingredient strawberry jam  3 Ingredient mixed berries jam Homemade strawberry jam recipe Polkapuffs recipe No pectin strawberry jam recipe No pectin jam recipe  Mulberry jam recipe  How to make jam at home without pectin

So coming to what I did with these berries besides chomping on them was jamming! I made Strawberry Jam last year, it was super delicious and absolutely lip-smacking! I made another batch within a month because I almost didn’t want it to ever get over πŸ˜‹

So this time around, I wanted to use both the berries in the jam and that’s exactly what I have done! Look at the jam…it’s so beautifully coloured…and has little chunks of strawberries and mulberries 😍…perfect on a slice of fresh homemade sandwich bread!…..yummmm!

3 ingredient strawberry jam  3 Ingredient mixed berries jam Homemade strawberry jam recipe Polkapuffs recipe No pectin strawberry jam recipe No pectin jam recipe  Mulberry jam recipe  How to make jam at home without pectin

Since I am not tea/ coffee person, I prefer a light lemon tea with a ton of sugar…literally πŸ˜‚πŸ˜‚ and a couple of slices of bread with my homemade jam slathered all over ….pure bliss!

3 ingredient strawberry jam  3 Ingredient mixed berries jam Homemade strawberry jam recipe Polkapuffs recipe No pectin strawberry jam recipe No pectin jam recipe  Mulberry jam recipe  How to make jam at home without pectin

Let’s make some jam….

Yield: Approx 200 gms

Equipment: a big bowl, measuring cups/ spoons, a heavy bottomed pan, a potato masher, a small stainless steel/ ceramic plate, a clean & dry glass bottle to store the jam.

Ingredients:

300 gms fresh strawberry

100 gms fresh mulberries

3/4 cup sugar (I added this much as it is good enough for our taste and the mulberries we’re extremely sweet. Adjust to your taste preferences and as per how sweet the berries are!)

1 tsp lemon juice

Method:

Wash the mulberries and the strawberries, pat them dry. Then hull the strawberries using a paring knife (a regular knife will also do). Remove the small stalks on each mulberry. Chop the berries  roughly and keep them in a large bowl.

Add sugar to this and mix well. Cover and set it aside for 4-5 hours. Remember to stir it once every 30 mins or so. This will macerate the mulberries and the strawberries well (help in releasing the juices).

3 ingredient strawberry jam  3 Ingredient mixed berries jam Homemade strawberry jam recipe Polkapuffs recipe No pectin strawberry jam recipe No pectin jam recipe  Mulberry jam recipe  How to make jam at home without pectin img_6822

After 4-5 hours, that’s how they should look.

Alongside, place a ceramic/ stainless steel plate in the freezer, it will be used later to check the consistency of the jam.

Heat a heavy bottomed pan, add the mulberries and the strawberries with all their juices to the pan, stir continuously until they come a rolling boil, this will take about 6-7 mins. Using a potato masher, mash the mulberries and the strawberries well and continue to stir. Cook for another 10 mins. Add the lemon juice at this stage (lemon juice is added to give a nice gloss to the jam). Let it cook & allow the juices to reduce for a few mins, but ensure you stir it constantly.

3 ingredient strawberry jam 3 Ingredient mixed berries jam Homemade strawberry jam recipe Polkapuffs recipe No pectin strawberry jam recipe No pectin jam recipe Mulberry jam recipe How to make jam at home without pectinimg_6824img_6825

Once the jam looks thick and gooey, keeping the flame on, drop some on the chilled plate and wait for 30 secs to let it set. Then draw a line in between, if the lines do not spread into each other, it means that the jam is ready & you can turn off the gas.

If not, then cook it for another 5-7 mins and repeat this step with another chilled plate.

3 ingredient strawberry jam 3 Ingredient mixed berries jam Homemade strawberry jam recipe Polkapuffs recipe No pectin strawberry jam recipe No pectin jam recipe Mulberry jam recipe How to make jam at home without pectinimg_6827

Cool the cooked jam thoroughly and store it a clean & dry glass bottle/ jar. Always use a dry spoon to remove the jam. Store this in the refrigerator and it should last for over 6 months ☺️

3 ingredient strawberry jam 3 Ingredient mixed berries jam Homemade strawberry jam recipe Polkapuffs recipe No pectin strawberry jam recipe No pectin jam recipe Mulberry jam recipe How to make jam at home without pectin

I even add some this jam to bowl of warm custard and it tastes delicious…a dessert without effort 😍😍😍

Love,

ShreyaπŸ’