Besanwali Shimla Mirch Aloo Aloo Shimla mirch Indian recipes Simla Mirch ki sabji capsicum cooked in Indian style with potatoes Chickpea flour recipes Polkapuffs North Indian recipes Lunch box ideas Easy Indian side dish recipe

Besan Wali Shimla Mirch Aloo

What goes into my hubby’s lunch box is a question I ask him every night before bed ๐Ÿ˜ usually, he goes along with whatever I decide. But there are days…when I let him decide! And I indulge him…sometimes, when he craves Masala Puris…I pair it with spicy potato curry or my spicy Bharwa Baigan ๐Ÿ‘Œ…a combo made in heaven! He even prefers a spicy Veg Pulav with some curd raita…! Wow!ย 

Besanwali Shimla Mirch Aloo Aloo Shimla mirch Indian recipes Simla Mirch ki sabji capsicum cooked in Indian style with potatoes Chickpea flour recipes Polkapuffs North Indian recipes Lunch box ideas Easy Indian side dish recipe

So last week…post dinner he asks me to pack some Besan wali Shimla Mirch Aloo (his favourite)ย in his lunch box the next morning with some Phulkas๐Ÿ˜€ and some salad! Pretty straight forward stuff..but I had never packed this for his lunch box till date!! ๐Ÿ˜ณ I wasn’t sure if it would keep well packed for 4-5 hours….asked my mom, she too wasn’t sure…having never packed this before for us. So I asked my blogger bestie Deepti Gupta, if it would stay fresh…and she said yes it would!! She has some amazing recipes over at Cookoholichomemaker.…you can check out her version of Besanwali Shimlamirchย too๐Ÿ˜Š Mine is a bit different though…it’s my mom’s recipe..๐Ÿ˜Š

Besanwali Shimla Mirch Aloo Aloo Shimla mirch Indian recipes Simla Mirch ki sabji capsicum cooked in Indian style with potatoes Chickpea flour recipes Polkapuffs North Indian recipes Lunch box ideas Easy Indian side dish recipe

This is really quick recipe…prefect for rushed mornings…or even quick side dish for your rice & dal combo! If you like, you can avoid the potatoes or capsicum…anything you like! ๐Ÿ˜ lets get on with the recipe:

Serves: 1 (had made it for hubby’s lunch box)

Equipment: a heavy bottom wok with a lid, measuring cups/ spoons, a mixing spoon.

Ingredients:

3 nos. green bell pepper/ capsicum/ Shimla Mirch

2 nos. potato

4 tbsp chick pea flour/ besan

salt to taste

2-3 tbsp mustard oil (use refined oil or ghee if you don’t prefer mustard oil)

A pinch of hing (asafoetida)

1 tsp paanch phoran (a mix of nigella seeds/ mangrela + saunf/ aniseeds + rai/ mustard seeds + jeera/ cumin seeds + methi/ fenugreek seeds)

1/2 tsp red chilli pwd

1/4 tsp turmeric pwd

1/2 tbsp cumin/ jeera pwd

1/2 tbsp dhaniya/ coriander pwd

1/4 tsp amchur/ dry mango pwd

Chopped coriander leaves to garnish

Method:

Peel & clean the potatoes & de-seed the capsicum. Wash, dry & cut everything into equal sized cubes. Set aside.

Heat the wok, add the Besan without any oil. Keep stirring it in low-medium flame until you get an earthy aroma & the colour changes to light pink. It will take about 5 mins. It will look like this. Be careful that it should not burn or turn darker in colour. Remove it in a bowl and set it aside.

Besanwali Shimla Mirch Aloo Aloo Shimla mirch Indian recipes Simla Mirch ki sabji capsicum cooked in Indian style with potatoes Chickpea flour recipes Polkapuffs North Indian recipes Lunch box ideas Easy Indian side dish recipe

Heat the oil in the same wok. I was using mustard oil, so I let heated it till it smoked a bit, cooled it down and then started cooking (use refined oil ghee by simply heating it as usual).

Now add the paanch phoran (used extensively in Bihar, Uttar Pradesh & Kolkata. It’s very aromatic, however u can simply use cumin or mustard seeds in case you don’t use paanch phoran in your cooking)

Besanwali Shimla Mirch Aloo Aloo Shimla mirch Indian recipes Simla Mirch ki sabji capsicum cooked in Indian style with potatoes Chickpea flour recipes Polkapuffs North Indian recipes Lunch box ideas Easy Indian side dish recipe

Once the seeds start crackling around, add hing. Next, add the cubed veggies. Immediately season with salt & turmeric. Mix well and cover cook until the veggies are soft. It will take about 10 mins on low-medium flame. Then take off the lid, add the chilli pwd, cumin pwd & coriander pwd. Stir well & cook without lid for 5-7 mins. Next add the roasted besan & amchur pwd. Mix well so that the besan coats everything well. Cook for another 5-6 mins. Turn off the flame and garnish with chopped coriander. ๐Ÿ˜‰ that’s it! Serve with phulkas or parathas!

Besanwali Shimla Mirch Aloo Aloo Shimla mirch Indian recipes Simla Mirch ki sabji capsicum cooked in Indian style with potatoes Chickpea flour recipes Polkapuffs North Indian recipes Lunch box ideas Easy Indian side dish recipe

Hubby was excited to get his favourite and I got a ‘happy’ text from him during lunch time ๐Ÿ˜˜

Love,

Shreya๐Ÿ’ž

Vegetarian Croquettes Vegetable croquettes Easy recipe for vegetarian starters Croquettes recipe Vegetable cutlet recipe Kolkata cutlets

Vegetable Croquettes

Some evenings my hubby craves for snacks with his tea….I say ‘some evenings’ because he usually doesn’t take anything with his evening tea. He loves his tea…so wouldn’t miss that for anything..but munchies aren’t a compulsion ๐Ÿ˜ That sure does make life easier for yours truly!! ๐Ÿ˜œย 

Vegetarian Croquettes Vegetable croquettes Easy recipe for vegetarian starters Croquettes recipe Vegetable cutlet recipe Kolkata cutlets

So last evening he texted me saying that he was craving something spicy like Bhajia /Pakodas! I said no way..I am not frying anything…you will get spicy but definitely not fried. We have consumed too many calories in the past couple of weeks… He was okay with that…told me to go ahead and keep it ready. I looked into my fridge & pantry to check what could be made in precisely 50 mins! Lol!

Vegetarian Croquettes Vegetable croquettes Easy recipe for vegetarian starters Croquettes recipe Vegetable cutlet recipe Kolkata cutlets

I am used to keeping some boiled potatoes & beetroot in my fridge…so assemble a quick sandwich usually. But then again, my hubby isn’t fond of sandwiches too….yeah too many restrictions ๐Ÿ˜ซ๐Ÿ˜ซ So I decided to add some peas & spices…to make croquettes! Easy-peasy, crunchy Vegetable Croquettes ๐Ÿ˜‰ Non fried…cos they are made in my trusty Aebelskiver / Appe pan!! They taste great…maybe something like a Kolkata Cutlet or even the famous Indian Railway Canteen Cutlets.ย 

Yield: 7-8 large croquettes.

Equipments: An Aebelskiver /Appe pan, mixing bowl, measuring cups/ spoons, a couple of spoons/ forks, a plate.

Ingredients:

For the croquettes:

1 nos each of potato, beetroot & carrot (boiled & mashed)

1/4 cup boiled green peas (you can add more veggies of your choice like sweet corn, French beans, etc)

1 slice of brown bread (remove the sides)

1/2 tsp red chilly pwd

1/2 tsp ginger paste

1/2 tsp green chilly paste

1/4 tsp turmeric pwd

1/4 tsp amchur pwd (dry mango pwd)

A pinch of kala namak (Himalayan pink salt)

a pinch of hing (asafoetida)

salt to taste

Method:

Mix all the above ingredients well in a mixing bowl. Avoid lumps & don’t add any water. Set it in the refrigerator for 10-15 mins. The mixture will be easier to handle & shape when slightly cold.

For the outer coating:

1/2 cup rice flour (options given at the end of the post**)

some water

salt to taste

1 cup fine rawa / semolina

1-2 tsp oil to cook

Method:

Make a thick paste using rice flour and little water. Season it with some salt. Not too much though, as the croquettes will have seasonings. Place the semolina in a plate to roll the croquettes.

Heat the Appe pan alongside and add a few drops of oil in each indentation. The pan should nicely heated, if not the croquettes won’t be crunchy.

For assembling:

Take the mixture out of the refrigerator and immediately make 7-8 equal sized balls and set it aside. Coat each ball with the rice flour paste and then roll it in semolina. Place it in an indentation of the Appe pan. Repeat the same steps for the other balls too. Cook on each side for about 3-4 mins to get an even colour & crunch. You can add a few more drops of oil if required. Once done, serve them piping hot with some ketchup or green chutney โ˜บ๏ธ

**They are super crunchy as they are coated with rice flour. Although, if you don’t have rice flour, you can use cornflour or APF (Maida) in the same quantity and follow the same steps.

Vegetarian Croquettes  Vegetable croquettes  Easy recipe for vegetarian starters Croquettes recipe Vegetable cutlet recipe  Kolkata cutlets

They turned out perfect…almost oil-free…ideal for kids too! My hubby loved them ….because this is the first time made a non fried version of these Croquettes…๐Ÿ˜€๐Ÿ˜€ No one can really know the difference. A must try for all ๐Ÿ‘Œ

Love,

Shreya๐Ÿ’—

Rose Popsicle recipe Rose & mango popsicles recipe Summer popsicles Exotic popsicles recipe Coconut mango Popsicles recipe Recipe for popsicles Mango popsicles recipe Ice popsicles recipes

Rose & Mango Popsicles

As a child, I think among everything everything icy, Popsicles were my favourite…I could eat too many at a go! Come summer and I would go on a Popsicle Eating Marathon…orange, lemon, mango …raspberry!! Oh, the list is endless ๐Ÿ˜€ And yes, I have a serious liking for ice! Just ice…flavoured ice! That’s what Popsicles are if made using water/ juice as the base! That’s exactly how I like them…not the yogurt based ones.ย 

Rose Popsicle recipe Rose & mango popsicles recipe Summer popsicles Exotic popsicles recipe Coconut mango Popsicles recipe Recipe for popsicles Mango popsicles recipe Ice popsicles recipes

I remember making Popsicles even as a kid..using those age-old ‘kulfi’ moulds. I would simply freeze some lemonade or even some rose milk๐Ÿ˜‹ & they did taste good! My mom was my partner in crime back then…and even today, the two ย us enjoy our Popsicles like little kids! Maybe it’s something that I have gotten from her…my love for ice!โค๏ธ

She was visiting me recently for a few days…and we got talking about Popsicles! She was laughing remembering about all those times when I’d sneak into the freezer for a Popsicle or two and not share any with her while she’d be napping during those hot summer afternoons ๐Ÿ˜‰ I said to her, ‘I do owe you one too many Popsicles! I will make some for you then!’

Rose Popsicle recipe Rose & mango popsicles recipe Summer popsicles Exotic popsicles recipe Coconut mango Popsicles recipe Recipe for popsicles Mango popsicles recipe Ice popsicles recipes

I decided to incorporate her favourite fruit for these Popsicles. Mangoes ๐Ÿ‹๐Ÿ‹๐Ÿ‹ & paired it along with something exotic…Rose ๐ŸŒนalthough you can try my Spiced Mango Popsicles too! She liked the sound of the flavours…thought they’d work well. Trust me your kids will love these…no added colours or flavours…absolutely healthy! So here’s what needs doing…

๏ธYield: 6 Popsicles

Equipment: 1 glass, a mixing spoon, measuring cups/ spoons, ice-cream sticks.

Ingredients:

1 cup mango pulp (I had homemade frozen mango pulp with me, you can use store bought mango purรฉe or some other fruit purรฉe too, like strawberry/ blueberries/ kiwi/ melons..etc)

1+1/2 cup coconut water (approximately depending on the size of the Popsicle mould)

2-3 tsp rose syrup (I used Roohafza, add more to make it bright pink if you like. I used it just to flavour, not add colour)

Method:

Mix Roohafza with coconut water in a glass. Now fill 1/3 of each popsicle mould with this mix. Freeze the moulds for 2 hours. The first layer will set by then. Now fill the next 1/3 of each popsicle mould with mango pulp. Freeze the moulds for 45 mins, remove & insert the ice cream sticks or popsicle sticks in the centre of each mould. Again freeze for 2 hours. Finally, remove from the freezer & fill the last 1/3 of the mould with the same coconut-Roohafza mixture & freeze for 2 hours. That’s it! To release the Popsicles from their moulds, dip them in some water for 2-3 mins & carefully pull them out using the ice cream sticks ๐Ÿ˜๐Ÿ˜ Enjoy your Popsicles before they melt!!๐Ÿ˜œ

Rose Popsicle recipe  Rose & mango popsicles recipe  Summer popsicles  Exotic popsicles recipe Coconut mango Popsicles recipe Recipe for popsicles  Mango popsicles recipe  Ice popsicles recipes

The combined flavour of rosy coconut water & mango is just too summery! We loved them..!! Even my hubby who isn’t too fond of them, had an entire Popsicle & said he liked the flavours! Yippie! ๐Ÿ˜š So, do try them..!

Love,

Shreya๐Ÿ’“

Pinwheel Pizza Rustic Pizza Pinwheels Pizza dough recipe Easy recipe for pizza dough Easy homemade pizza pinwheels No-fail recipe for homemade pizza pinwheels Italian food Fool proof recipe for pizza dough Recipe for homemade dinner rolls

Rustic Pizza Pinwheels

Everyone loves Pizzas! It’s true…I haven’t ever come across anyone who doesn’t ๐Ÿ˜‰ I can have it everyday! It’s the oozing cheese along with a tangy pizza sauce that really makes all the difference for me….and not to forget…a really good pizza base ๐Ÿ˜Š

Pinwheel Pizza Rustic Pizza Pinwheels Pizza dough recipe Easy recipe for pizza dough Easy homemade pizza pinwheels No-fail recipe for homemade pizza pinwheels Italian food Fool proof recipe for pizza dough Recipe for homemade dinner rolls

Yes…nothing tastes worst than a chewy, rubbery pizza base…no matter how good your sauce or toppings are!! The base or the crust, must have the perfect balance of flavour, airiness & should be light! That is obviously achieved by using yeast in the right proportion & proving the dough with great care. And I have finally perfected the recipe for a perfect pizza base! Learnt the trick from A Spicy Perspective! A few trials & errors have taught me something very important – proportion. It’s the key to getting perfect results! I was so driven to perfect it…that I finally bought a proper kitchen weighing scale too ๐Ÿ˜ฌ ….something that I had been putting off for almost an year!

Pinwheel Pizza Rustic Pizza Pinwheels Pizza dough recipe Easy recipe for pizza dough Easy homemade pizza pinwheels No-fail recipe for homemade pizza pinwheels Italian food Fool proof recipe for pizza dough Recipe for homemade dinner rolls

The results are for you to see! A perfect crust with soft, pillowy texture within… I have used this recipe almost thrice now & I am happy each time! So I thought of making something which was lying in my Pinterest folders for the longest time ever! Pizza Pinwheels! I did my take on it and made a bit Rustic..! Hence, Rustic Pizza Pinwheels!

Pinwheel Pizza Rustic Pizza Pinwheels Pizza dough recipe Easy recipe for pizza dough Easy homemade pizza pinwheels No-fail recipe for homemade pizza pinwheels Italian food Fool proof recipe for pizza dough Recipe for homemade dinner rolls

The recipe for the base is adapted from Nita Mehta’s cookbook with a slight change in the ingredients & proportions as well. I did watch many YouTube videos to understand the kneading bit over the last few months!! ๐Ÿ˜€ So, to make the Pinwheels happen, I followed the recipe for the base & then worked on it with some sauce & fillings of my choice! Pizzas can be so versatile…just play with the toppings…infinite options๐Ÿ‘ŒI like my pizza simple…you can easily alter them as per your preference…you can add non-veg fillings as well..or keep it simple with just the sauce & some cheese ๐Ÿ˜„ Let’s get started with the recipe….

๏ธYield: makes 8-9 large pinwheels

Equipment: 1 large mixing bowl, a small bowl, a fork, a rolling pin, a sharp knife, measuring cups/ spoons, baking tray, cooling rack.

Ingredients for the base:

2 cups plain flour (Maida/ APF, 1 cup is approx 130 grams)

some extra flour to dust

2+1/2 tsp dry active yeast (1 tsp is approx 3.5/ 4 grams)

2 + 1/4 tsp sugar

3/4 cup warm water (you should be able to dip your finger comfortably)

2 1/2 Tbsp oil + extra for greasing

1 tsp sea salt (use regular salt if you don’t have sea salt)

Ingredients for the filling:

1/2 cup pizza sauce ( I used readymade)

1/4 cup eggless mayonnaise

1/2 tbsp garlic powder (optional)

1 tbsp mixed Italian herbs

sea salt to taste (use regular salt if you don’t have sea salt)

4-5 tbsp grated mozzarella cheese

4-5 tbsp chopped veggies of your choice (I used capsicum & sweet corn)

Method for the base:

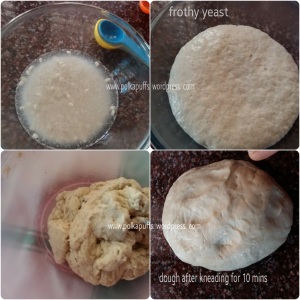
Take warm water in a bowl, add the sugar and yeast to it. Cover it and leave to prove & froth for 10 mins in a warm place. Next, in a large mixing bowl, add the flour, 2 1/2 tbsp oil, salt to taste. Now add the entire proved yeast mixture & using a fork mix everything together to make a sticky dough. It will be very sticky but should not be falling apart at all. Now, sprinkle some flour on a work surface, and drop the dough on it,sprinkle some more flour over the dough. Using your palms, start kneading the dough well. Add more flour if the dough feels too sticky or some water if it feels very dry. Keep kneading well for 10 mins. You will have a neat, non-sticky ball of dough. Knead it for a couple of mins more. It should all look like this.

Pinwheel Pizza Rustic Pizza Pinwheels Pizza dough recipe Easy recipe for pizza dough Easy homemade pizza pinwheels No-fail recipe for homemade pizza pinwheels Italian food Fool proof recipe for pizza dough Recipe for homemade dinner rolls

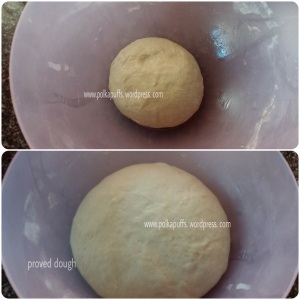
Now, grease the mixing bowl which you have kept aside & place the dough in it, cover with a lid or cling film & set aside in a warm place for 1 1/2 hours to prove. It should be double or more than double in size after proving. It will look like this.

Pinwheel Pizza Rustic Pizza Pinwheels Pizza dough recipe Easy recipe for pizza dough Easy homemade pizza pinwheels No-fail recipe for homemade pizza pinwheels Italian food Fool proof recipe for pizza dough Recipe for homemade dinner rolls

In the meanwhile, pre-heat the oven at 210’C.

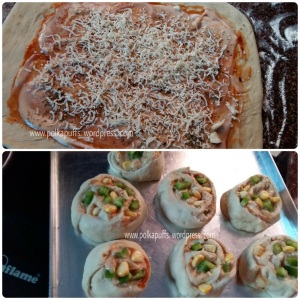
Now, punch down the dough, and knead for a min. Then again sprinkle some flour on the work surface & using a rolling pin, roll the dough in a rectangular shape. The thickness should be about 6-7 mm. Dust it with some flour again. Now leaving an inch space on all four sides, spread some pizza sauce, top it with mayonnaise, then the garlic pwd, Italian herbs, salt, grated cheese & some veggies of your choice. Flatten them out carefully. And start rolling from one end, carefully so that the dough doesn’t tear or the filling shouldn’t spill out. Seal the edges by pinching them together. Next, using a sharp knife, cut pinwheels of about 1 1/2″ thickness. Make sure the fillings don’t spill. Grease your baking tray with some oil. Place these pinwheels carefully a little apart from one another.

Pinwheel Pizza Rustic Pizza Pinwheels Pizza dough recipe Easy recipe for pizza dough Easy homemade pizza pinwheels No-fail recipe for homemade pizza pinwheels Italian food Fool proof recipe for pizza dough Recipe for homemade dinner rolls

Bake these for 25 mins @ 210′ C using both upper and lower heating rods. If you see that they are turning too dark, lower the temperature as each oven is different. Once done, remove from the oven & cool for 5 mins on a cooling rack. Serve them warm with any dip/ sauce of your choice! My hubby & I dipped it in some garlic butter…it was pure heaven! ๐Ÿ˜‡

Pinwheel Pizza Rustic Pizza Pinwheels Pizza dough recipe Easy recipe for pizza dough Easy homemade pizza pinwheels No-fail recipe for homemade pizza pinwheels Italian food Fool proof recipe for pizza dough Recipe for homemade dinner rolls

Totally drool-worthy, aren’t they?!!! ๐Ÿ˜› These were yummy…..do try soon! They are a great option to serve at kids parties, or as starters…even alongside your favourite soup! ๐Ÿ‘Œ๐Ÿ˜

Love,

Shreya ๐Ÿ’—