Garlic cheese smashed potatoes Gluten free meals in 30 mins Polkapuffs recipe Polkapuffs Shreya Tiwari recipe Shreya Tiwari Photography Vegetarian appetisers

Garlic Cheese Smashed Potatoes | GF meals in 30 minutes

You guys know I love potatoes….I do! I may not share too many recipes with potatoes in them, but the Lord above knows my love for these spuds….and my love for them is shared by my hubby!! Talk about marriages being made in heaven…..for us, it’s more like a spud-farm 🤣🤣🤣😂

Breakfast to dinner, I can live on them. Start your day with some scrumptious Aloo ke Parathe (potato stuffed Indian flatbreads). These are are absolutely awesome and very mildly spiced to start your day with these parathe and you will full almost up to lunch time…I serve them with some home made yogurt, some mango pickle and a lot of butter on top of these….the butter melts all over these piping hot beauties 😍…Mmmmm!

IMG_7670

Not looking for something so heavy early in the morning….then you can try my super-yum….brilliant beyond brilliant Baked Potato Wedges 😉 We, the spud-lovers are particularly partial to it and can never share it…hence we make ourselves two whole trays of them, beauties……one for him and one for yours truly 😜

Next, if your looking something Indian…curry style for a proper supper, just go with the Aloo Dum, pair it with some Pooris (fried flatbreads) or Laccha Paratha or even some rice, a quick home style salad (sliced red onions + chopped tomatoes + chopped cucumber + salt + a bit of lime juice) on the side and just step into the food coma …..it’s that good 😍  For something a bit less spicy…look out for my Rassedaar Aloo (potatoes and tomatoes simmered in a thin gravy with little spices),  just a few easy ingredients and it’s ready in under 30 minutes?

Garlic cheese smashed potatoes Gluten free meals in 30 mins Polkapuffs recipe Polkapuffs Shreya Tiwari recipe Shreya Tiwari Photography Vegetarian appetisers

You must also try my Aloo Ki Kachori if you love a good North Indian fare 😉 It’s easy to put together and works well for brunches!

Anyways…..that’s a whole lotta potatoes recipes for you guys…not to mention that I’ve not even included a few  here…they are all there in the blog archives ➡️➡️ …go, look them up!

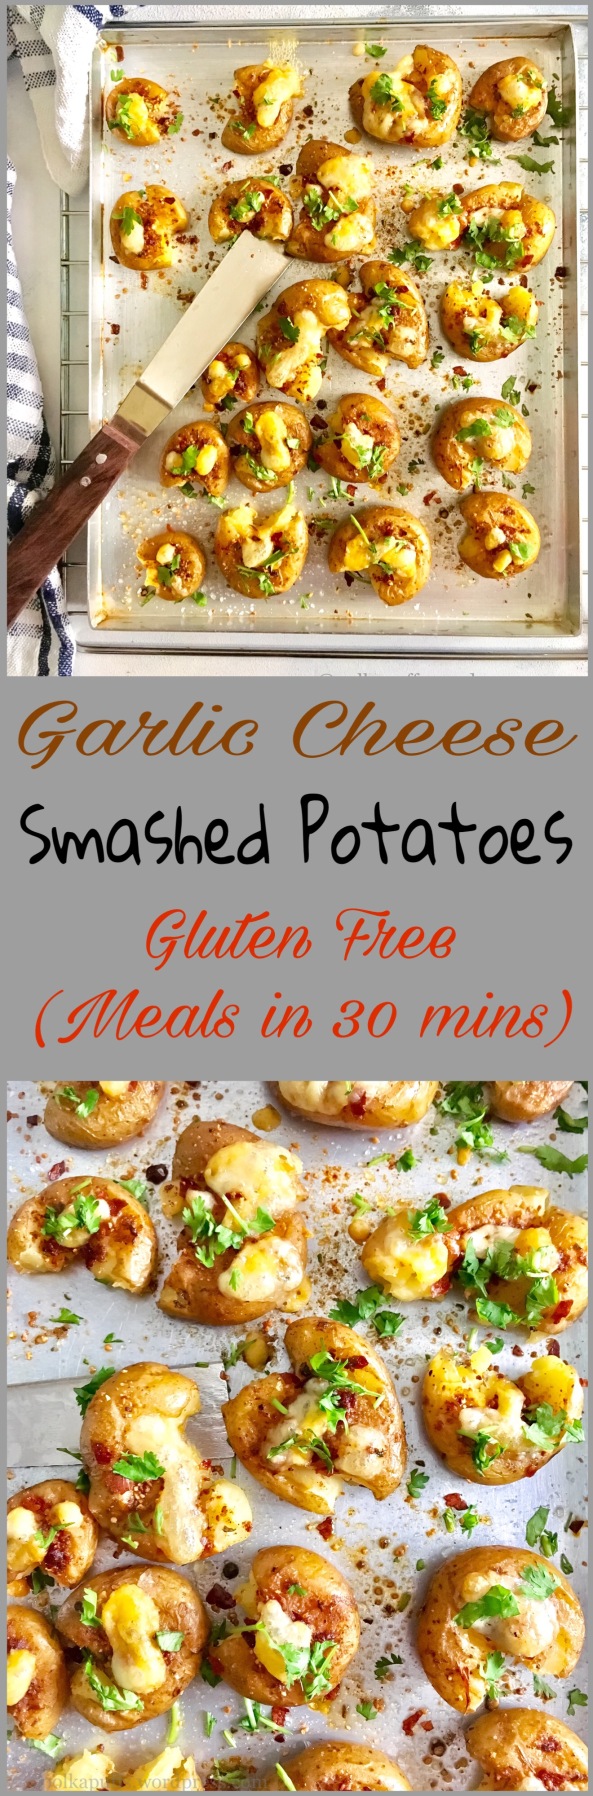
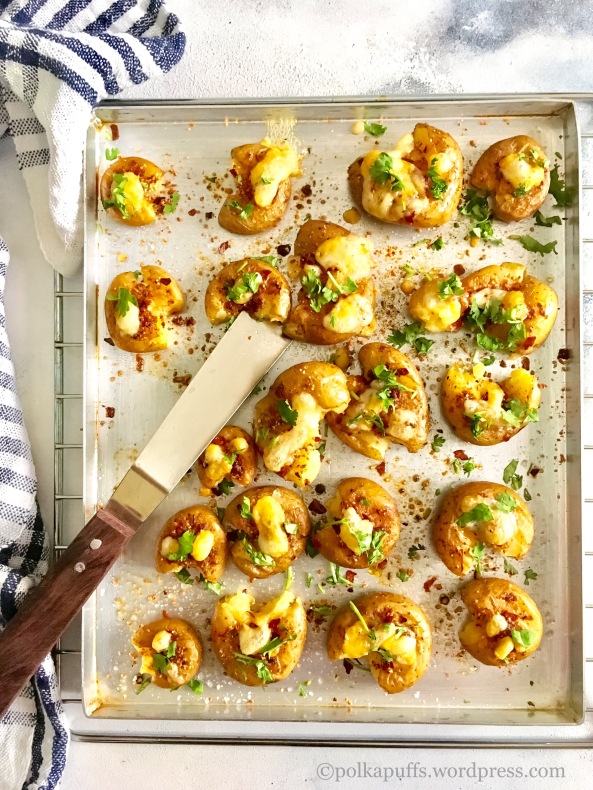
So…about these crisp, gorgeous looking smashed potatoes…well, I have been meaning to share this recipe for a while…I have many other variations for these, but the one which I’ve here today, is like the best way to have potatoes 😍😍 they are just everything one looks for in a side dish … a bit of spice from the chilli flakes (or, you could use smoked paprika), that comforting warmth from the garlic, a bit smokiness as I’ve used smoked sea salt (you could always use regular salt or even plain sea salt)…..spicy becaaaaaause…I’ve added my favourite spice mix in the whole wide world….yeah! Peri Peri spice powder and that last bit off oozing good in the form of Mexican blend cheese  😋 Yes please!!!

Let’s see how can we get you to make these babies….

Yield: serves 2

Equipment: baking tray, measuring cups/ spoons, pressure cooker, cooling rack.

Ingredients:

300 gms baby potatoes

sea salt to taste

1 tsp peri peri spice mix (store bought)

1/2 tsp chilli flakes

1 tsp garlic powder (use fresh minced garlic if you don’t have garlic powder)

3 tbsp oil

1/4 cup Mexican cheese mix (store bought, easily available in any supermarket or hyper stores)

some fresh green coriander to garnish

Method:

Take 2 cups of water in a pressure cooker, add a pinch of regular salt to it along with washed baby potatoes. Cook them for about 10 minutes or one whistle is good enough. We need to soften them but not turn them into a watery mush!

Once cooked, drain the water and let the potatoes cool down a bit. Then, grease the baking tray with about a tbsp of oil. Roll the boiled potatoes in the oil on the tray. Spread out the potatoes and use a fork to smash them a bit.

Pre-heat the oven @200’c.

Garlic cheese smashed potatoes Gluten free meals in 30 mins Polkapuffs recipe Polkapuffs Shreya Tiwari recipe Shreya Tiwari Photography Vegetarian appetisers

Now, drizzle some more of the remaining oil over the smashed potatoes. Sprinkle sea salt, garlic powder, peri peri spice mix, chilli flakes and the cheese and some oil if you like.

Garlic cheese smashed potatoes Gluten free meals in 30 mins Polkapuffs recipe Polkapuffs Shreya Tiwari recipe Shreya Tiwari Photography Vegetarian appetisers

Bake these at 200’c for 12-15 mins or until the cheese bubbles and the top of these potatoes turns a bit crisp using both the upper and the lower heating rods/ elements.

Garnish with some chopped coriander and sprinkle some more cheese if you like 😉 Serve these piping hot with some drinks or just as it is!

IMG_7668

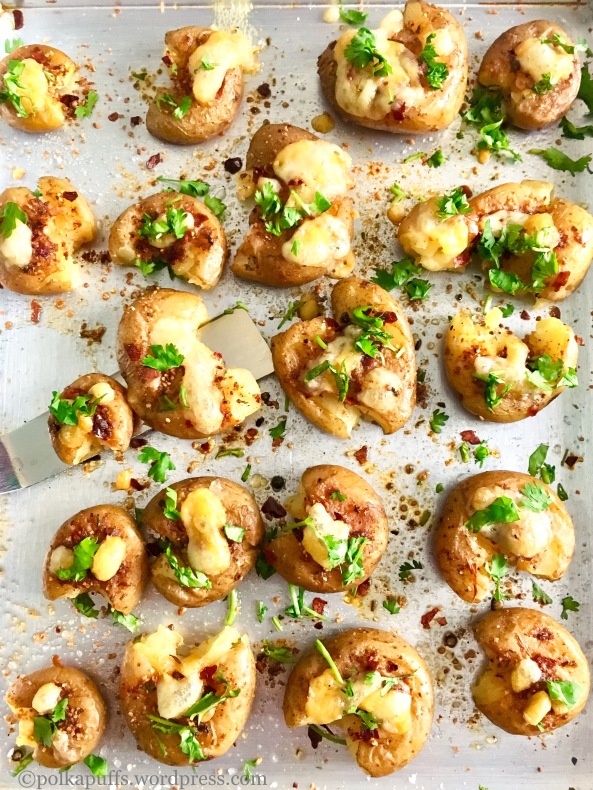
They will melt in your mouth😋😋😋😋 so tempting…and so easy to put together!

Love,

Shreya💕

For more such deliciousness, follow me on –

Pinterest ID : https://www.pinterest.com/emarald_icon123/

Facebook page : https://www.facebook.com/pages/PolkaPuffs/334992336689991

Instagram : https://instagram.com/polkapuffs/

Garlic Cheese Smash Potatoes | gluten free meals in 30 mins


Mango and Kiwi Popsicle recipe Vegan gluten free Popsicle Shreya Tiwari's recipe Polkapuffs recipes Shreya Tiwari photography

Mango Kiwi Popsicles

The sweltering heat…sticky, humid afternoons and my loss of appetite 😑😑 yeah…I do manage to skip meals very easily. Somehow, I never tend to feel all that hungry too… but it’s the thirst and constant craving for something chilled that keeps me running to the refrigerator every few minutes 😂 Chilled, ice cold water and I have a very, very long relationship….more like a love and hate relationship…because I love it and it tends to give me throat issues every now and then…hence the hate bit 😂😂😜😜😜

Mango and Kiwi Popsicle recipe Vegan gluten free Popsicle Shreya Tiwari's recipe Polkapuffs recipes Shreya Tiwari photography

It doesn’t make any difference to me! Lol! Anyways…it’s the chilled stuff that keeps me going in summers. And, people who follow the blog regularly know that I have been posting a lot of ice creams and Popsicles since the summers have started….I even shared a recipe of a lovely, exotic drink, my Rose and Pineapple Cooler . It is one of the most refreshing drinks that I have ever put together, obviously after my Tropical ice tea!😍

Mango and Kiwi Popsicle recipe Vegan gluten free Popsicle Shreya Tiwari's recipe Polkapuffs recipes Shreya Tiwari photography

Since it’s the summers, mangoes can’t be far away…can they!? Juicy, ripe and so sweet…they are my go to snack these days. A couple or more of chopped Alphonso (always Alphonso) mangoes and that’s my lunch pretty much sorted (I adda couple drops lemon juice and a few torn mint leaves), it’s so refreshing and helps me push through my work for another couple of hours during the long afternoons….sigh!! Yeah, summers do make me lazy and processing picture after picture can take a lot out of me…😂😂🤣

Anyways… talking about tropical stuff always reminds me of Kiwis, they are another of my most favourite tropical fruits…. and I always have a few in my refrigerator…they pair well with almost every other fruit (read making a quick fruit salad thingy) and look too pretty if you need to add them as a quick garnish for drinks or mocktails….which reminds me….you must go take a look at my Kiwi mojito Popsicle 👌🏼 You’ll be making it even before logging out of the blog 😁

Mango and Kiwi Popsicle recipe Vegan gluten free Popsicle  Shreya Tiwari's recipe Polkapuffs recipes Shreya Tiwari photography

So what do I do when I have to clear out my refrigerator over the weekend to make room for fresh produce…I look at all the leftover bits of sliced mangoes and some kiwis sitting at the back of the refrigerator…I think frozen goodies to take me through my misery of the week ahead that is going to need a tad bit of extra efforts….phew! Popsicles….my mind jumps at the prospect of the very thought! Hahha….but a girl needs to make her snacks healthy, doesn’t she!? What more can I add to these beauties to ensure that….well, enough said…check out the recipe below and go make yourself some….call it a Mango Kiwi Popsicle or tropical smoothie Popsicle 😍

Yiled: 4 Popsicles

Equipment: a blender, Popsicle mound, measuring cups, ice cream sticks.

Ingredients:

3/4 cup fresh mango pulp (I used Alphonso mangoes, they have a beautiful colour and the taste is unmatched)

1/4 cup fresh tender coconut water

2 slices Kiwi (use green or golden kiwi as per your choice)

2-3 tbsp Kiwi fruit pulp (use green or golden Kiwi as per your choice)

Method:

In a blender jar, add coconut water along with mango pulp and give it a whiz.

Now, pour half of this mixture into each Popsicle mould, fill them only about to the 1/4 th capacity. We will use the remaining half for the next step. Place the moulds in the freezer for setting the pulp, for about 2-3 hours.

Then remove the moulds with the set pulp. I have added kiwi slices in the first 2 mounds and kiwi pulp in the remaining two moulds. Then pour remaining mango-coconut mixture into all 4 moulds (the kiwi and mango pulp blend into each other very naturally and I think it looks pretty too) and add an ice cream stick into each mould. Place them in the freezer to set for another 4-5 hours.

That’s it, once they have frozen completely, to serve them, dip the lower halfs of the moulds into water for 1-2 minutes, gently tug at the ice-cream sticks and pull out each Popsicle. One of the healthiest ways to enjoy frozen treats without added colours or artificial sweetners. 😊

Mango and Kiwi Popsicle recipe Vegan gluten free Popsicle  Shreya Tiwari's recipe Polkapuffs recipes Shreya Tiwari photography

They look so delicious… do make these and let us know how you like them!

Love,

Shreya💖

 
For more such deliciousness, follow me on –

Pinterest ID : https://www.pinterest.com/emarald_icon123/

Facebook page : https://www.facebook.com/pages/PolkaPuffs/334992336689991

Instagram : https://instagram.com/polkapuffs/

Vegan & GF tropical Popsicles No added sugar


Eggless Tutti Frutti Cake recipe Polkapuffs recipes Shreya Tiwari photography How to make an eggless tea time tutti Frutti cake Easy recipe for yogurt cake

Eggless Tutti Frutti Cake

I prefer tea cakes over frosted cakes, however, that wasn’t always the same….as a teenager or for that matter even in my early twenties…I had a great love for all things Chocolate. This included a major drool situation for a Chocolate cake with a hearty slathering of chocolate frosting 😍😍😍😍😍 I just couldn’t resist them!

I prefer tea cakes over frosted cakes, however, that wasn't always the same....as a teenager or for that matter even in my early twenties...I had a great love for all things Chocolate. This included a major drool situation for a Chocolate cake with a hearty slathering of chocolate frosting 😍😍😍😍😍 I just couldn't resist them! () But with time, I have begun to appreciate other flavours which are slightly milder and yet so amazingly delicious. Tea cakes are one of them. If you've been following my blog, you'll know what I am talking about. Simply, moist sponges are my go to cakes for any occasion.

But with time, I have begun to appreciate other flavours which are slightly milder and yet so amazingly delicious. Tea cakes are one of them. If you’ve been following my blog, you’ll know what I am talking about. Simple, moist sponges are my go to cakes for any occasion. Besides, they are so easy to put together😊😊. This one has no butter, no eggs! 👌🏼

You must try ⬇️⬇️

Banana Muffins/ bundt

Chocolate Peanut Butter banana bread  (egg free)

Chocolicious Butterscotch and Banana breakfast bars

and many more….click here. I have a few pressure cooker cake recipes on the blog too, look for them in the archives😊

What I find particularly comforting about such light tea-cakes is that they don’t weigh you down and there always room for another slice 🤗. Oh, not to forget…how easy they can be for experimentating with new flavours!

Eggless Tutti Frutti Cake recipe Polkapuffs recipes Shreya Tiwari photography How to make an eggless tea time tutti Frutti cake Easy recipe for yogurt cake

This recipe is just as easy and calls for yogurt instead of eggs. As most of my readers look for egg free options, I try to keep their needs in mind. However, if you wish replace the yogurt in this cake, just take out the yogurt and instead add 1 large egg. Also, minus the baking soda if working with egg in this recipe. It will turn into a beautiful cake ☺️

Why I like using yogurt over hot water or even sour cream….it’s because the taste of sour cream is slightly too tart for our liking whereas using yogurt makes just as moist a cake as the sour cream one. And besides, let’s be honest….most would prefer going for the yogurt as it’s readily available in nearly every Indian household and there’d be no need to bother to go find sour cream.

I love practical recipes! The one’s where I just peek into my pantry and come out with a big pile of everyday ingredients to make something delicious! This recipe is one such 😍 Spontaneous is my middle name….I hate having to plan a list of groceries specific to what I plan to share here on the blog unless it’s something that was on my bucket list for a while 😂

Eggless Tutti Frutti Cake recipe Polkapuffs recipes Shreya Tiwari photography How to make an eggless tea time tutti Frutti cake Easy recipe for yogurt cake

Isn’t the texture just awesome! This cake literally melts in the mouth…and I make it nearly every fortnight! But never was able click even one decent picture as I usually bake this in the evenings just before the mister gets back from work…so that he can have a slice of warm goodness with his cuppa 😍

So getting on with the recipe…

Yield: one 7″ loaf

Equipment: a large mixing bowl, a manual whisk, a rubber spatula, measuring cups/ spoons, baking tin, parchment paper, cooling rack.

Ingredients:

1 cup All purpose flour (Maida)

1/4 tsp baking powder

1/2 tsp baking soda

3/4 cup powdered sugar (I used icing sugar)

1/4 cup + 2 tsp oil

1/4 cup thick yogurt (or use 1 large egg instead of yogurt)

1 tsp vanilla extract

2-3 tbsp milk

1/2 cup mixed tutti Frutti

Method:

Preheat the oven @ 180’c. Line the baking tin with the parchment paper. Set this aside.

Now, take yogurt, sugar, baking soda, baking powder in a mixing bowl. Stir these ingredients together for a minute. Leave it aside for a couple of minutes to let the baking soda work with the acidity of the yogurt. The mixture will become little frothy after a few minutes.

Eggless Tutti Frutti Cake recipe Polkapuffs recipes Shreya Tiwari photography How to make an eggless tea time tutti Frutti cake Easy recipe for yogurt cake

Now, add the oil and vanilla extract to this frothy yogurt mixture. Whisk well to make a lumpfree mixture. Next, sift in the flour. Using a rubber spatula, gently fold the flour into the wet ingredients. Do not beat or whisk the batter. Once the flour is well incorporated, add the tutti Frutti bits and fold them into the batter. (Tip: Add milk only if the batter is too thick else skip it).

Now, pour the batter into the ready tin and sprinkle some tutti Frutti on top of the batter too.

Eggless Tutti Frutti Cake recipe Polkapuffs recipes Shreya Tiwari photography How to make an eggless tea time tutti Frutti cake Easy recipe for yogurt cake

Bake the cake @180’c for about 30-35 mins using the lower heating elements/ rods. Once the cake is baked, insert a toothpick in the centre of the cake to check readiness. The toothpick must come out with a few moist crumbs. If the cake is under cooked, bake for a further 5 mins.

Remove the ready cake from the oven and place the tin on the cooling rack. Let the cake cool completely before unmoulding and slicing. This cake stays fresh in an airtight container for about 3-4 days.

Eggless Tutti Frutti Cake recipe Polkapuffs recipes Shreya Tiwari photography How to make an eggless tea time tutti Frutti cake Easy recipe for yogurt cake

Hope you try this soon and don’t forget to share your feedback with us 😀

Love,

Shreya 💝

 
For more such deliciousness, follow me on –

Pinterest ID : https://www.pinterest.com/emarald_icon123/

Facebook page : https://www.facebook.com/pages/PolkaPuffs/334992336689991

Instagram : https://instagram.com/polkapuffs/

Egg free Butter free tutti Frutti Tea cake

3 Ingredient no Churn Vanilla ice cream How to make vanilla ice cream at home Easy recipe for vanilla ice cream Eggless vanilla ice cream recipe Polkapuffs recipes Shreya tiwari photography

No-Churn 3 Ingredient Eggfree Vanilla Ice Cream | Gluten-Free Recipe for Vanilla Ice Cream

My first few memories of enjoying ice-creams are very fresh in my mind. Small, perfect white scoopfuls in a plastic cup with a handy wooden spoon. The flavour was Vanilla, always Vanilla. Nothing exotic or fancy…just some good old sweet, delicious and classic Vanilla 😍 And ever since then, Vanilla happens to be my go-to flavour for desserts, specially ice-creams!

Most people will agree with me when I say it’s alost everyone’s  favourite flavour of ice-cream. A no-fringe, straightforward Vanilla ice-cream is such a comfort food at times. The summers, for one, call for constant relief and I find some in my homemade No-Churn, 3 Ingredient Eggfree Vanilla Ice-Cream 🍦🍦

There was a time when just three or four flavours ruled the roost…back when we were kids Tutti Frutti ice cream was what most of us kids got and the elders picked butterscotch ice cream or some such basic flavour. But going out for ice cream these days is such a task …I look at the array of new flavours we can try and I am overwhelmed at the choices thrown at me….I almost get confused and pick something I can identify with and make my peace with it😄😄😂….hubby, on the other hand is the adventurous type and keeps trying new flavours…at times, even he’s in for a rude shock and looks at me sheepishly!

3 Ingredient no Churn Vanilla ice cream How to make vanilla ice cream at home Easy recipe for vanilla ice cream Eggless vanilla ice cream recipe Polkapuffs recipes Shreya tiwari photography

Look at the creamy, luscious texture of the ice cream. Each spoonful is melt in the mouth good and has no ice crystals either. Making eggfree ice creams is indeed a treat and so so fun. I have added neither CMC nor GMS to this recipe and it just doesn’t need any! Just some basic pantry ingredients and a bit of prepping is all you need. But ensure that you use good quality Vanilla extract or essence. It’s the Vanilla that will give you the flavour and the beautiful aroma 😊

3 Ingredient no Churn Vanilla ice cream  How to make vanilla ice cream at home Easy recipe for vanilla ice cream  Eggless vanilla ice cream recipe  Polkapuffs recipes  Shreya tiwari photography

I rarely add chocolate syrup or any toppings to my Vanilla ice cream but these cute little sugar sprinkles looked too adorable to miss during my recent visit to my favourite baking needs store and I picked it…and these do add a touch of colour to the pristine white ice cream 😍 the prettiest pastel shades ever ☺️

Anyways…so I will share this recipe now, its quick but needs a few things to be done before you start with actual preparation. Let’s get on with it…

Yield: serves 4-5 (makes about 7-8 small scoops)

Equipment: a manual or an electric whisk, an aluminium tin or any freezer safe container to set the ice cream, a large stainless steel bowl, measuring cups/ spoons, silicon or rubber spatula.

Ingredients:

400 ml sweetened condensed milk

1+3/4 cup full fat whipping cream (heavy cream/ double cream)

1+1/2 tsp vanilla extract

Method:

To begin with, keep the whipping cream (I chilled the whipping cream overnight), the manual whisk or the electric whisk attachments and the large stainless steel bowl in the refrigerator for a minimum of 1 hour to chill.

Next, place some ice cubes on a large tray/ platter (make an ice bed), place the chilled bowl on top of the ice cubes. Pour the chilled whipping cream in to the bowl and using the manual whisk or the electric whisk, whip the cream until it has firm peaks. Took me about 5-7 mins using an electric whisk on setting 3 but keeping the ice cubes beneath the mixing bowl helps a lot in achieving the firm peaks in this heat.

Once, the whipped cream holds the peaks well, add the vanilla extract and the condensed milk. Now, DO NOT whip anymore. Use a silicon or a rubber spatula and gently fold everything together in the bowl. Make sure the bowl is kept on an ice bed all through the process.

Pour the ready mixture into the tin or into the freezer safe container, cover the container/ tin with some cling wrap and set it for 2-3 hours in the freezer.

After 2-3 hours, remove the container from the freezer and pour the mixture into another bowl and give good mix to the half set ice cream using a manual whisk (do not use the electric whisk for this step). Pour the contents back into the tin/ container, cover it with a cling wrap again and let the ice cream set for about 7-8 hours in the freezer.

That’s it, your smooth, creamy and delicious 3 Ingredient, No-Churn, Eggfree Vanilla Ice Cream is ready 😊

To serve, let the tin/ container sit on the kitchen platform for 5 mins before scooping out the ice cream.

3 Ingredient no Churn Vanilla ice cream How to make vanilla ice cream at home Easy recipe for vanilla ice cream Eggless vanilla ice cream recipe Polkapuffs recipes Shreya tiwari photography

I think…after all my love for Popsicles, I can definitely say that Vanilla ice cream is my favourite 😋

Love,

Shreya💝


For more such deliciousness, follow me on –

Pinterest ID : https://www.pinterest.com/emarald_icon123/

Facebook page : https://www.facebook.com/pages/PolkaPuffs/334992336689991

Instagram : https://instagram.com/polkapuffs/

Homemade No-Churn Vanilla Ice-Cream Glutenfree recipe


Vegetarian lo mein recipe Chow-mien recipe How to make street style Schezwan noodles Polkapuffs recipes Shreya Tiwari photography Vegan noodle recipe Schezwan noodle recipe

Schezwan Noodles | Indo Chinese Street Food

We Indians love our ‘desi’ Indo-Chinese….we may pretend to apprecite the gourmet, Asian-style spreads at the most sought after restaurants…but you’ll find us literally stuffing our faces with these street style noodles…or fried rice and some cornflour laden, soy sauce soaked manchurian gravies more often than not😍😍😍😂 and I am no different, I am in love with our ‘desi’ Chinese which is absolutely no where close to the authentic cuisine but what the heck?! It’s just too yummy to part with….and it’s one of my favourite things in the whole wide world 🤗 There! I said it!

Vegetarian lo mein recipe Chow-mien recipe How to make street style Schezwan noodles Polkapuffs recipes Shreya Tiwari photography Vegan noodle recipe Schezwan noodle recipe

So, having said that…what would you expect from me if I have a few packets of Hakka noodles sitting in my pantry and one hungry husband on a weekend ….with no plans to step out because the man ain’t in the mood to drive 😩 I make some street vendor style Schezwan Noodles…spicy….loaded with veggies…full of flavours and absolutely lip-smacking good😍😍😍 besides, it gets done in about 30 minutes…what’s not to love👌🏼

Vegetarian lo mein recipe Chow-mien recipe How to make street style Schezwan noodles Polkapuffs recipes Shreya Tiwari photography Vegan noodle recipe Schezwan noodle recipe

Actually, it’s better than your favourite take-out as this is healthier because of the veggies and I’ve added very little oil. Spicese, yes…added a whole lot of spices while making it as we prefer it to be hot! 😁 So, if you’ve been a person who starts sneezing and coughing at the first bite of anything spicy…tone this recipe down a couple of notches and you’ll survive 😉 I have used my homemade Schezwan sauce here and I did serve this with some quick Schezwan paneer….basically, everything was Schezwan 😑🤔 how’d that happen?! 😜

Enough said! Start cooking…pronto!

Yield: serves 2-3

Equipment: a large heavy bottomed wok, measuring cup/ spoons, a pair of tongs.

Ingredients:

2 packets of Hakka Noodles (boiled as per the instructions on the package)

1+1/2 cups julienned carrots

1 cup julienned cabbage

1 cup julienned capsicum

1 cup finely sliced red onion

1/2 cup finely chopped spring onion whites

1/2 cup finely chopped spring onion greens

salt to taste

1/4 cup Schezwan sauce

3 tbsp oil

1 tsp noodle Masala (Indian grocery stores carry it, else skip it and add black pepper powder)

3 tsp finely chopped garlic

1 tsp finely chopped ginger

2 tbsp soy sauce

1 tbsp red chilli sauce

1 tsp vinegar

3 nos. whole red chillies

1 tbsp tomato ketchup (optional)

Method:

In the wok, heat oil until nice and hot. Then add the ginger, garlic, whole red chillies and spring onion whites. Sauté these on high flame until the garlic turns golden. Then add all the veggies along with salt and noodle Masala (black pepper). Keep mixing well and sautéing on high flame for the next 2-3 minutes.

Next, add the sauces – Schezwan, soy, chilli. Add vinegar and ketchup too. Sauté for another 2 minutes. Now tip in the boiled noodles (ensure that the noodles are al-dentè). Use tongs to mix the veggies with the noodles and be gentle. You don’t want to break any of those gorgeous noodles. Once everything is looking good, add the spring onion greens and give them a last mix. That’s it, serve them piping hot! Done😉

You can add any veggies if your choice or add Proteins of your choice…like shredded chicken or some sautéed prawns if you like seafood.

Vegetarian lo mein recipe Chow-mien recipe How to make street style Schezwan noodles Polkapuffs recipes Shreya Tiwari photography Vegan noodle recipe Schezwan noodle recipe

Doesn’t that make you drool?! 😃 …you should make some👆🏼

Love,

Shreya💖


For more such deliciousness, follow me on –

Pinterest ID : https://www.pinterest.com/emarald_icon123/

Facebook page : https://www.facebook.com/pages/PolkaPuffs/334992336689991

Instagram : https://instagram.com/polkapuffs/

Vegetable Lo-Mein spicy and Vegan Meals under 30 mins Asian noodle recipe Polkapuffs

Jeera biscuits Bakery style jeera cookies Polkapuffs recipes Shreya Tiwari photography How to make cumin cookies Recipe for cumin cookies

Cumin Cookies | Jeera Biscuits

The baking bug has bitten me for quite sometime now and there days when I am baking around the clock! It’s fun to do so little and I still get to enjoy big treats😍😍…besides, baking all my meals sounds like a doable thing in these summers when standing in front of the stove is next to impossible!

I bake things which my hubby and I both enjoy apart from experimenting new recipes or recipes which I’d bookmarked earlier….dinner last night was a batch of my Baked Spring Rolls which I served with some homemade Schezwan Sauce and glasses after glasses of my Tropical Iced Tea to cool things down 😁 I still have a bottle of the tea sitting chilled in the refrigerator for tonight….planning to pair it with my mixed lentil Adai and Tomato Chutney….mmmm!

Jeera biscuits Bakery style jeera cookies Polkapuffs recipes Shreya Tiwari photography How to make cumin cookies Recipe for cumin cookies

So while all this kept happening, my hubby reminds me about something I used to bake in the early days of my experiments with baking…almost over 2 years ago…he says why haven’t I revisited my Bakery Style Cumin Cookies a.k.a. Jeera Biscuits! I was stumped 🤔…been over a year I made them for HIS teatime 😜😂😂 obviously, the poor chap must’ve been missing them!

Jeera biscuits Bakery style jeera cookies Polkapuffs recipes Shreya Tiwari photography How to make cumin cookies Recipe for cumin cookies

And these happened a while back…just for him…he came back home to an amazing aroma wafting out of our home and he’d already known that I’ve baked these Cumin Cookies. He says…come on, give me some straight away😋…didn’t wait for his tea or anything…..and I was super satisfied 😍

These bakery style cookies are so easy to put together, mildly sweet and tad bit salty..and the flavour of the roasted cumin seeds/ jeera seeds are something so earthy and yet addictive! Besides, they lend the crunch to them. The original recipe which I had first used called for eggs but I have worked around to avoid eggs just as I avoid eggs in my Sugar Cookie recipe.

Let’s start…

Yield: 24 cookies of 2″ each.

Equipment: electric whisk, measuring cup/ spoon, rolling pin, baking tray, parchment paper/ butter paper, cooling rack, cookie cutter/ knife, mixing bowl.

Ingredients:

1 cup + 1 tbsp all purpose flour (Maida)

1/2 cup / 1 stick unsalted butter (if using salted butter then skip adding any salt in the recipe)

1/4 cup icing sugar (I use icing sugar as it helps the cookies hold better shape, you can use regular powdered sugar)

1/4 tsp salt

a pinch of baking powder

2 tbsp jeera (Cumin seeds)

3-4 tbsp milk (if needed to bind the dough)

Method:

Take cumin seeds in a pan and roast them until they are slightly brown and fragrant. Set them aside to cool.

Line the baking trays with parchment paper/ butter paper. Lining the tray avoids having burnt bases and edges with the cookies and ensures they colour evenly even at the bottom and the cookies don’t spread too much.

Now, in the mixing bowl, cream together the butter and icing sugar until they are smooth and well incorporated.

Jeera biscuits Bakery style jeera cookies Polkapuffs recipes Shreya Tiwari photography How to make cumin cookies Recipe for cumin cookies

Next, seive in the flour and add salt. Whisk again until the flour is well incorporated into the creamed butter. Add baking powder and the 1 tbsp roasted cumin seeds. Make a smooth dough with your hands, you can add 1-2 tbsp milk if the dough needs some moisture to come together. It’s optional, I always add 2-3 tbsp. Smoothen the dough and set it aside for 10 mins.

Next, dust your work surface (I prefer silicon mats) with some flour and roll the dough to a thickness of about 3mm and cut them in any desired size and shape.

Jeera biscuits Bakery style jeera cookies Polkapuffs recipes Shreya Tiwari photography How to make cumin cookies Recipe for cumin cookies

Place the cut out cookies an inch apart on the lined baking tray. Sprinkle some roasted cumin over each cookie. Place the baking tray with the cookies in the refrigerator for 10 mins to set the cookies before baking.

Jeera biscuits Bakery style jeera cookies Polkapuffs recipes Shreya Tiwari photography How to make cumin cookies Recipe for cumin cookies

In the meanwhile, preheat the oven @180’c for 10-12 minutes.

Once the cookies have set in the refrigerator, bake them @180’c for 12-13 minutes using both upper and the lower heating elements/ rods. They will turn slightly golden on the edges once ready. (Every oven works differently so adjust the baking time and temperature according to that)

Jeera biscuits Bakery style jeera cookies Polkapuffs recipes Shreya Tiwari photography How to make cumin cookies Recipe for cumin cookies

The base of the cookies…a perfect golden brown 😍

Once baked, keep the tray on a cooling rack and let the cookies crisp up on the tray as they continue to cook for a few minutes on the hot tray. Remove them from the tray and place them on the cooling rack to let the cookies/ biscuits cool completely before storing in airtight boxes, they keep well for upto 3-4 days.

They taste best when served fresh with some tea/ coffee or simply as a munchy😀

Jeera biscuits Bakery style jeera cookies Polkapuffs recipes Shreya Tiwari photography How to make cumin cookies Recipe for cumin cookies

You can add more sugar or salt, as per your choice. But be generous with the cumin!

Love,

Shreya💖

Cumin cookies | jeera biscuits


Tutti Frutti ice cream recipe Eggless no cook no Churn Tutti Frutti ice cream Polkapuffs Shreya tiwari photography

Eggless No Cook No Churn Tutti Frutti Ice Cream

Hey all….yes..I have been a bit out of it lately…blame the summers..! Yes, please do blame the summers…so that you have an excellent excuse to make yourself some creamy….dreamy ice cream 😍

My No Churn, No Cook and egg free Tutti Frutti Ice Cream 🤗🤗 should cool you down I guess….it certainly did cool us down…scoop after scoop were polished off this last weekend and I have been ordered by my man to make some more ice cream ASAP! I will indulge him😘 I always do…..

Tutti Frutti ice cream recipe Eggless no cook no Churn Tutti Frutti ice cream Polkapuffs Shreya tiwari photography

I prefer ice creams rarely…more of a Popsicle girl..(see my Fruity Volcano Popsicle here …you’ll love it!). But when I do make an ice cream…I make a mean one! It’s always on point! 👌🏼😉 I love ice creams that need no churning machines and fancy equipment….and definitely no fancy ingredients! They need to be simple, easy to put together and they must taste better than the ones at your favourite ice cream place..!

This Tutti Frutti ice cream checks all the right boxes and is big on flavour!! 💃🏻It’s slightly citrusy…..that’s my version. You can go with the classic vanilla flavour or even almond extract would go beautifully. There are infinite options…if you like, add some cardamom flavour or even a bit of saffron (Kesar).

Tutti Frutti ice cream recipe Eggless no cook no Churn Tutti Frutti ice cream Polkapuffs Shreya tiwari photography

Coming to how to get that beautiful texture which is so creamy and yet has a firmness…. we come across many recipes which are no-cook, no-egg and no-churn but many of these recipes are complicated or call for some preservatives too. I won’t advocate such recipes…I like the idea of making ice cream only because it can be done without any CMC or GMS powders. These are obviously exceptional ingredients to ensure a good textured ice cream, but the challenge lies in making home made ice cream without any of these.

I have used very basic ingredients which are easily available and since it doesn’t need any machine to churn the mixture, a simple wired whisk or an electric whisk can do the magic!

Lets make some ice cream.

Yield: serves 4 (about 8-9 medium sized scoops)

Equipment: electric whisk (wired whisk will do too), an aluminium tin to set the ice cream, a large stainless steel bowl to whisk the ingredients, measuring cups/ spoons, aluminium foil, rubber spatula.

Ingredients:

400 ml condensed milk (I used Amul Mithai Mate tin)

1+1/2 cup chilled heavy whipping cream (Amul red tetra packet)

1/4 cup dairy whitener (milk powder)

1/2 cup mixed Tutti Frutti bits

4-5 drops orange gel colour (or even liquid)

1/4 tsp fresh lemon zest

Method:

Place the the wired whisk or the whisk attachment of the electric whisk along with the stainless steel mixing bowl in the refrigerator for about 30 minutes an hour for them to chill.

In the chilled bowl, take the chilled whipping cream, whisk it for 4-5 minutes using the electric whisk until the cream has soft peaks. It will take about 10-12 minutes manually.

Next add the milk powder and whisk again until it is fully incorporated. Now, pour the condensed milk into the whipped cream and using a rubber spatula, gently fold the condensed milk into the whipped cream. Add the lemon zest next. If you are using the colour, add that colour and the tutti frutti bits. Mix everything gently so the the air incorporated into the cream doesn’t escape.

Pour the the mixture into the tin and cover the tin with some aluminium foil. Set it in the freezer for about 2 hours, it will be partially set by then. Remove from the freezer after 2 hours, remove the partially set ice cream in another chilled stainless steel bowl and whisk it again for 2-3 minutes. Pour the mixture back into the tin and cover it again with the foil. Freeze the mixture for 6-7 hours.

To serve, keep the ice cream in room temperature for 10 minutes before scooping it into bowls and devouring it😉

Tip: I have used the lemon zest to cut the sweetness, the ice cream does taste very mildly citrusy. You can omit the colour or choose any other colour.

Hope you try it out soon…you’ll be revisiting this recipe often which is adapted from my Mango Tutti Frutti ice cream which I had shared last year.

Love,

Shreya❤️

Tutti Frutti ice cream recipe


Bombay Masala Aloo sandwich recipe Bombay toast sandwich recipe Lunchbox ideas Street food of mumbai Polkapuffs recipes Shreya Tiwari photography

Bombay Aloo Masala Sandwich | Spicy Potato Sandwich

Sandwiches are a staple street food in Amchi Mumbai….be it vegetable toast sandwich or a plain Chutney (salsa) sandwich…the options are endless and oh so yummy! 😍

Bombay Masala Aloo sandwich recipe Bombay toast sandwich recipe Lunchbox ideas Street food of mumbai Polkapuffs recipes Shreya Tiwari photography

I personally love the vegetable cheese grill sandwich! It’s like the best of both worlds…you get veggies and if you are a cheese lover like me…it’s just so good with that cheese within and on the outside😍😍😍😍….a side of some potato crisps/ chips/ wafers…and some ketchup😋

Similarly, there is another hot favourite among most Mumbaikars….the spicy, aromatic and very delicious Bombay Aloo Masala Sandwich…make it as a toast sandwich or a grilled one…it’s amazing! Aaaaannnddd…..it’s my hubby’s favorite 😘

Bombay Masala Aloo sandwich recipe Bombay toast sandwich recipe Lunchbox ideas Street food of mumbai Polkapuffs recipes Shreya Tiwari photography

This is a regular breakfast or evening snack at our place…and my Mom’s recipe for the filling/ Aloo Masala is super duper yum!

I usually use brown bread to make them…you can use regular white sandwich bread or any multigrain bread if your choice. I had once even used a Homemade Herbed Focacia bread for this sandwich and it was so good!

Anyways…let’s get you started on the recipe..

Yield: can be used for upto 6-7 sandwiches with generous amount of the potato filling.

Equipment: a non-stick pan, measuring cups/ spoons, grilled or toaster or a pan to grill or toast the sandwiches, a bread knife to cut the sandwiches into portions.

Ingredients:

5 nos. large potatoes (boiled and mashed)

3 tbsp oil

1 tsp finely chopped green chilli

a pinch of hing (asafoetida)

1/4 tsp cumin seeds (jeera)

1/2 cup finely chopped onions

1/4 cup finely chopped green bell pepper (capsicum)

2 nos. finely chopped tomatoes

salt to taste

1 tsp ginger-garlic paste

1/4 tsp turmeric powder

1/2 tsp red chilli powder

1 tsp Pav bhaji Masala

1/4 tsp amchur powder (raw mango powder)

1-2 tsp water (if needed to correct the consistency)

2 tsp chopped fresh coriander leaves

butter as needed to grill/ toast the sandwiches

Method:

To make the filling:

Heat oil in a non-stick pan. Once the oil is hot, add cumin seeds, hing and chopped green chillie. Sauté for a minute.

Next, add the chopped onions. Sweat them for a few minutes. Then add the capsicum. Sauté again. Tip in the tomatoes followed by the salt, turmeric, red chillie powder, ginger-garlic paste. Mix well and cook these together until the tomatoes turn mushy and the raw smell of the ginger- garlic paste goes away.

Next, add the mashed potatoes along with the Pav bhaji Masala. Also add the amchur powder and mix well. Turn off the flea me. Add chopped coriander leaves and give them all a final mix. That’s your filling done! Keep well in the refrigerator for 3-4 days.

Bombay Masala Aloo sandwich recipe Bombay toast sandwich recipe Lunchbox ideas Street food of mumbai Polkapuffs recipes Shreya Tiwari photography

To make the sandwich:

Take 2 slices of bread. Slather both the slices with butter. Sprinkle some chaat Masala (optional) and spread a thick layer of the potato filling. Heat the griller/ toaster…spread some butter on the griller plate and place the sandwich on it and let it crisp up on both sides. Serve hot with some chips/ crisps and ketchup!

Bombay Masala Aloo sandwich recipe Bombay toast sandwich recipe Lunchbox ideas Street food of mumbai Polkapuffs recipes Shreya Tiwari photography

You can add some veggies to this filling recipe or even minus a few things if you wish. Do try it…it’s lip smacking 😍

Love,

Shreya💖

Sandwiches with Spicy Potato fillng | Bombay Masala Aloo Sandwich | PolkaPuffs


Pressure cooker cake recipe PolkaPuffs recipe Chocolate sponge cake in pressure cooker Eggless chocolate cake in pressure cooker Vegan chocolate cake recipe Bake a cake in the pressure cooker

Eggless Chocolate Sponge Cake in Pressure Cooker | Vegan Chocolate Sponge Cake Recipe

I am back with another easy pressure cooker cake recipe! Yayy! Yayy….because it’s eggless this time! Yup….I know most of my beloved readers out there wanted to learn to bake an eggless cake in the pressure cooker the last time when I’d posted my Mom’s Vanilla Sponge Cake in the Pressure Cooker recipe….. I also know that I am a bit late than I thought I would be…but better late than never, right!? 😄 A ONE BOWL WONDER….

Pressure cooker cake recipe PolkaPuffs recipe Chocolate sponge cake in pressure cooker Eggless chocolate cake in pressure cooker Vegan chocolate cake recipe Bake a cake in the pressure cooker

The best thing about this cake is that it can be baked as well. So, it ain’t necessary that you must bake it in a pressure cooker only. I use the same recipe to bake some muffins in my OTG from the leftover batter as this cake baked in the pressure cooker….and this what it looked like…perfect flat top! You can frost it like a pro!

Pressure cooker cake recipe PolkaPuffs recipe Chocolate sponge cake in pressure cooker Eggless chocolate cake in pressure cooker Vegan chocolate cake recipe Bake a cake in the pressure cooker

It was just perfect…this is my go to recipe whenever I am planning on an eggless, vegan chocolate cake😍 I had discovered this recipe long ago..although it had butter originally but I have been using oil …and it stayed with me. Works like a charm….perfect texture!

Pressure cooker cake recipe PolkaPuffs recipe Chocolate sponge cake in pressure cooker Eggless chocolate cake in pressure cooker Vegan chocolate cake recipe Bake a cake in the pressure cooker

I have used this recipe even for a proper frosted cake. It’s easy to slice in layers and frost well as the crumbs do not just fall off either. It stays fresh for 2-3 days at room temperature too.

Pressure cooker cake recipe PolkaPuffs recipe Chocolate sponge cake in pressure cooker Eggless chocolate cake in pressure cooker Vegan chocolate cake recipe Bake a cake in the pressure cooker

Since I’ve raved so much about it…it’s only fair we look at recipe now😀

Yield: a 6″ square cake (in pressure cooker) and 4 medium cupcakes (baked)

Equipment: a mixing bowl, measuring cups/ spoons, baking tin, a large pressure cooker, a spare steel bowl, a cooling rack, parchment paper/ baking paper.

Ingredients:

1 + 1/2 cup All purpose flour (Maida)

1 cup + 2 tbsp powdered sugar

1/4 cup cocoa powder

1 tsp baking soda

1/4 tsp salt

1 tsp baking powder

1/3 cup oil (I used regular cooking oil)

1 cup warm water

1 tbsp lemon juice / vinegar

1/2 tsp vanilla extract

Method :

Line the cake tin with baking paper/ parchment paper. Dust it with a bit of flour.

Pressure cooker cake recipe PolkaPuffs recipe Chocolate sponge cake in pressure cooker Eggless chocolate cake in pressure cooker Vegan chocolate cake recipe Bake a cake in the pressure cooker

In a large mixing bowl sift together flour, powdered sugar, cocoa powder, baking soda, baking powder, cocoa powder and salt.

Next, add lemon juice, oil, vanilla extract, warm water. Mix everything well but do not over mix the ingredients as that results in a heavy cake.

Heat the pressure cooker on high flame for 10 mins. Place a stand/ bowl or plate inside at the bottom. DON’T ADD WATER IN THE COOKER.

Pressure cooker cake recipe PolkaPuffs recipe Chocolate sponge cake in pressure cooker Eggless chocolate cake in pressure cooker Vegan chocolate cake recipe Bake a cake in the pressure cooker

Fill the batter in the ready tin upto half its capacity and place the tin in the heated pressure cooker on the bowl/ stand kept at the base. Cover the pressure cooker with it lid but remove its gasket and weight. Bake on medium flame for 40-45 mins.

Pressure cooker cake recipe PolkaPuffs recipe Chocolate sponge cake in pressure cooker Eggless chocolate cake in pressure cooker Vegan chocolate cake recipe Bake a cake in the pressure cookerIMG_7011

Do a toothpick test and check if the cake is ready after 40 mins, it should come out with a few moist crumbs, if your cake is ready then remove from the cooker using kitchen tongs and cool the tin on cooling rack for 15-20 mins before unmoulding the cake.

If the cake in undercooked, then let it cook for another 10 mins. It should be ready by then. Slice and serve.

To bake the muffins, fill each muffin mould upto 3/4 th of it’s capacity. Then, I pre-heated the oven @180’c for 10 mins. Next, I  baked the muffins for 20-22 mins @180’c. (Each oven works differently so please adjust the baking time and temperature). Do take a toothpick test. Cool them for 15 mins on a cooling fack before unmoulding. Enjoy!

This cake keeps well in an airtight box for 2-3 days.

Pressure cooker cake recipe PolkaPuffs recipe Chocolate sponge cake in pressure cooker Eggless chocolate cake in pressure cooker Vegan chocolate cake recipe Bake a cake in the pressure cooker

Make this soon…because it hardly takes any time! Sounds cheesy…well…I can’t help it!! 😂

Love,

Shreya💗

Vegan Chocolate Cake in pressure cooker

Rose and Pineapple Cooler

I can live on cool drinks all year long…😉 Being a teetotaller couple, we are constantly looking forward to trying some new flavours of mocktails and coolers…and more often than not we come across great finds👌😚

Speaking of great finds, I also find it interesting to try and make a new flavour combination right in the comfort of my kitchen! Earlier, I have shared the recipe of tropical iced tea which was a total hit! I make it every summer and we can’t get enough of it😀 I keep myself and the hubby hydrated as we sip on some of the most delicious homemade coolers. I have been told by people who have tried my Fruity Green Tea cooler, that it was one of the best ways to enjoy their green tea!

Rose and Pineapple cooler Non alcoholic summer mocktail Pineapple cooler recipe Polkapuffs recipes Shreya tiwari Rose and Pineapple cooler Non alcoholic summer mocktail Pineapple cooler recipe Polkapuffs recipes Shreya tiwari photography Rose mocktail Rose mocktail

Coming to this gorgeous beauty that has gotten you all parched is my take on two amazing flavours…tropical Pineapple and the very exotic Rose. Rose, on it’s own is very cooling. I have combined it’s flavours with the sweet and slightly tangy juices of local Pineapples and added my twist to it….😁 The resulting cooler/ mocktail is a bit spicy, has the freshness of summer mint and is loaded with ice! Just the thing you need in these sweltering afternoons.

Rose and Pineapple cooler Non alcoholic summer mocktail Pineapple cooler recipe Polkapuffs recipes Shreya tiwari photography Rose mocktail

Let’s get started….

Yield: serves 2

Equipment: mortar-pestle, measuring cups/ spoons, mixing spoons, 2 glass/ bottles of your choice to serve the drink.

Ingredients:

1+1/2 cup fresh or canned pineapple juice

4 tsp rose syrup

9-10 fresh mint leaves

1/2 tsp chaat masala (Indian spice mix easily available in Indian Grocery/ Food Stores. If you can’t find chaat Masala, replace this ingredient with some salt and pepper to taste)**

1/4 tsp ginger juice (grate some ginger and squeeze the juice to add to the mocktail)

ice cubes as needed

Method:

Muddle together mint leaves, chaat Masala** and ginger juice together in the mortar-pestle.

Add two tsp rose syrup in each of the 2 serving glasses/ bottles.

Top the rose syrup up with 1-2 tsp of the mint leaves, ginger juice and chaat Masala** mixture.

Add ice cubes. Lastly, pour the Pineapple juice. The flavours will combine on their own, however, you can give them a quick stir. Garnish the drink with a sprig of mint! Enjoy!

Rose and Pineapple cooler Non alcoholic summer mocktail Pineapple cooler recipe Polkapuffs recipes Shreya tiwari photography Rose mocktail

Love,

Shreya❤️

Rose and Pineapple Cooler | Vegan