3 Ingredients Mixed Berries Jam | No Pectin Jam Recipe | Berry Jam Recipe

It’s the ‘very berry’ season in my home!! I am literally swamped with berries of late! I am having strawberries and mulberries for breakfast, lunch…dinner and then some for desserts 😁 and I am loving them! They are so juicy and the colour…oh my.. I have an almost permanent purple stain on my lips because of the mulberries πŸ˜‚πŸ˜‚ but I can’t seem to stop popping them each time I walk past the dining table…and I am never short of excuses to be ‘walking past’!! LoL!

3 ingredient strawberry jam 3 Ingredient mixed berries jam Homemade strawberry jam recipe Polkapuffs recipe No pectin strawberry jam recipe No pectin jam recipe Mulberry jam recipe How to make jam at home without pectin

I mean, look at them beauties…can keep your hands off?! Specially the mulberries….this is just the third, maybe the fourth time in my entire 29 years of existence that I could lay my hands on them…probably I couldn’t have paid much attention to them around me…but this year has been different…I can see them everywhere..beautiful, organic and absolutely delicious! Just as yummy as the juicy red strawberries.

3 ingredient strawberry jam  3 Ingredient mixed berries jam Homemade strawberry jam recipe Polkapuffs recipe No pectin strawberry jam recipe No pectin jam recipe  Mulberry jam recipe  How to make jam at home without pectin

I will share some health benefits of various berries here……I have read a lot about them online and because I prefer eating seasonal produce, I strongly recommend that one must have them but obviously you must consult doctors whenever necessary.

Strawberries:

Improves immune system.

Reduces the chance of contracting eye related ailments and issues.

Helps maintains a healthy heart by keeping Blood Pressure in check.

Reduces risk of of gout, cancer and arthritis.

Reduces cholesterol.

Great anti-oxidant and helps maintain great skin, hair and overall health.

Studies say that one bowl of strawberries a d is just about 50 calories!

Mulberry (Shahtoot): 

Cures certain diseases.

Cures cancer.

Prevents blood clots and heart stroke.

Cleanses blood.

Prevents seasonal cold and flu.

Strengthens kidney and helps cleanse liver.

Keeps blood sugar in check.

3 ingredient strawberry jam  3 Ingredient mixed berries jam Homemade strawberry jam recipe Polkapuffs recipe No pectin strawberry jam recipe No pectin jam recipe  Mulberry jam recipe  How to make jam at home without pectin

So coming to what I did with these berries besides chomping on them was jamming! I made Strawberry Jam last year, it was super delicious and absolutely lip-smacking! I made another batch within a month because I almost didn’t want it to ever get over πŸ˜‹

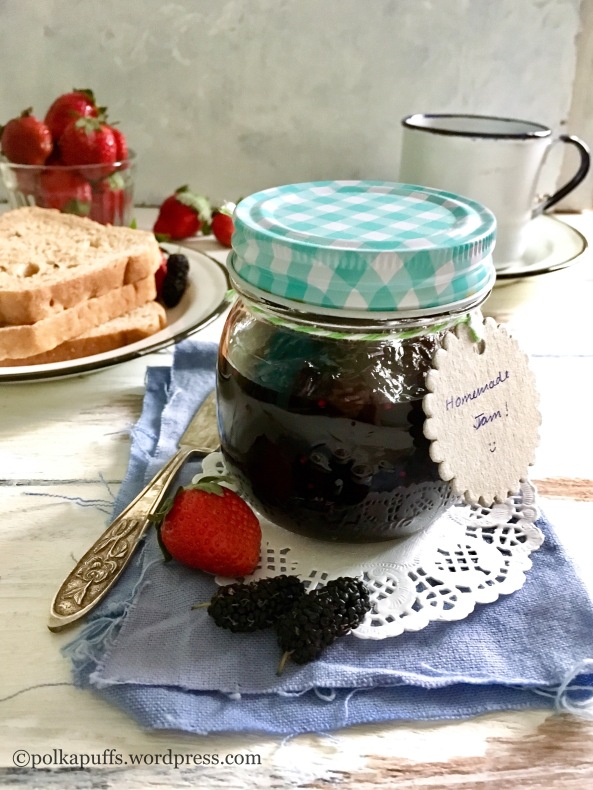
So this time around, I wanted to use both the berries in the jam and that’s exactly what I have done! Look at the jam…it’s so beautifully coloured…and has little chunks of strawberries and mulberries 😍…perfect on a slice of fresh homemade sandwich bread!…..yummmm!

3 ingredient strawberry jam  3 Ingredient mixed berries jam Homemade strawberry jam recipe Polkapuffs recipe No pectin strawberry jam recipe No pectin jam recipe  Mulberry jam recipe  How to make jam at home without pectin

Since I am not tea/ coffee person, I prefer a light lemon tea with a ton of sugar…literally πŸ˜‚πŸ˜‚ and a couple of slices of bread with my homemade jam slathered all over ….pure bliss!

3 ingredient strawberry jam  3 Ingredient mixed berries jam Homemade strawberry jam recipe Polkapuffs recipe No pectin strawberry jam recipe No pectin jam recipe  Mulberry jam recipe  How to make jam at home without pectin

Let’s make some jam….

Yield: Approx 200 gms

Equipment: a big bowl, measuring cups/ spoons, a heavy bottomed pan, a potato masher, a small stainless steel/ ceramic plate, a clean & dry glass bottle to store the jam.

Ingredients:

300 gms fresh strawberry

100 gms fresh mulberries

3/4 cup sugar (I added this much as it is good enough for our taste and the mulberries we’re extremely sweet. Adjust to your taste preferences and as per how sweet the berries are!)

1 tsp lemon juice

Method:

Wash the mulberries and the strawberries, pat them dry. Then hull the strawberries using a paring knife (a regular knife will also do). Remove the small stalks on each mulberry. Chop the berries  roughly and keep them in a large bowl.

Add sugar to this and mix well. Cover and set it aside for 4-5 hours. Remember to stir it once every 30 mins or so. This will macerate the mulberries and the strawberries well (help in releasing the juices).

3 ingredient strawberry jam  3 Ingredient mixed berries jam Homemade strawberry jam recipe Polkapuffs recipe No pectin strawberry jam recipe No pectin jam recipe  Mulberry jam recipe  How to make jam at home without pectin img_6822

After 4-5 hours, that’s how they should look.

Alongside, place a ceramic/ stainless steel plate in the freezer, it will be used later to check the consistency of the jam.

Heat a heavy bottomed pan, add the mulberries and the strawberries with all their juices to the pan, stir continuously until they come a rolling boil, this will take about 6-7 mins. Using a potato masher, mash the mulberries and the strawberries well and continue to stir. Cook for another 10 mins. Add the lemon juice at this stage (lemon juice is added to give a nice gloss to the jam). Let it cook & allow the juices to reduce for a few mins, but ensure you stir it constantly.

3 ingredient strawberry jam 3 Ingredient mixed berries jam Homemade strawberry jam recipe Polkapuffs recipe No pectin strawberry jam recipe No pectin jam recipe Mulberry jam recipe How to make jam at home without pectinimg_6824img_6825

Once the jam looks thick and gooey, keeping the flame on, drop some on the chilled plate and wait for 30 secs to let it set. Then draw a line in between, if the lines do not spread into each other, it means that the jam is ready & you can turn off the gas.

If not, then cook it for another 5-7 mins and repeat this step with another chilled plate.

3 ingredient strawberry jam 3 Ingredient mixed berries jam Homemade strawberry jam recipe Polkapuffs recipe No pectin strawberry jam recipe No pectin jam recipe Mulberry jam recipe How to make jam at home without pectinimg_6827

Cool the cooked jam thoroughly and store it a clean & dry glass bottle/ jar. Always use a dry spoon to remove the jam. Store this in the refrigerator and it should last for over 6 months ☺️

3 ingredient strawberry jam 3 Ingredient mixed berries jam Homemade strawberry jam recipe Polkapuffs recipe No pectin strawberry jam recipe No pectin jam recipe Mulberry jam recipe How to make jam at home without pectin

I even add some this jam to bowl of warm custard and it tastes delicious…a dessert without effort 😍😍😍

Love,

ShreyaπŸ’

Adai with Tomato Onion Chutney | Indian Lentil Crepes with Tomato Onion Dip

Breakfasts are an important meal in our home, something fresh, filling and delicious is a must. But for me it’s more important to serve a healthy breakfast for my hubby and myself. We particularly do not enjoy a bread and butter kind of breakfast on a regular basis. We have similar preferences when it comes to food…and like to have something warm for breakfast and definitelyΒ not out of a box!Β 

Today, I am sharing the recipe of Adai (mixed lentil dosa), a popular breakfast variety in South Indian Cuisine which is gluten free and vegan too.Β 

How to make adai dosa Recipe for no fermentation dosa Multi dal dosa Multi gain dosa recipe No ferment dosa recipe Polkapuffs recipe Tomato onion chutney for dosa idli Shreya tiwari blog recipes Instant dosa recipe

These crepes or Adai are very crisp and flavoursome as opposed to a plain dosa (South Indian crepe). They are very healthy as they are made using various lentils along with rice and some more spices.

How to make adai dosa Recipe for no fermentation dosa Multi dal dosa Multi gain dosa recipe No ferment dosa recipe Polkapuffs recipe Tomato onion chutney for dosa idli Shreya tiwari blog recipes Instant dosa recipeimg_5893

img_5894

The best part about making Adai is that, one need not have to spend hours prepping it. It can made in about under 4 hours from start to finish. However, as I make it for breakfast, I keep the batter ready the previous night itself and that does make the batter more workable and the end results are always very good. But that is not important, you can soak everything together for about 2 hours, grind and start making the Adai immediately without giving the batter any time to ferment.

How to make adai dosa Recipe for no fermentation dosa Multi dal dosa Multi gain dosa recipe No ferment dosa recipe Polkapuffs recipe Tomato onion chutney for dosa idli Shreya tiwari blog recipes Instant dosa recipe

See the texture, it is so crisp as the ratio that have kept has more rice as compared to the lentils! I have always enjoyed them even as a kid when my Mom would make these on weekends….a welcome change from our typical North Indian fare I’d say! That still holds true in my home, making these on weekends is very convenient and makes for a yummy brunch….along with the spicy tomato onion chutney (my take on this popular dip from the South Indian Cuisine).

How to make adai dosa Recipe for no fermentation dosa Multi dal dosa Multi gain dosa recipe No ferment dosa recipe Polkapuffs recipe Tomato onion chutney for dosa idli Shreya tiwari blog recipes Instant dosa recipe

These are packed with protein and that keeps you full for a long time..it’s a complete meal in itself as it has rice and lentils. Pack these for your kids lunch boxes too!

Let’s make these then….

Yield: 6 Adai

Equipment: a dosa tawa, a spatula, a blender, measuring cups/ spoons.

Ingredients for the Adai:

1 cup rice

1 tbsp chana dal (split chick pea lentils)

1 tbsp dhuli moong dal (split small yellow lentils)

1 tbsp dhuli urad dal (split white lentils)

1 tbsp toor dal (split pigeon peas)

2-3 nos. dried red chillies

10-12 nos. curry leaves

1 tsp jeera seeds(cumin seeds)

5-6 nos. peppercorns (akkhi kali mirch)

2″ piece ginger

salt to taste

oil as needed

water as needed

Method:

Wash the rice and the lentils together. Soak them together in 3-4 cups of water for two or three hours at room temperature. In the same bowl, along with the lentils and rice, also soak the red chillies, curry leaves and peppercorns too.

Once these have soaked well for two-three hours, grind them to a smooth paste with salt, jeera and ginger using about 1/2 cup of water. Adjust the consistency of the batter with more water if required. (The consistency of the batter needs to a little thinner in comparison to that of a a regular dosa batter). Also, adjust the seasoning now. Remove the batter in a bowl, cover it and set it aside for 5 mins before making the Adai.

Now heat a dosa pan, once hot enough, spread some oil and wipe it off with a kitchen tissue paper. Pour a ladleful of the batter onto the hot pan. Drizzle some oil around the Adai and let it cook on low flame for 4-5 mins. This takes a longer to cook and crisp up and colour too.

How to make adai dosa Recipe for no fermentation dosa Multi dal dosa Multi gain dosa recipe No ferment dosa recipe Polkapuffs recipe Tomato onion chutney for dosa idli Shreya tiwari blog recipes Instant dosa recipe

Flip it over and cook for another minute or two. That’s it, done and ready to serve!

Ingredients for the Chutney: (for a small bowlful)

2 nos. medium sized onion, sliced

2 nos. medium sized tomato, cubed

3 nos. dry red chillies

2 tsp oil

10-12 nos. curry leaves

salt to taste

a pinch of hing (asafoetida)

2 tsp dalia (split roasted lentils)

water as needed

Method:

Heat oil in a pan, once it’s hit, turn the flame at it’s lowest setting, then add hing, sliced onions, red chillies and curry leaves. Let the onions turn translucent, then season with salt and add the tomatoes and dalia. Stir well and let the tomatoes turn mushy and the oil seperate from the mixture. Turn off the flame, let the cooked mixture cool down.

Then grind the mixture using very little water to make a coarse Chutney. It’s ready. You can temper it if you like. I always do…. this is how – heat 1 tbsp of oil in a pan, add 1/4 tsp split urad dal, 1/4 tsp mustard seeds (rai) and 5-6 nos. curry leaves into the oil and let them splatter for a minute. Turn off the flame and add it to the Chutney. Mix it well and enjoy with the Adai 😊

The batter for Adai stays good in the refrigerator for 2 days. The Chutney stays good in the refrigerator in a glass or porcelain jar for 3-4 days if tempered. It lasts for 2 days if not tempered.

How to make adai dosa Recipe for no fermentation dosa Multi dal dosa Multi gain dosa recipe No ferment dosa recipe Polkapuffs recipe Tomato onion chutney for dosa idli Shreya tiwari blog recipes Instant dosa recipe

A plate looking that healthy and fulfilling is definitelyΒ a welcome sight!

You can also try Rawa Dosa recipe (includes the recipe for green coconut Chutney).

Try my recipe for Sambhar here.

Love,

ShreyaπŸ’•


Bharwa Hari Mirch | Spicy Stuffed Green Chillies | GF vegan recipe

So, now that Diwali is done and dusted with…and having gorged on like a ton of sweets and chocolates..I don’t think I will be having anything sweet for a while!! Lol! My otherwise sweet and ‘meetha’ loving hubby too agrees with me on thisπŸ˜‚ Now that’s a serious relief for at least a few days…no more worrying about dessert every night! He will be wanting light, non greasyΒ but spicy food…as will I!!!!!!Β 

Bharwa hari mirch recipe How to make instant Bharwa hari mirch Polkapuffs recipe

So coming to today’s recipe…Bharwa Hari Mirch. This can be made in so many different ways, some are stuffed with spicy potato filling, coated with gram flour mixture and then deep fried or baked (baking them is the latest fad to keep things healthy, but for me it tastes no where close to the authentic version). Some recipes call for a sweet and spicy filling of lentils as a filling and then they are later shallow fried in the pan until the green chillies char a bit on the outside! Wow…all of them are absolutely yum and bring a balance of flavours to any platter.

There is another version of these stuffed Hari Mirch which I will be sharing soon…😍

Bharwa hari mirch recipe How to make instant Bharwa hari mirch Polkapuffs recipe

These, as you can see aren’t filled with anything even remotely complicated. I think Diwali prepping took care of that for a whileπŸ˜‚….these are filled…and generously at that, with the most basic spice mix that one can find in any pantry and they are my Mom’s signature instant Bharwa Mirchi. I can assure you that these will get you hooked! They have the correct balance of tang and heat…nothing sweet! I mean, you can add some sugar to the filling but that won’t be as delicious as having them in their original avatar! Besides, these are a must make during winters…when instant pickles are enjoyed with parathasdal Chawal or practically any meal. …yummm!

Anyways, for these I have used organic green chillies, the thick variety, easily available with the onset of winters. They were pretty hot but I let the seeds stay intact. You can discard them if you feel they will be too much handle. Let’s make them, shall we?!

Yield: serves 3-4

Equipment: a kitchen towel, a pointed knife, measuring spoons, a skillet, a clean and dry glass/porcelain jar to store them.

Ingredients:

10-12 organic green chillies (the thicker variety which is usually available during winters)

2 tsp amchur powder Β (dry mango)

salt to taste

a pinch of asafoetida (hing)

3-4 tbsp refined oil

Method:

Wash the whole chillies under running water but carefully as we don’t want to loose the stems.

Wipe them dry. Let them air dry as well for 15-20 mins. They must be absolutely free of any moisture.

Tip: These chillies are usually medium hot. Therefore, I always let the seeds stay intact. However, if they are very hot or you cannot handle the heat, feel free to de-seed them after they ha eΒ dried completely.

To make the incision, keep the chillies straight on a board or hold them and using a pointed knife, cut them down the centre from the top to the bottom edge, carefully not to split them as you do so. See the picture below.

Bharwa hari mirch recipe How to make instant Bharwa hari mirch Polkapuffs recipe

For the filling: Mix together amchur powder, salt and asafoetida in a bowl.

To stuff: Using a spoon fill each chilly with generous quantities of the filling mix but ensure that the stem and the entire chilly stays intact as you stuff them.

Heat oil in a skillet, once it’s hot, add the stuffed chillies and toss them in the oil for about 8-10 mins. They will shrink as they cook and the filling will ooze out in places. That’s it, remove them from the skillet and serve them hot or cold with your meal. These keep well in the refrigerator for upto a week in a glass or porcelain jar.

Pair them up with my Benarasi Samosas for that lip smacking evening snack!

Bharwa hari mirch recipe How to make instant Bharwa hari mirch Polkapuffs recipe

Do try these soon…

Love,

ShreyaπŸ’–

Eggless cinnamon sugar pumpkin muffins Polkapuffs recipe Eggless vegan muffins

Eggless Cinnamon Sugar Pumpkin Muffins

Love baking…absolutely love it 😍 so little to do and so much to enjoy!! And I can assure you that you’ll love these vegan, eggless and wholewheat muffins! They are so healthy too asΒ they have been sweetened with honey πŸ™‚ and areΒ super moist as they have pumpkin! Sounds delicious!? Wait till I get to the last bit….

img_5423

The last and final flourish to these beauties comes from the cinnamon sugar dusting 😍..oh so yum! Do I have you with me so far…!?

So the last 10 days have been going on with too many activities around me…assignments kept me on my toes, Navratri celebrations and the cooking were being juggled with the blog posts alongside…Dusshera was spent with much gusto…πŸ€— And not to forget the calories that we inhaled during all thisπŸ˜„ And if that wasn’t enough….with my birthday just gone a couple of days ago…it was the breaking point of heavy food..sweets..binge eating!! So much so..that I didn’t bake a thing for my own birthday…lol! Hubby was expecting another batch of my gooey Brownie Muffins but I was just not in the mood!

img_5426

So this was something I’d been eyeing on Pinterest and I conveniently had about a large chunk of pumpkin in my refrigerator…. my own little early Hallowe’en cum late birthday treatπŸ˜„

img_5409

These were comforting and warm…I had two of them at a go!! Hubby too approved these…says they are a welcome change to the usual flavours πŸ˜„

Let’s get your oven going…

Yield: 8 muffins

Equipment: 2 mixing bowl, muffin tray, muffin liners, measuring cups/ spoons, manual wired whisk, cooling rack.

Ingredients:

109 grams or Β approx 3/4 cup + 2 tbsp Wholewheat flour (I used Aashirwaad Select Atta or you can use APF too)

1+1/2 tsp baking powder

1/4 tsp salt

3/4 tsp cinnamon powder

1/4 cup vegetable oil

1/2 cup + 2 tbsp honey or more as per taste

183 gms fresh pumpkin purΓ©e (see detailed method below)

For the cinnamon sugar coating:

3-4 tbsp icing sugar

3/4 tsp cinnamon powder

Method:

Preheat the oven at 160’c for 10 mins. (Please note that every oven works differently and you must adjust it accordingly)

Line the muffin tray with liners. Set it aside. (If you don’t have liners, grease the tray with oil.)

How to make the pumpkin purΓ©e:

TakeΒ fresh ripe/ orange pumpkin, wash, peel and cut into small cubes. Add 1 tbsp water to it and make a thick purΓ©e. Weigh it to 183 gms/ approximately 3/4 cup.

In a large mixing bowl, sift together the atta, baking pwd, salt and cinnamon pwd. Set it aside.

In another mixing bowl, whuskΒ together the oil, honey and pumpkin purΓ©e.

Now, add the dry sifted ingredients to the whisked wet ingredients. Fold everywhere together gently.

Pour the batter into each muffin liner upto 3/4 th capacity. Bake @160’c for 30 mins or until a toothpick inserted in the middle of the muffin comes out clean.Β Eggless cinnamon sugar pumpkin muffins Polkapuffs recipe Eggless vegan muffinsEggless cinnamon sugar pumpkin muffins Polkapuffs recipe Eggless vegan muffins

Once baked, set the Muffins on a cooling tray for about 15 mins.

For the the cinnamon sugar:Β 

Mix together icing sugar and cinnamon powder in a small bowl. Using a small tea strainer dust this cinnamon sugar on the muffins:) ….that’s it, they are ready! Perfect to have with some tea/ coffee or even on their own!

Eggless cinnamon sugar pumpkin muffins Polkapuffs recipe Eggless vegan muffins

Also, click here to try my delicious tea time Vanilla Sponge cake in Pressure cooker.

Love,

ShreyaπŸ’–

Adapted from texanerin baking.

Vada Pav recipe How to make vada Pav at home Vada Pav chutney Garlic chutney recipe for vada Pav Batata vada recipe Mumbai vada Pav recipe Polkapuffs recipe

Vada Pav

A typical Mumbaiiya staple….if you’ve ever been in Mumbai or lived here for as long as I have…Vada Pav will be your go-to meal on the move! It’s famous as an Indian Burger…but I don’t like calling it that…for me, it’s Aamchi Mumbai’s Vada Pav with Spicy Dry Chutney! πŸ˜ŠπŸ‘ŒπŸ˜‹πŸ˜‹

Vada Pav recipe How to make vada Pav at home Vada Pav chutney Garlic chutney recipe for vada Pav Batata vada recipe Mumbai vada Pav recipe Polkapuffs recipe

It brings a smile on my face each time I have had one! Ever since schooling days…till date, it’s happens to be one of my absolute favourites! And the best part is…my hubby loves it too! πŸ˜€ So, that way I can even make some at home whenever I like…and he enjoys it just as much😎..almost every Mumbaikar knows how to make these at home! It’s too easy😜

Vada Pav recipe How to make vada Pav at home Vada Pav chutney Garlic chutney recipe for vada Pav Batata vada recipe Mumbai vada Pav recipe Polkapuffs recipe

This spicy..dry garlic chutney is a must with Vada Pav along with fried green chillies! And making this chutney at home barely takes 5 mins! The Pav that you see here is store bought…..what do you expect from me?!! 😬😬

Vada Pav recipe How to make vada Pav at home Vada Pav chutney Garlic chutney recipe for vada Pav Batata vada recipe Mumbai vada Pav recipe Polkapuffs recipe

Doesn’t that look deliciously inviting! Spicy potato mash coated with a light batter…deep fried until crispy, served between soft Pav with some chutney….I could live on this stuffπŸ‘ŒπŸ‘Œ

Let’s get cooking…

Yield: 7-8 vadas

Equipment: a wok, a coulpe of mixing bowl, a slotted spoon, measuring cups/ spoons, a blender.

Ingredients:

For the Vada:

5 nos. large, boiled & mashed potatoes

2 tbsp oil

3 tbsp on ginger-garlic-green chilli paste

7-8 nos curry leaves

1/2 tsp mustard seeds

1/4 tsp asafoetida (hing)

1 tsp lemon juice

1/2 tsp turmeric pwd

salt to taste

For the batter:

1 cup Besan (gram flour)

water as needed

1/4 tsp baking soda

salt to taste

oil to deep fry

Method:

To start with the vada, heat oil in a wok, add hing, mustard seeds, curry leaves. Once they crackle, add ginger-garlic-green chilli paste. SautΓ© for 2 mins, then add the lemon juice, turmeric pwd & salt to taste. Stir and add the mashed potatoes. Mix everything well. That’s it. Set it aside to cool. Once it’s cool enough, make equal sized balls and set them aside.

Vada Pav recipe How to make vada Pav at home Vada Pav chutney Garlic chutney recipe for vada Pav Batata vada recipe Mumbai vada Pav recipe Polkapuffs recipe

Now, to get the batter ready, mix salt & besan with some water and make smooth, thick batter. Add the soda too and mix again. The consistency should be thick so that it coats the potato balls.

To fry them, heat enough oil in a wok, once it’s hot enough, reduce the flame to medium. Now, dip each potato ball in the batter and coat it well all over and drop it in the oil. You can drop 2-3 balls at one go, fry them until golden and crispy on all sides. Drain on kitchen paper. The vadas are done.

For the chutney:

2 tbsp red chilli pwd

9-10 cloves of garlic

4 tbsp dedicated coconut pwd

2 tbsp raita boondi

salt to taste

2 tbsp oil

Method:

Grind all the ingredients except the oil in a blender to a coarse texture. Now, heat oil and sautΓ© the ground mixture for 3-4 mins. That’s it. The chutney is ready too.

Vada Pav recipe How to make vada Pav at home Vada Pav chutney Garlic chutney recipe for vada Pav Batata vada recipe Mumbai vada Pav recipe Polkapuffs recipe

To assemble:

Take a Pav, slit it in half and sprinkle some dry chutney and place a Vada in between & press it down…enjoy with some fried green chillies! πŸ˜ŠπŸ‘Œ

Vada Pav recipe How to make vada Pav at home Vada Pav chutney Garlic chutney recipe for vada Pav Batata vada recipe Mumbai vada Pav recipe Polkapuffs recipe

Grab one…you’ll be hookedπŸ˜‰

Love,

ShreyaπŸ’“

Recipe of the chutney is Adapted from Sanjeev Kapoor.Β 

How to make schezwan sauce Homemade schezwan sauce recipe Easy schezwan sauce recipe Indo Chinese recipes Polkapuffs Polkapuffs recipe

Homemade Schezwan Sauce

We Indians love our Indo-Chinese cuisines to the hilt! 😜 I am no different….I am crazy for the all of them…😊

And Schezwan Sauce happens to be my favourite…ever since I first tasted it as a dip along with some Spring Rolls long back! I just fell in love with the fiery, tangy and the mild sweetness all at once!

How to make schezwan sauce Homemade schezwan sauce recipe Easy schezwan sauce recipe Indo Chinese recipes Polkapuffs Polkapuffs recipe

I even started buying this sauce by a popular brand…however it was obviously full of synthetic preservatives & added colours. So not exactly the healthiest option. So I looked up a few recipes & found one which was perfect. It tastes fiery and absolutely lip-smacking! πŸ˜¬πŸ˜¬πŸ˜‰

*Please note that I have used fresh red chillies as they are in season now. However, you can use dried chillies, just soak them in warm water for 1 hour & de-seed if you wish to reduce the heat. Then, continue with this recipe.

*We don’t like a very chunky texture hence, I grind the ginger & garlic with the chillies. You can cook them with the onions.

Let’s start the recipe..

Yield: approx 400 gms

Equipment: a wok, a ladle, measuring cups/ spoons.

Ingredients:

200 gms chopped fresh red chillies (de-seed if needed)

1/4 cup chopped garlic

1/4 cup chopped ginger

5 tbsp oil

6 tbsp vinegar (I used Apple Cider vinegar, you can use any variety but avoid balsamic or a darker vinegar)

4 tbsp soy sauce (I used light soy)

2 tbsp ketchup (add more if you like it sweeter)

1/2 cup finely chopped onion

1 tsp cornstarch/ cornflour

salt to taste

Method:

Grind together chopped chillies, ginger & garlic using 2 tbsp of vinegar to a smooth paste. Set it aside.

How to make schezwan sauce Homemade schezwan sauce recipe Easy schezwan sauce recipe Indo Chinese recipes Polkapuffs Polkapuffs recipe

Then, heat oil in the wok and sautΓ© the onions until translucent. Next add the paste you have kept aside. Cook for 5-8 mins on low flame. Season with salt, add the remaining vinegar & the sauces too. Mix well. Then dilute cornstarch/ cornflour with 2 tbsp water & add it to the simmering sauce, keep stirring continuously for a few mins. Let the sauce again simmer for about 5 mins. That’s it…turn off the heat and cool completely before storing in glass/ porcelain bottles.

It stays well in the refrigerator for at least 2 weeks although I have stored it for almost 45 days with no change in flavour & colour.

Serve it with any & every snacks 😜

How to make schezwan sauce Homemade schezwan sauce recipe Easy schezwan sauce recipe Indo Chinese recipes Polkapuffs Polkapuffs recipe

Try this today…I promise, you won’t be buying this anymore! πŸ˜‰

Love,

Shreya❀️

Adapted fromΒ Sharmis PassionsΒ & Khana Khazana

Aromatic Garam Masala – North Indian All Spice Mix.

"Something smells good ..what's cooking today?"Β 

I hear this so often when Mr. PP walks into our home after work.. He always knows what’s smelling good but loves asking me the menu for dinner! 😬

Not that there’s some sort of feast being cooked by me for we prefer light, healthy and traditional North Indian fare for most days. And I keep it elaborate on Friday nights &/or Saturdays too… πŸ‘Œ Sundays are all about brunches & breakfasts for dinner!!! Ya, we do that a lot, and eat out to try some of the new eateries…or revisit our old haunts. It’s a welcome change 😜

Anyways, what does smell good is a basic stir-fry of cauliflower & peas or a simple dal tadka…reason being my special Garam Masala Mix (North Indian Style All Spice Mix).

image

It’s my mom’s recipe..and I haven’t changed a thing. I make it every month, just enough so that it lasts for about a month or so and make a fresh batch again. That way I know it’s going to taste fresh and aromatic! πŸ™ŒπŸ™Œ

image

I add the spice to mix to most of the traditional, North Indian food that I prepare on daily basis and trust me, the aromas are so earthy and heady…I can smell them around the entire house!

As a kid, I hated it when my mom added the Garam Masala to any of the curries /veggies. LOL! I didn’t mind the whole spices as I could pick those out of my food. I grew fond of it’s flavours very late in life 😝

image

I actually smile to myself each and every time I am making this spice mix..πŸ˜€

Anyways, I guess you would pretty much know the ingredients that go into making this Masala, however they could be some ingredients which you would not be well acquainted with as the Garam Masala made in every household is slightly different with the basic flavour being the same.. So here comes the recipe. πŸ˜‹

Yield: Approximately 50 gms

Equipments: A large skillet, measuring cups / spoons, a heavy duty dry blender (most homes have this, a basic mixie), a clean dry jar (preferably a glass jar, as spices keep better in these).

Ingredients:

1 tbs each of Jeera seeds (cumin), Dagadphool (black stone flower)

8-9 nos dry whole red chillies

1/2 tbs each of Akkhi Kali Mirch (black pepper corns), Shahi Jeera seeds (black cumin seeds)

9-10 nos. each of Laung (Cloves), Chotti Elaichi (green cardamom)

3-4 nos. Badi Elaichi (black cardamom)

1 no. 3″ piece Dalcheeni (cinnamon stick)

5-6 nos. Tej Patta (bay leaves)

1 no. Javitri Phool (mace flower)

1-2 pinches Jaiphal pwd (nutmeg pwd)

1 no. Anasphal (star anise)

Method:

Heat a skillet on low – medium heat for a couple of mins. Add all the. Above ingredients to this hot skillet and dry roast them for 4-5 mins, making sure that they don’t burn or change colour. Use a spoon to move around these whole spices to ensure the heat gets distributed evenly. Turn off the heat and remove these now warm whole spices in a bowl to cool a bit. Once they are cool enough to touch, put everything into the blender jar, and dry grind them to a fine powder or a slightly coarse powder, the choice is yours! πŸ˜‹ I keep mine slightly coarse.

Store this masala / spice mix in a clean, dry glass jar, preferably in the freezer (it’s humid in Mumbai so I keep mine in the freezer along with any other spice mix / masalas). They will be fresh and last for almost 2-3 months.

image

Hope you will try this recipe and savour it’s rustic flavours!

Love,

Shreya ☺️