Tutti Frutti ice cream recipe Eggless no cook no Churn Tutti Frutti ice cream Polkapuffs Shreya tiwari photography

Eggless No Cook No Churn Tutti Frutti Ice Cream

Hey all….yes..I have been a bit out of it lately…blame the summers..! Yes, please do blame the summers…so that you have an excellent excuse to make yourself some creamy….dreamy ice cream 😍

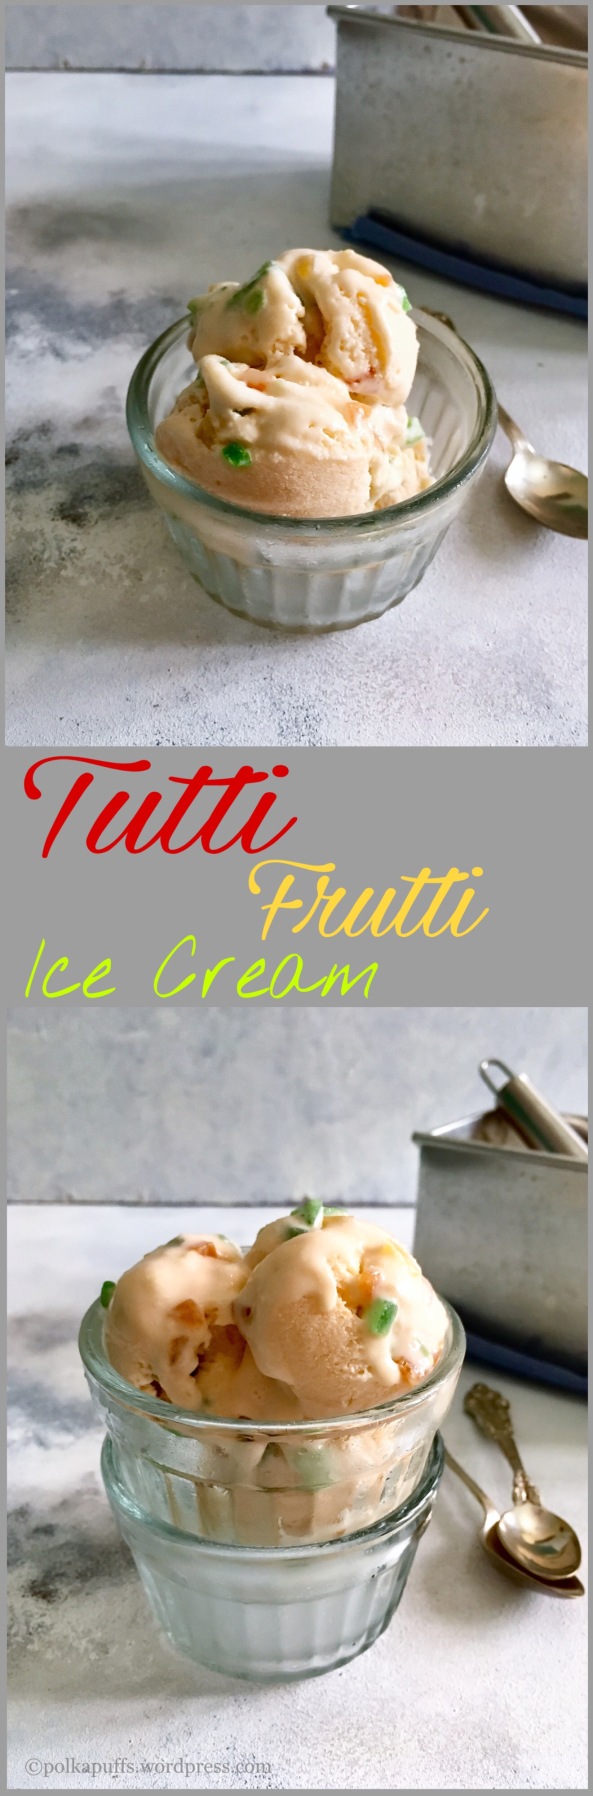
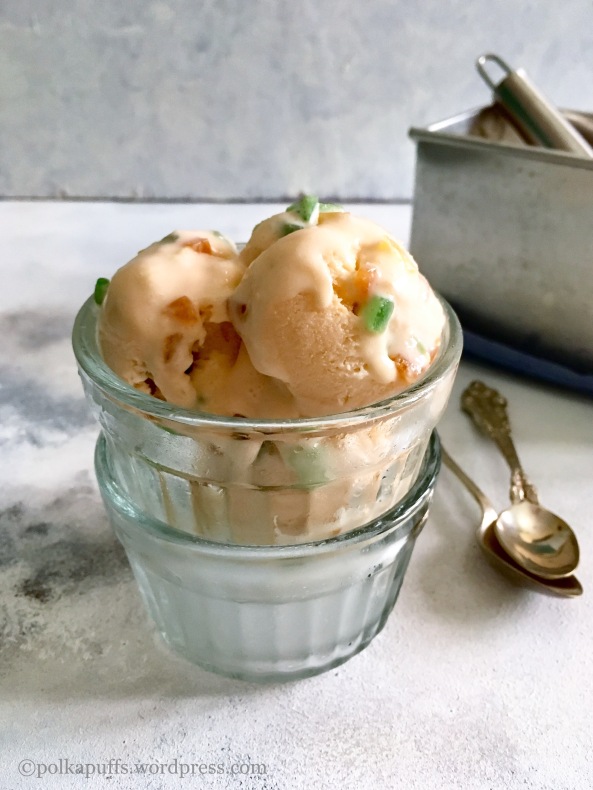
My No Churn, No Cook and egg free Tutti Frutti Ice Cream 🤗🤗 should cool you down I guess….it certainly did cool us down…scoop after scoop were polished off this last weekend and I have been ordered by my man to make some more ice cream ASAP! I will indulge him😘 I always do…..

Tutti Frutti ice cream recipe Eggless no cook no Churn Tutti Frutti ice cream Polkapuffs Shreya tiwari photography

I prefer ice creams rarely…more of a Popsicle girl..(see my Fruity Volcano Popsicle here …you’ll love it!). But when I do make an ice cream…I make a mean one! It’s always on point! 👌🏼😉 I love ice creams that need no churning machines and fancy equipment….and definitely no fancy ingredients! They need to be simple, easy to put together and they must taste better than the ones at your favourite ice cream place..!

This Tutti Frutti ice cream checks all the right boxes and is big on flavour!! 💃🏻It’s slightly citrusy…..that’s my version. You can go with the classic vanilla flavour or even almond extract would go beautifully. There are infinite options…if you like, add some cardamom flavour or even a bit of saffron (Kesar).

Tutti Frutti ice cream recipe Eggless no cook no Churn Tutti Frutti ice cream Polkapuffs Shreya tiwari photography

Coming to how to get that beautiful texture which is so creamy and yet has a firmness…. we come across many recipes which are no-cook, no-egg and no-churn but many of these recipes are complicated or call for some preservatives too. I won’t advocate such recipes…I like the idea of making ice cream only because it can be done without any CMC or GMS powders. These are obviously exceptional ingredients to ensure a good textured ice cream, but the challenge lies in making home made ice cream without any of these.

I have used very basic ingredients which are easily available and since it doesn’t need any machine to churn the mixture, a simple wired whisk or an electric whisk can do the magic!

Lets make some ice cream.

Yield: serves 4 (about 8-9 medium sized scoops)

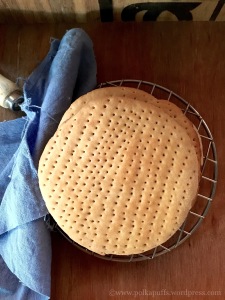
Equipment: electric whisk (wired whisk will do too), an aluminium tin to set the ice cream, a large stainless steel bowl to whisk the ingredients, measuring cups/ spoons, aluminium foil, rubber spatula.

Ingredients:

400 ml condensed milk (I used Amul Mithai Mate tin)

1+1/2 cup chilled heavy whipping cream (Amul red tetra packet)

1/4 cup dairy whitener (milk powder)

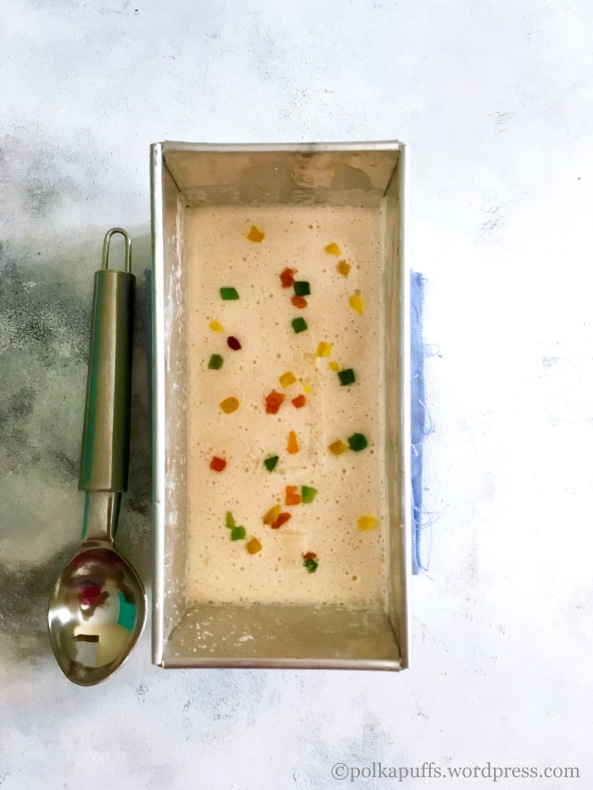
1/2 cup mixed Tutti Frutti bits

4-5 drops orange gel colour (or even liquid)

1/4 tsp fresh lemon zest

Method:

Place the the wired whisk or the whisk attachment of the electric whisk along with the stainless steel mixing bowl in the refrigerator for about 30 minutes an hour for them to chill.

In the chilled bowl, take the chilled whipping cream, whisk it for 4-5 minutes using the electric whisk until the cream has soft peaks. It will take about 10-12 minutes manually.

Next add the milk powder and whisk again until it is fully incorporated. Now, pour the condensed milk into the whipped cream and using a rubber spatula, gently fold the condensed milk into the whipped cream. Add the lemon zest next. If you are using the colour, add that colour and the tutti frutti bits. Mix everything gently so the the air incorporated into the cream doesn’t escape.

Pour the the mixture into the tin and cover the tin with some aluminium foil. Set it in the freezer for about 2 hours, it will be partially set by then. Remove from the freezer after 2 hours, remove the partially set ice cream in another chilled stainless steel bowl and whisk it again for 2-3 minutes. Pour the mixture back into the tin and cover it again with the foil. Freeze the mixture for 6-7 hours.

To serve, keep the ice cream in room temperature for 10 minutes before scooping it into bowls and devouring it😉

Tip: I have used the lemon zest to cut the sweetness, the ice cream does taste very mildly citrusy. You can omit the colour or choose any other colour.

Hope you try it out soon…you’ll be revisiting this recipe often which is adapted from my Mango Tutti Frutti ice cream which I had shared last year.

Love,

Shreya❤️

Tutti Frutti ice cream recipe


Spicy Arrabbiata Sauce – Glutenfree and Vegan

It’s always better to have a go to pasta sauce recipe…this one here, happens to be mine😊 Especially during these hot summers days….when cooking up a storm isn’t exactly someone’s dream…having this ready in the refrigerator or the freezer can be a lifesaver! 😄

Spicy Arrabbiata Sauce - Glutenfree and Vegan Recipe for easy arrabbiata sauce Italian arrabbiata sauce recipe Polkapuffs recipes Shreya tiwari food photography Macro I in arrabbiata sauce Glutenfree recipe for arrabbiata sauce Vegan arrabbiata sauce

There are days when I go through the entire ritual of sautéing some exotic veggies like some American sweet corn, broccoli, some snow peas and a bit of bell pepper along with some crushed garlic to go with my pasta…and then are days when all I want to do is dump the sauce with some boiled pasta and give it a quick stir and I serve it without any fancy-shmancy garnishing…just a bit of grated cheese and I am all sorted🤗

And hence, happens my quick macaroni with some spicy, vegan-Glutenfree arrabbiata sauce! Just like that….and obviously it’s one of my favourite meals👌🏼😍

Spicy Arrabbiata Sauce - Glutenfree and Vegan Recipe for easy arrabbiata sauce Italian arrabbiata sauce recipe Polkapuffs recipes Shreya tiwari food photography Macro I in arrabbiata sauce Glutenfree recipe for arrabbiata sauce Vegan arrabbiata sauce

This sauce can also be used for topping up your bruschetta along with some slices of olives or just some crumbled feta cheese…..some capers, if like little bursts of salty..briny flavours….see..I have given you some ideas for your next girls’ night in…or if you’re a dude reading this here…make a bruschetta platter for your buddies as you watch the latest season of IPL ’17….or impress a lady friend with your sauve kitchen moves😉

I use this sauce for my chip-n-dip platters on movie nights with my fella…it’s healthy and definitely delicious! Follow this easy recipe for some healthy Wholewheat crackers to go with this sauce.

**Coming to how you would go about storing this sauce. I make a slightly larger batch and refrigerate it and it stays fresh for almost 10-12 days. I don’t add salt while this sauce especially when the purpose is to store it. To freeze, simply cool the sauce and pack them in small ziplock pouches and freeze them. The freezer sauce needs to be thawed at room temperature for about an hour before using it. Always remember to season it using the stored sauce. When making the sauce for immediate consumption, then do add salt as per taste.

Now, on to the recipe….

Yield: serves 2-3 persons

Equipment: a heavy bottomed saucepan, measuring cups/ spoons, a ladle, hand blender.

Ingredients:

3 cups blanched and roughly chopped tomatoes (choose ripe tomatoes)

3/4 cup finely chopped onions

salt to taste (I used sea salt)

freshly cracked black pepper to taste

4 tbsp olive oil

3-4 cloves of garlic, crushed

a few fresh basil leaves (or use dried)

2 tsp chilli flakes

1 tsp dried oregano

1/2 tsp dried rosemary

some warm water if needed to correct the consistency

Method:

Heat oil in the pan, once it is hot enough, add crushed garlic and onions. Sweat these until the onions turn translucent and the garlic turns a bit golden. Then go in the roughly chopped chopped blanched tomatoes.

Keep the flame on low, season with salt, chilli flakes, cracked black pepper, rosemary and oregano. Keep stirring these together for a few minutes to ensure the flavours blend well. Add some warm water at this stage to correct the consistency (I added about 3/4 cup), mix well and cover with a lid and let the sauce cook for about 10 mins on low flame.

Open the lid after 10 minutes, the sauce should be done by now. Turn off the flame, let the sauce cool off a bit. Then using a hand blender, blend the sauce as much as you prefer. I like my sauce a bit chunky so I don’t go overboard with the blending.

If you are making a pasta dish immediately, just add this entire sauce to about 2 cups of boiled macaroni or penne and give them a good toss. Garnish with some finely chopped fresh basil leaves and some grated cheese!

**scroll above to read about how to store this sauce.

Spicy Arrabbiata Sauce - Glutenfree and Vegan Recipe for easy arrabbiata sauce Italian arrabbiata sauce recipe Polkapuffs recipes Shreya tiwari food photography Macro I in arrabbiata sauce Glutenfree recipe for arrabbiata sauce Vegan arrabbiata sauce

Do try this sauce soon…you know what? This even works as a great pizza sauce😉😉

Love,

Shreya💖

Spicy Arrabbiata Sauce Glutenfree and Vegan


3 Ingredients Mixed Berries Jam | No Pectin Jam Recipe | Berry Jam Recipe

It’s the ‘very berry’ season in my home!! I am literally swamped with berries of late! I am having strawberries and mulberries for breakfast, lunch…dinner and then some for desserts 😁 and I am loving them! They are so juicy and the colour…oh my.. I have an almost permanent purple stain on my lips because of the mulberries 😂😂 but I can’t seem to stop popping them each time I walk past the dining table…and I am never short of excuses to be ‘walking past’!! LoL!

3 ingredient strawberry jam 3 Ingredient mixed berries jam Homemade strawberry jam recipe Polkapuffs recipe No pectin strawberry jam recipe No pectin jam recipe Mulberry jam recipe How to make jam at home without pectin

I mean, look at them beauties…can keep your hands off?! Specially the mulberries….this is just the third, maybe the fourth time in my entire 29 years of existence that I could lay my hands on them…probably I couldn’t have paid much attention to them around me…but this year has been different…I can see them everywhere..beautiful, organic and absolutely delicious! Just as yummy as the juicy red strawberries.

3 ingredient strawberry jam  3 Ingredient mixed berries jam Homemade strawberry jam recipe Polkapuffs recipe No pectin strawberry jam recipe No pectin jam recipe  Mulberry jam recipe  How to make jam at home without pectin

I will share some health benefits of various berries here……I have read a lot about them online and because I prefer eating seasonal produce, I strongly recommend that one must have them but obviously you must consult doctors whenever necessary.

Strawberries:

Improves immune system.

Reduces the chance of contracting eye related ailments and issues.

Helps maintains a healthy heart by keeping Blood Pressure in check.

Reduces risk of of gout, cancer and arthritis.

Reduces cholesterol.

Great anti-oxidant and helps maintain great skin, hair and overall health.

Studies say that one bowl of strawberries a d is just about 50 calories!

Mulberry (Shahtoot): 

Cures certain diseases.

Cures cancer.

Prevents blood clots and heart stroke.

Cleanses blood.

Prevents seasonal cold and flu.

Strengthens kidney and helps cleanse liver.

Keeps blood sugar in check.

3 ingredient strawberry jam  3 Ingredient mixed berries jam Homemade strawberry jam recipe Polkapuffs recipe No pectin strawberry jam recipe No pectin jam recipe  Mulberry jam recipe  How to make jam at home without pectin

So coming to what I did with these berries besides chomping on them was jamming! I made Strawberry Jam last year, it was super delicious and absolutely lip-smacking! I made another batch within a month because I almost didn’t want it to ever get over 😋

So this time around, I wanted to use both the berries in the jam and that’s exactly what I have done! Look at the jam…it’s so beautifully coloured…and has little chunks of strawberries and mulberries 😍…perfect on a slice of fresh homemade sandwich bread!…..yummmm!

3 ingredient strawberry jam  3 Ingredient mixed berries jam Homemade strawberry jam recipe Polkapuffs recipe No pectin strawberry jam recipe No pectin jam recipe  Mulberry jam recipe  How to make jam at home without pectin

Since I am not tea/ coffee person, I prefer a light lemon tea with a ton of sugar…literally 😂😂 and a couple of slices of bread with my homemade jam slathered all over ….pure bliss!

3 ingredient strawberry jam  3 Ingredient mixed berries jam Homemade strawberry jam recipe Polkapuffs recipe No pectin strawberry jam recipe No pectin jam recipe  Mulberry jam recipe  How to make jam at home without pectin

Let’s make some jam….

Yield: Approx 200 gms

Equipment: a big bowl, measuring cups/ spoons, a heavy bottomed pan, a potato masher, a small stainless steel/ ceramic plate, a clean & dry glass bottle to store the jam.

Ingredients:

300 gms fresh strawberry

100 gms fresh mulberries

3/4 cup sugar (I added this much as it is good enough for our taste and the mulberries we’re extremely sweet. Adjust to your taste preferences and as per how sweet the berries are!)

1 tsp lemon juice

Method:

Wash the mulberries and the strawberries, pat them dry. Then hull the strawberries using a paring knife (a regular knife will also do). Remove the small stalks on each mulberry. Chop the berries  roughly and keep them in a large bowl.

Add sugar to this and mix well. Cover and set it aside for 4-5 hours. Remember to stir it once every 30 mins or so. This will macerate the mulberries and the strawberries well (help in releasing the juices).

3 ingredient strawberry jam  3 Ingredient mixed berries jam Homemade strawberry jam recipe Polkapuffs recipe No pectin strawberry jam recipe No pectin jam recipe  Mulberry jam recipe  How to make jam at home without pectin img_6822

After 4-5 hours, that’s how they should look.

Alongside, place a ceramic/ stainless steel plate in the freezer, it will be used later to check the consistency of the jam.

Heat a heavy bottomed pan, add the mulberries and the strawberries with all their juices to the pan, stir continuously until they come a rolling boil, this will take about 6-7 mins. Using a potato masher, mash the mulberries and the strawberries well and continue to stir. Cook for another 10 mins. Add the lemon juice at this stage (lemon juice is added to give a nice gloss to the jam). Let it cook & allow the juices to reduce for a few mins, but ensure you stir it constantly.

3 ingredient strawberry jam 3 Ingredient mixed berries jam Homemade strawberry jam recipe Polkapuffs recipe No pectin strawberry jam recipe No pectin jam recipe Mulberry jam recipe How to make jam at home without pectinimg_6824img_6825

Once the jam looks thick and gooey, keeping the flame on, drop some on the chilled plate and wait for 30 secs to let it set. Then draw a line in between, if the lines do not spread into each other, it means that the jam is ready & you can turn off the gas.

If not, then cook it for another 5-7 mins and repeat this step with another chilled plate.

3 ingredient strawberry jam 3 Ingredient mixed berries jam Homemade strawberry jam recipe Polkapuffs recipe No pectin strawberry jam recipe No pectin jam recipe Mulberry jam recipe How to make jam at home without pectinimg_6827

Cool the cooked jam thoroughly and store it a clean & dry glass bottle/ jar. Always use a dry spoon to remove the jam. Store this in the refrigerator and it should last for over 6 months ☺️

3 ingredient strawberry jam 3 Ingredient mixed berries jam Homemade strawberry jam recipe Polkapuffs recipe No pectin strawberry jam recipe No pectin jam recipe Mulberry jam recipe How to make jam at home without pectin

I even add some this jam to bowl of warm custard and it tastes delicious…a dessert without effort 😍😍😍

Love,

Shreya💝

Chocolate-Dipped Cinnamon Biscotti

Biscotti is a traditional Italian cookie which requires the dough to be shaped as logs, baked until done, then cooled a bit, sliced and baked again until crispy and crunchy! A perfect companion to your coffee. There’s no other way to describe it except – too good! 

Yes, if I may say so myself…this recipe is a keeper. Don’t hunting for other recipes of biscotti because you won’t need one if you try this recipe☺️ This has become my go to recipe for biscotti for the past year or so…and I bake them often!

Biscotti recipe Cinnamon biscotti recipe Chocolate dipped biscotti recipe Polkapuffs recipes Christmas cookie ideas Christmas baking

You can obviously make out how crunchy these are, but definitely not in a bad way! They are crunchy and yet very enjoyable. I will point a few basics that I learnt from this recipe after failing with a couple other recipes in the past.

Essentially, eggs are the only wet ingredients that are added to any biscotti recipe but adding butter or oil can make them richer with obviously a much better texture. This recipe called for oil too but I somehow didn’t like the after taste and hence skipped it after the first trial.

Eggs, yes I have used 1 and a 1/2 egg here…don’t be surprised. I always make half of what this original recipe specifies and trust me, the 1/2 egg is very essential (I realised that too with some trial and error) so do not miss that. However, if you’ve decided to half my recipe, I am not sure how the egg factor will work out! Or probably, ping me later and I will definitely come up with a way for you to do that too ☺️ Else, just use a really small egg.

Biscotti recipe Cinnamon biscotti recipe Chocolate dipped biscotti recipe Polkapuffs recipes Christmas cookie ideas Christmas baking

When I talk about my favourite flavour in a biscotti, I will always say Cinnamon! Else, you can even keep it simple by adding adding just vanilla extract, or if you like nuts, add some sliced pistachios or almonds in the dough. However, if you’re using almonds, do toast them slightly to avoid ending up with soggy nuts. The original recipe calls for brown sugar but I have always used regular castor sugar and I am perfectly happy with the flavour! We, my hubby and I love the flavour of dark chocolate hence, I have dunked these biscottis in some melted chocolate once they had cooled off completely. 😋

Biscotti recipe Cinnamon biscotti recipe Chocolate dipped biscotti recipe Polkapuffs recipes Christmas cookie ideas Christmas baking

Making biscotti takes time, it’s the baking twice that takes time and not making its dough. Getting the dough together is a quick mixing job, then this dough needs to be shaped into logs of deliciousness and then bakedonce…and another time too!! 😉

I have added a lot of step by step pictures as always …so you’re pretty much sorted! I don’t think you’ll have a difficult time going forward with it 😊

Yield: 12 cookies

Equipment: a rolling pin, cooling rack, baking tray, a large mixing bowl, a large serrated knife, parchment paper, measuring cups/ spoons, weighing scales (I have used it to measure everything to the last gram)

Ingredients:

Biscotti recipe Cinnamon biscotti recipe  Chocolate dipped biscotti recipe Polkapuffs recipes Christmas cookie ideas Christmas baking

131 gms all purpose flour (maida)

1/4 tsp cinnamon powder

1/4 tsp salt

1/2 tsp vanilla extract

1/2 tsp baking powder

100 gms castor sugar

30 gms cold and cubed unsalted butter

2 nos. eggs (follow my tip on this)**

1 tbsp milk (for the egg wash)

30 gms dark chocolate (morde) + 1 tsp butter – for dunking

Method: (I am using step numbers, there’s a reason, so follow the steps carefully)

1. In a large bowl, whisk together the flour, cinnamon powder, salt and sugar.

2. Add cold and cubed butter into the flour and sugar mixture. Rub the butter into the flour with your fingertips until the flour mixture resembles breadcrumbs. Set it aside.

Biscotti recipe Cinnamon biscotti recipe Chocolate dipped biscotti recipe Polkapuffs recipes Christmas cookie ideas Christmas bakingimg_5861img_5862

3. Now in a small bowl, whisk one egg. Now remove half of the whisked into another bowl (Save the half whisked egg for egg wash).

Biscotti recipe Cinnamon biscotti recipe Chocolate dipped biscotti recipe Polkapuffs recipes Christmas cookie ideas Christmas baking

**Add one whole egg to the second bowl in which you have transferred half of a whisked egg. Now whisk this one and a half egg together. Add vanilla extract to the whisked eggs and whisk again.

4. Now add the whisked mixture of eggs and vanilla extract into the flour and butter. Use a large silicon spatula to mix until everything is well moistened but do not over mix.

Biscotti recipe Cinnamon biscotti recipe Chocolate dipped biscotti recipe Polkapuffs recipes Christmas cookie ideas Christmas baking

5. Now, sprinkle some flour in a large plate or the working surface. Place the dough on this floured surfaced and knead well for a few minutes. But keep enough loose flour around as this dough is super sticky so you’ll continuously need to dust the surface and your palms too.

Biscotti recipe Cinnamon biscotti recipe Chocolate dipped biscotti recipe Polkapuffs recipes Christmas cookie ideas Christmas baking

Dont worry about the dough even if it looks too sticky, it will all come together in a few minutes.

In the mean while, preheat the oven at 160’c.

6. Shape the dough as shown below and place it on a parchment lined baking tray. I had dusted the parchment paper with some flour too.

Biscotti recipe Cinnamon biscotti recipe Chocolate dipped biscotti recipe Polkapuffs recipes Christmas cookie ideas Christmas baking

7. We had set aside 1/2 a whisked egg aside, add 1 tbsp of milk to it and whisk again. Use it to Give an egg wash to the shaped dough.

8. Bake this shaped dough at 160’c for 20-25 minutes using the lower heating element. In the last 5 minutes of the baking time, turn on the upper heating elements to give a good colour to the top of the biscotti.

Leave the oven running at 140’c.

Biscotti recipe Cinnamon biscotti recipe Chocolate dipped biscotti recipe Polkapuffs recipes Christmas cookie ideas Christmas baking

9. Now, let this cool for about 15 minutes but not completely cold. Using a large serrated knife, cut it into 1.5 inch wide slices. Place them on the parchment lined baking tray as shown below.

Biscotti recipe Cinnamon biscotti recipe  Chocolate dipped biscotti recipe Polkapuffs recipes Christmas cookie ideas Christmas baking

10. Bake the sliced biscotti on the first side for 7-8 mins. Then flip them over to bake the other side for another 5 mins. Remove them from the oven and let them cool completely before enjoying these crunchy treats with your favourite cuppa! 🤗

11. If you wish to dip them in chocolate too, melt together 30 gms of dark chocolate with 1 tsp of butter over a double boiler or in a microwave. Once the biscotti has cooled completely, dip one end of each biscotti in the melted chocolate, let them dry and then they are ready to serve! You can dip the entire biscotti in chocolate too, no one will judge you 😁

Biscotti recipe Cinnamon biscotti recipe Chocolate dipped biscotti recipe Polkapuffs recipes Christmas cookie ideas Christmas baking

These stay crunchy and fresh in an airtight container for about a week or so.

These can be amazing edible gifts this Holiday Season! 🎄🎁☃️

Love,

Shreya💗

Adapted from Sally’s Baking Addiction

How to make penne pasta in lemon cream sauce Polkapuffs recipe Pasta in white sauce recipe

Penne in Basil and Lemon Cream Sauce

Pasta has to be one of my favourite comfort foods…it just lifts my mood. I can have it in any kind of sauce…or even just a basic tossed pasta salad with some olive oil and some herbs!

Besides, you can do so many variations with pasta…baked cheesy pasta with some veggies is another favourite at our place, my hubby loves it with some garlic bread💖

How to make penne pasta in lemon cream sauce Polkapuffs recipe Pasta in white sauce recipe

I particularly prefer the red sauce for any pasta…but since I also enjoy a citrusy flavour to pasta sometimes, I planned to go with my Lemon Cream sauce which is absolutely delicious for our weekend brunch, it’s a bit tangy and goes so well with penne or even spaghetti for that matter. Since the sauce is cream based, it coats the pasta well…and I chose to add some sweet corn, you can add more veggies or even boiled & shredded chicken or some sliced sausages if you wish.

Let’s begin..

Yield: serves 2

Equipment: a non-stick pan, measuring cups/ spoons.

Ingredients:

1 cup boiled penne pasta (follow the instructions on the packaging)

2 tbsp garlic butter (or regular butter)

1 tsp oil

5-6 nos. black peppercorns

1/2 cup boiled sweet corn kernels

4-5 nos. fresh basil leaves sliced

1 tbsp Maida all purpose flour)

3/4 cup milk

2 tbsp fresh cream

1/2 tsp lemon juice

salt to taste

Dried Italian herbs to taste

Method:

Heat the pan on low flame, add butter & oil. Once the butter melts into the oil, add the peppercorns. Sauté for a minute.

How to make penne pasta in lemon cream sauce Polkapuffs recipe Pasta in white sauce recipe

Then add the flour and sauté for 2-3 mins. Once the roux is ready, add milk and stir continuously to avoid lumps. Let the sauce simmer for a couple of mins while you stir it. Add the sliced basil leaves and corn kernels, season with salt and dry Italian herbs. Mix well. Turn off the flame. Let the sauce cool for a minute or two, add the cream and lemon juice. Stir well. Once again keep turn on the flame on low mode. Then add the boiled penne and toss everything together quickly. Turn off the flame. That’s it, it’s ready. You can add grated cheese on the top if you wish…I don’t. 😊

How to make penne pasta in lemon cream sauce Polkapuffs recipe Pasta in white sauce recipe

It’s a must try recipe…easy and yummy!

Love,

Shreya💝

Wholewheat Pizza Base | How to make Wholewheat Pizza Base

You like pizza, I know you do! It’s Friday night…you’re watching your favourite rom-com, you scarf down 5 slices of Pizza without pausing for a breath….and then the DOUGH hits you! Hits you hard 😶😶😶 it’s super chewy, hard and weighs you down. Not the best note to start your weekend on, right!?

We are all the same, I am just like you…love to have pizzas…watch movie marathons and hate getting off my couch on weekends! But not at the cost of feeling weighed down and missing the next two meals or so. Hence, my Wholewheat Pizza Base is perfect for satisfying all those pizza cravings in a healthy way 🤗

Wholewheat pizza base recipe Polkapuffs recipes Vegan pizza base recipe

They are extremely light, crisp on the outside, moist within and taste way better than the all purpose flour ones. And the toppings…well that’s a whole other topic! Play! Yes, simply play with the toppings…veg..non-veg..greens or just plain cheese and herbs! They all work well with this Wholewheat Pizza Base. Although, if you still feel good about a APF pizza base, click here for a detailed, step by step recipe. Also, learn to make your own homemade pizza sauce, absolutely lip smacking and the quickest recipe ever!

A few things to keep in mind when making your own Wholewheat Pizza Base..

1. Yeast – I have used Active Dry yeast. Keep in mind the manufacturing date and the expiration date. Mine is manufactured in June’16 and expires in February ’17. So that’s the window..but I won’t be using this packet after December ’16. The effectiveness of the yeast diminishes with time. So work according to the dates.

2. Wholewheat Flour – I have used Aashirwaad Select flour here. Also, I didn’t seive the flour before kneading the dough. Just measured it correctly by first fluffing the flour, then adding spoonfuls of the flour into the measuring cup and then levelling it off with a palette knife. This is very crucial, so be measure it right!

3. Hydration – Wholewheat flour based breads need slightly more hydration as opposed to the APF ones. I used olive oil and water to hydrate the dough. (You can use regular refined oil too).

Let’s get baking!

Yield: 4-5 pizza bases depending on the size and the thickness. (I made 5 bases of approximately 7″ diameter).

Equipment: a baking tray, measuring cups/ spoons, rolling board, rolling pin, a large mixing bowl, a small mixing bowl, cooling rack, a fork.

Ingredients:

2.5 cups wholewheat flour + some extra flour to dust the board while rolling the dough

125 ml warm water (you should be able to comfortably hold your finger in the water)

25-30 ml water @r.t.

3 tsp sugar

3 tsp active dry yeast

4 tbsp olive oil + 2 tsp extra to grease the dough

1.5 tsp sea salt

Method:

Activate the yeast – take 125 ml warm water and add the sugar & yeast. Mix well. Cover and set aside for 10 mins without disturbing it, to let the yeast bloom. If it doesn’t bloom, discard & start again. Don’t compromise this step.

Wholewheat pizza base recipe Polkapuffs recipes Vegan pizza base recipeWholewheat pizza base recipe Polkapuffs recipes Vegan pizza base recipe

To make the dough – take the flour in a bowl, add salt and oil. Next add all the bloomed yeast mixture in one go. Start mixing them altogether using your fingers. At first the dough will be sticky but it will come together with 3-5 mins of kneading. Add 25 ml of water and keep kneading until you have a smooth dough. The more you knead, the better the dough shall rise! Grease the dough with 2 tsp oil and knead again for a 2-3 mins. Totally, you need to knead for about 15-20 mins. Cover with a kitchen towel and place it in a warm place for 45-60 mins to rise.

Wholewheat pizza base recipe Polkapuffs recipes Vegan pizza base recipe

image

Wholewheat pizza base recipe Polkapuffs recipes Vegan pizza base recipe

After 45 mins, this is what the dough looked like post the first rise. 

Wholewheat pizza base recipe Polkapuffs recipes Vegan pizza base recipe

Now, we punch the dough down and divide it into equals sized balls. Cover them again and let them rest for 30 mins for the second rise. The third picture below shows the size of the dough balls post the second rise.

Wholewheat pizza base recipe Polkapuffs recipes Vegan pizza base recipeWholewheat pizza base recipe Polkapuffs recipes Vegan pizza base recipeWholewheat pizza base recipe Polkapuffs recipes Vegan pizza base recipe

Preheat the oven for 10 mins at 200’c.

Now, dust the rolling board and the pin with some wholewheat flour and roll out the balls into a flatbread of about 3mm thickness and the diameter of about 6″-7″. Prick them well with fork as shown below.

imageWholewheat pizza base recipe Polkapuffs recipes Vegan pizza base recipe

Place the rolled dough on the baking tray and bake for 12-15 mins using both, upper & lower heating elements at 200’c to 210’c. (Please note every oven works differently so keep an eye on the pizza base, once it turns golden on the top side, take it out of the oven).

Once baked, cool the base on a cooling rack for 10 mins. Then apply pizza sauce & add other toppings and cheese and bake for another 10 mins or until the cheese melts. Enjoy!

If storing for future use, cool them completely, wrap them in cling wrap and refrigerate. Stays fresh for 2-3 days under refrigeration.

Wholewheat pizza base recipe Polkapuffs recipes Vegan pizza base recipe

Do try these out soon…you’ll love them!

Love,

Shreya💖

Almond cookies Almond shortbread cookies How to make eggless cookies Polkapuffs recipes

Almond Shortbread Cookies

If you love Almonds, then these cookies will make you swoon! They are crunchy & yet very moist. The nuttiness from the toasted Almonds compliments the butteriness just right. 😍 

At first, when I baked these, I was positive that my hubby may not approve of them…and I will end up eating the entire batch…although it was small one. Later that evening, he takes one tentative bite off a cookie and I see him stalking past me with the entire box!! No complaints there! I was super pleased. I didn’t need to ask him how these cookies tasted…they were finished in 2 days😁🤓

Almond cookies Almond shortbread cookies How to make eggless cookies Polkapuffs recipes

I will be making these again…maybe around Christmas.

I have followed a very easy recipe that I had bookmarked sometime back. I have made a very small change here, the original recipe called for Amaretto, I replaced it with Vanilla extract as I didn’t have any Amaretto.

All you Nigella Lawson fans out there must already know what Amaretto is…(she uses it generously in her desserts) and for those of you who don’t….well it’s a sweet, almond flavoured liquor from Italy. Saronno to be precise! ☺️

Any ways, coming to the recipe…it’s as easy as it gets but I will share a few pointers on how to measure the flour for that perfect cookie.

Yield: 12-15 cookies

Equipment: a mixing bowl, electric whisk/ manual whisk, baking tray, baking paper, measuring cups/ spoons, cooling rack, rubber spatula, cling wrap.

Ingredients:

1/2 cup softened unsalted butter

1/2 cup castor sugar (adjust as per taste)

1 tsp vanilla extract/ Amaretto

a pinch of salt

1 cup flour (Maida/ APF)

1/4 cup toasted & sliced almonds

Method:

Pre heat the oven @170’C. See tips for baking/ heating oven here. Line the baking tray with baking paper and set aside.

In a mixing bowl, whisk sugar and butter until fluffy. The sugar must dissolve but do not over whisk as the butter may split.

Almond cookies Almond shortbread cookies How to make eggless cookies Polkapuffs recipes

Next, add the flour, salt, vanilla extract. Whisk again for a minute to mix the butter & the flour well. Then add the almond slivers and mix gently using a spatula.

Almond cookies Almond shortbread cookies How to make eggless cookies Polkapuffs recipes

Place the dough on the cling wrap. Gently shape the dough into a log. Wrap it in the cling well. Place it in the refrigerator for 40-45 mins.

Almond cookies Almond shortbread cookies How to make eggless cookies Polkapuffs recipes

Once the dough has chilled well for 45 mins, remove it from the refrigerator and let it sit out for a few mins. Then cut the log of dough into 1/4 inch slices.

Place them an inch apart on the prepped baking tray and bake @ 170’c for 12-15 mins or just until the edges turn slightly golden. Once baked, cool on the cooling rack for about 15-20 mins. They will crisp up.

Almond cookies Almond shortbread cookies How to make eggless cookies Polkapuffs recipes

Then store them in an airtight container. They stay fresh for about 3-4 days.☺️

Almond cookies Almond shortbread cookies How to make eggless cookies Polkapuffs recipes

Tips on measuring the flour correctly: Never dip the measuring cup in the flour and remove a cupful of flour. You will end up with a lot more flour than required. Always fluff the flour well with a spoon. Then use the spoon to fill the measuring cup to the top and level it off using a knife. This way you will always have the exact amount of flour needed and the dough won’t turn too dry because of excess flour.

Enjoy!!

Love,

Shreya💞

Adapted from Julia’s Album

Cheesy Baked Pasta recipe Homemade white sauce recipe Bechamèl sauce recipe Polkapuffs recipe Penne pasta recipe

Cheesy Baked Pasta

Come Summers and I hate spending hours in the kitchen! I look forward to making quick meals and getting done as soon as possible😜

My Lemon Rice is one such….even Tehri is another option if you are looking for ‘desi’ one-pot meals. Or simply go Asian with some easy Fried Rice and pair it with my spicy Schezwan Sauce!!

Cheesy Baked Pasta recipe Homemade white sauce recipe Bechamèl sauce recipe Polkapuffs recipe Penne pasta recipe

But coming to today’s post…I had made our absolute favourite last weekend! Cheesy Baked Pasta….white bechamèl (white) sauce and loads of veggies…and cheese obviously!! 😉 Although my hubby is wary of indulging in cheese or too much of calorie loaded meals, this he gobbles up without any complaints!😘

I’d been wanting to share this for the longest time but never did I ever make it for lunch so couldn’t click decent pics…and besides, I usually eyeball the ingredients when I make this, (which is very often) so that make things even more difficult to pen down! That’s why, this time around I used measuring cups and spoons for every ingredient 🤓🤓 and trust me, it took me longer than it usually takes to get this ready…😜😜😂

Cheesy Baked Pasta recipe Homemade white sauce recipe Bechamèl sauce recipe Polkapuffs recipe Penne pasta recipe

I simply love this pasta..it’s gooey, oozing with cheese and is huge on flavours! What’s not to like?! And pair this with my Tropical Iced Tea and you have yourself and really fancy brunch😀

Let’s get going then,

Yield: serves 2

Equipment: a baking dish, measuring cups/ spoons, cooling rack, a heavy bottomed non-stick pan, a wired whisk.

Ingredients:

2 cups cooked pasta (I used Penne, they should be al-dentè)

1/2 cup each of chopped green & red bell pepper

1/2 cup sweet corn kernels

2-3 pods grated garlic

salt & pepper to taste

3 tbsp butter

1 tsp Italian seasonings

1/2 tsp red chilli flakes

4 tbsp APF (Maida)

1 to 11/2 cup milk at room temperature

1 tbsp cream (optional)

1/2 cup grated mozzarella cheese

2-3 tbsp bread crumbs

Method:

Cheesy Baked Pasta recipe Homemade white sauce recipe Bechamèl sauce recipe Polkapuffs recipe Penne pasta recipe

Melt butter in the pan, add APF. Sauté for 2-3 mins. Then add the milk and whisk the flour with the milk constantly until they combine into a smooth paste. If it looks too thick, add some more milk (about 3-4 tbsp). Add grated garlic along with cream and mix well. Season with salt, pepper, Italian seasoning & red chilli flakes.

Next, add the veggies (you can use broccoli, mushrooms, baby spinach, zucchini, olives, fresh basil leaves, etc as well). Mix well and cook for 2-3 mins. Then, add the cooked and drained pasta. Stir carefully, cover and cook for 2 mins on low flame. Turn off the heat.

Cheesy Baked Pasta recipe Homemade white sauce recipe Bechamèl sauce recipe Polkapuffs recipe Penne pasta recipe

Preheat the oven at 180’C.

Pour the cooked pasta with the sauce and veggies into a baking dish. Sprinkle the grated mozzarella on top of the pasta evenly. Top it with bread crumbs too (it gives an au gratin like texture). Bake this at 180’C for 10-15 mins or until the cheese bubbles and the top looks nice & golden brown. Take it out of the oven and cool it for a few mins on the cooling rack. Serve it piping hot 😁

Cheesy Baked Pasta recipe Homemade white sauce recipe Bechamèl sauce recipe Polkapuffs recipe Penne pasta recipe

This is such a comfort meal…and takes hardly any time to get done!

Tip: If you have leftovers, let them remain in the baking dish. Cover it with a foil and keep it in the refrigerator. Just heat it in the microwave the next day for about 2-3 mins. It will be as good as fresh 👍🏼

Love,

Shreya💓

Herbed Focacia bread recipe Polkapuffs recipes Baking a bread Homemade Focacia recipe

Herbed Focacia

An awesome aroma fills my home…yes, I am baking a bread! Nothing beats the flavours of a simple home baked bread. ☺️ 

Herbed Focacia bread recipe Polkapuffs recipes Baking a bread Homemade Focacia recipe

It’s soft and absolutely melt in the mouth…so much so, that I just brush it with some olive oil, sprinkled a bit of sea salt and chomped down most of the bread…but one could even have these with some soup or pasta!

Herbed Focacia bread recipe Polkapuffs recipes Baking a bread Homemade Focacia recipe

The herbs add an amazing earthiness to the bread….every bit worth the effort…which weren’t much to begin with in the first place! 😉 Yes…this is the easiest Focacia ever……

Let’s get started:

Yield: One 6″-7″ round bread

Equipment: a mixing bowl, baking tray, cooling tray, measuring cups/ spoons, rolling board, rolling pin.

Ingredients:

1 cup APF (Maida)

1+1/2 tsp active dry yeast

1/2 tsp sugar

1/2 cup warm water

1/2 tsp salt

1-2 tbsp olive oil for the dough + extra to brush on later

2 tsp mixed Italian herbs + extra for topping

1 tsp chilli flakes + extra for topping

1 tsp garlic pwd + extra for topping

sea salt to taste for topping

Method:

Take 1/2 cup warm water in a small bowl, add sugar and yeast in the water. Cover and set it aside for 15 mins to let the yeast bloom.

Herbed Focacia bread recipe Polkapuffs recipes Baking a bread Homemade Focacia recipe

In a mixing bowl, add APF, salt, Italian herbs, chilli flakes & garlic pwd. Add the frothy yeast and knead a soft dough. Knead it for 10-12 mins. Add some extra flour if it feels very sticky. Next, add 1-2 tbsp oil and again knead it for 5-6 mins. Grease the dough all over with some more oil, cover the bowl and set it aside in a warm place to prove. It should be almost double the size in about 1.5 to 2 hours.

Herbed Focacia bread recipe Polkapuffs recipes Baking a bread Homemade Focacia recipe

Then, after it has doubled in size, press the dough lightly and release the air within. Dust some APF on a rolling board and roll it into a circle of about 3/4″ thickness & 6″-7″ diameter with a rolling pin. Place the rolled dough onto a baking tray and sprinkle the toppings over it. Drizzle some more oil over it. Again set it aside for another 30 mins for second proving.

Then, after 30 mins, pre-heat the oven @210’c. The rolled dough will have doubled again by now & bake it for approximately 20 mins or until it turns golden on the top @ 210’c.

Remove from the oven and let it cool for a few mins on a cooling rack before slicing it. Enjoy it with olive oil or garlic butter or even homemade pizza sauce 😬

Herbed Focacia bread recipe Polkapuffs recipes Baking a bread Homemade Focacia recipe

This tastes so good…you won’t have leftovers! 😀

Love,

Shreya💕

Adapted from the book Nita Mehta’s Baking Recipes.


Bread pizza recipe How to make bread pizza Pizza sauce recipe Easy pizza recipe Vegetable pizza recipe Polkapuffs Instant pizza recipe

Bread Pizza Recipe/ Instant Pizza

Bread Pizza is rustled up for weekend breakfasts very often at my place! It’s so yummy and very quick😉 Perfect for those lazy Sunday mornings 😴 
Bread pizza recipe How to make bread pizza Pizza sauce recipe Easy pizza recipe Vegetable pizza recipe Polkapuffs Instant pizza recipe

It’s full of veggies and healthy stuff…hence, my hubby & I don’t mind a bit of cheese over it! Although you can add a lot more cheese…it’s up to you. And as I call it Instant, I don’t really wait for the cheese to melt…in fact I kind of prefer the half melted cheesy strands/ chunks in every bite 😋😋 …it’s simply droolicious! Lol! 😺

Bread pizza recipe How to make bread pizza Pizza sauce recipe Easy pizza recipe Vegetable pizza recipe Polkapuffs Instant pizza recipe

Also, I use brown bread for making these so it’s really not unhealthy in any way….and makes for a great party snacks or snack box idea for kids. Besides, you can make a non-veg version by adding some blanched chicken/ lamb meat, etc…the possibilities are infinite👌 however, you can try the same on proper pizza base too!

Here is the recipe..

Yield: serves 2-3

Equipment: baking tray, aluminium sheet, measuring cups/ spoons, a saucepan, cooling rack.

Ingredients:

For pizza sauce:

2 cup chopped tomato

1/2 cup chopped onion

1 tbsp chopped garlic

1/2 tbsp mixed Italian herbs (oregano, basil, thyme, etc.)

1/2 tbsp chilly flakes

1/2 tsp crushed black peppercorns

1/2 tsp degi mirch

1/4 tsp turmeric pwd

1 tsp tomato ketchup

1 tbsp butter

1 tsp oil

salt to taste

For the base:

6-8 slices of brown/ white bread

1/2 tbsp butter

For topping:

1+1/2 cup chopped/ sliced veggies (capsicum, red or yellow bell pepper, sweet corn, mushroom, baby corn, spinach, etc..)

grated mozzarella cheese/ pizza cheese as needed

mixed Italian herbs as needed

Method for sauce:

Heat butter and oil in a saucepan, then add chopped onions and garlic and sauté them until the onions turn golden brown. Next, add the chopped tomatoes and season with salt & crushed black pepper. Also, add turmeric pwd and degi mirch. Cover and cook for a few mins, until the tomatoes are cooked well.

Bread pizza recipe How to make bread pizza Pizza sauce recipe Easy pizza recipe Vegetable pizza recipe Polkapuffs Instant pizza recipe

Then add Italian herbs and chilli flakes. Cook for a further 5-7 mins. Lastly, add ketchup, mix well. Turn off the flame. The sauce is ready. Keep it aside to cool a bit. If you like, you can blend the sauce a bit, but I don’t. We like the sauce slightly chunky.

I usually add the chopped veggies in the warm sauce before spreading the pizza sauce on the bread. You can do the same too.

Assembling the bread pizza:

Preheat the oven @ 180’c and line the baking tray with aluminium foil.

Take a slice of bread, spread some butter. Then add the pizza sauce which has the veggies too. Sprinkle some grated cheese & herbs.

Bread pizza recipe How to make bread pizza Pizza sauce recipe Easy pizza recipe Vegetable pizza recipe Polkapuffs Instant pizza recipe

Place the prepared bread slices on the baking tray and bake them for 10 mins @ 180’c using the upper and lower heating rods together or until the cheese melts. Remove from the oven and cool for 2 mins on the cooling rack. Serve hot with some ketchup/ mayonnaise 😬

Bread pizza recipe How to make bread pizza Pizza sauce recipe Easy pizza recipe Vegetable pizza recipe Polkapuffs Instant pizza recipe

If you like these…you could try some Cheesy Garlic Bread 😊

Love,

Shreya💖

️Adapted from Tarla Dalal