Earlier this week, I shared with you my Diwali Recipe Collection (take 1), but there were many recipes that still needed to be added. I wanted to avoid overcrowding one post and decided to do it in parts.
To continue with Diwali frenzy and in my humble attempt to simplify things for everyone…I present to you my Diwali Recipe Collection (take 2). I will be putting up the entire step-by-step recipe here along with the direct link to each post at the end of each recipe. You can click that to see the step-by-step pictures in case you are interested 😊 Do read till the end and you will be deciding your menu right here!!
Let’s begin…
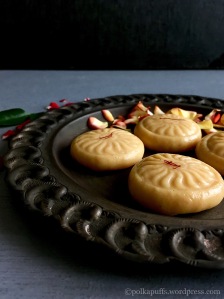
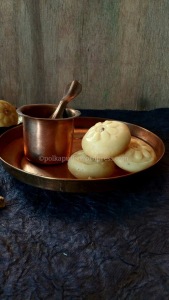
POORANPOLI

Yield: 15-16 Pooranpolis
Equipment: a pressure cooker, a wok, a mixing bowl, a potato masher, rolling pin, rolling board, measuring cups/ spoons, a non-stick pan, a spatula.
Ingredients:
For the Pooran:
1 cup chana dal (split gram)
2-3 cup water
a pinch of turmeric pwd
1/2 tsp salt
3/4 cup sugar (add more or less as per your preference)
1 + 1/2 tsp cardamom pwd
For the Poli:
1 1/2 cup Maida (APF)
a pinch of salt
1/4 cup refined oil
water as needed
Method:
For the Pooran:
Soak the dal for about 1 hour in 2-3 cups of water. Then pressure cook the dal with the same water that it was soaking in, turmeric & salt for 3-4 whistles. The water in the pressure cooker will evaporate considerably. Cool the cooker completely and the open the lid once the steam settles down on it’s own. Then mash the cooked dal using the masher.
Next, heat a wok. Add the mashed dal to the wok. Add the sugar now. Keep stirring it continuously, the sugar will start melting. Keep stirring to avoid the sugar from burning with the mashed dal. The consistency of the mixture will start to thicken and become very dense. Once it looks almost dry, turn off the flame. Add the cardamom pwd at this stage. Mix it well with the mixture. Taste the mixture and adjust the sugar if necessary (in case you add more sugar after tasting, then you will need to cook it again on medium heat and stir the mixture continuously until it dries up again).
The texture of the filling should look like the picture on the right.
For the Poli:
Take the maida in a mixing bowl, add salt. Add a little water at a time, start kneading a dough. It must be a soft dough. I used about 1/2 cup water approximately. Next, make indentations in the dough at drizzle the oil. Cover and set aside for 30 mins. After 30 mins, knead the dough again until it absorbs all the oil. The dough will be very soft and extremely pliable at this stage. Let it rest for another 15 mins before making the Pooranpoli.
For assembling the Pooranpoli:
Please follow the pictures for next few steps.
Divide the dough into equal parts, stuff them with the filling and cover them properly so that the filling doesn’t spill out while rolling them
Next, roll them out evenly. Heat a pan, cook them on both sides and smear some ghee or butter while cooking them. Ideally, they should puff up. But it’s ok if they don’t puff up.
Serve them piping hot with some more ghee or butter.
Click here for a direct link to detailed recipe of Pooranpoli.
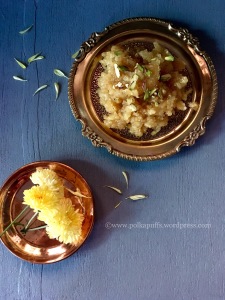
SPONGE RASGULLA (pressure cooker recipe)

️Yield: 7-8 Rasgullas
Equipment: a large plate, a pressure cooker, a ladle, extra bowls, measuring cups/ spoons.
Ingredients:
1 litre milk (I used Amul Toned milk)
1/2 tsp citric acid pwd
2 cup sugar
3-4 cup water
a few strands of saffron to garnish
pistachio to garnish
Method:
Please note that the milk had already split in my case. But to split the milk specially to make these…heat the milk in a large pan, once it comes to a boil, add the citric acid pwd and stir once. The milk will split. Just strain the milk solids in a muslin cloth and wash the solids within the cloth under running water to get rid of any traces of citric acid.
Keep the milk solids in the muslin cloth under some weight for 30 mins to remove all the whey. Then transfer the cottage cheese/ paneer on a plate. Mash the paneer with the your hands until it’s soft and a little greasy in texture. Next, divide the mashed paneer in equal parts…about 7-8 and make smooth, crack free balls. Set them aside.
Now, add water and sugar in the pressure cooker. Turn the flame on and let the sugar melt. Once the sugar has melted completely & the syrup starts boiling, add the balls one by one. Close the lid and place the weight too. Let it simmer for 10 mins on high flame. Then after the first whistle, lower the flame and let it simmer for another 5-8 mins. Turn off the flame after that. Let the pressure release on its own. Then take out the cooked rasgulla and the syrup and place them in a bowl to cool down completely. You can squeeze them and see how spongy they have turned out to be! They are ready…garnish & serve them chilled!!
Click here for a direct link to detailed recipe of Pressure Cooker Sponge Rasgulla.
WHITE CHOCOLATE TREATS (ideal for gifting)

Yield: 7-10 pieces
Equipment: a deep saucepan, a heat proof bowl (preferably borosil/ Pyrex), measuring cups/ spoons, silicon Chocolate moulds in any shape.
Ingredients:
1/2 cup chopped Morde White Compound
sugar sprinkles or sugar balls as needed
Method:
Heat water in the saucepan until it starts to boil, then place the heatproof bowl over the saucepan in such a way that the base of the bowl does not touch the boiling water below in the pan. Next, keep the chopped compound chocolate in the bowl and maintain the flame on it’s lowest possible level. Let the compound melt slowly and do not stir it.
While the compound melts, place the sugar balls/ sprinkles in the chocolate moulds, just a thin layer covering the base only.
Next, check the compound chocolate that is melting, it should be almost melted by now. Remove the bowl from the top of the saucepan. Stir the melted compound chocolate just once. It must be smooth and lump free.
Next, add 1-2 tsp of the melted compound chocolate over the sprinkles placed in the moulds. Fill the moulds to the top. Do the same for all the moulds and place them on a tray. Place this tray in refrigerator or the freezer for about 10-12 mins. They will be completely set and hard by then. When you break the chocolate in half, you should hear a ‘snap’! That’s the sound of a perfect homemade chocolate.🤓🤓😬
Follow the same recipe for Dark chocolate compound or Milk chocolate compound too. 😊
They keep well for 3-4 days under refrigeration.
Click here for a direct link to detailed recipe of Homemade White Chocolate Treats
MASALA SEV

Yield: 1 large bowl
Equipment: kitchen press, a wok, a slotted spatula, a mixing bowl, measuring cups/ spoons.
Ingredients:
1 cup Besan (chickpea flour)
2 tbsp refined oil
A pinch of hing (asafoetida)
1/2 tsp red chilli pwd
1/2 tsp black pepper pwd
1/2 tsp turmeric pwd
1/2 tsp roasted cumin pwd
1/4 tsp baking soda
1/4 tsp citric acid pwd (optional)
Salt to taste
oil to fry
lukewarm water as needed
Method:
Take besan in a mixing bowl, add all the spices and season with salt as well. Give it a mix. Add the oil and use lukewarm water to make a loose dough. The dough should be softer than that of roti (the dough should feel slightly sticky when u touch it, I used about 1/2 cup water). Let the dough rest for 30 mins.
Heat sufficient oil in a wok for frying.
Then, after resting it for 30 mins, fill the kitchen press with the dough and fit the plate with larger holes for thick Sev (see the pic above for reference). And slowly drop the dough into the hot oil from the press.
Fry the sev on medium flame until it turns golden brown. Remove from the oil and drain it on kitchen tissues. Repeat for the remains dough too. That’s it….it’s ready 😬 I usually serve these with some mango pickle! Tastes really yummy👌
These keep well for 10-15 days in an airtight container. Enjoy!
CLick here for a direct link to detailed recipe of Masala Sev.
DAHI WADAS ON A SKEWER

Yield: 21 small or 12-14 large Wadas
Equipment: Appe pan / Aebelskiver pan, skewer sticks, a blender, a large mixing bowl, 2-3 bowls, spice mixer, 2-3 spoons, measuring cups/ spoons, a small saucepan, 2 glass jars
Ingredients for the Wadas:
1 cup skinless white urad dal (black lentil) soaked for 6-7 hrs
10-12 nos black peppercorns
2″ pc ginger
3 nos green chilly
1/2 tsp red chilly pwd
1 pinch hing (asafoetida)
salt to taste
oil as required (optional)
Method for the Wadas:
Grind together all the ingredients mentioned above to make a smooth paste using little water. The paste should not be runny. It’s supposed to be thick and sticky. Let this batter / paste sit for 30mins. Whisk the batter vigorously using a spoon for at least 4-5 mins. This will make the batter very light and airy and will ensure that the Wadas are soft.
Now heat the appe pan, add a drop of oil if needed in every section. Now drop about a 1.5 – 2 tbs of the batter in every section and cook for 2 mins on the first side, then using another spoon flip them over to the other side and cook for another 1-2 mins. Repeat this for the entire batch of the batter. And set aside the Wadas to cool a bit. Then dip them in some warm for 10 mins then drain the water. Squeeze out the extra water. This is done to just soften the wada a little more. Set them aside.
Ingredients for the tamarind chutney:
1 cup tamarind pulp
3 tbsp pwd jaggery (use more if you like)
1/2 tsp each of red chilly pwd & roasted cumin pwd
1/2 tsp crushed saunf Dana (fennel seeds)
1/4 tsp salt
Method for the tamarind chutney:
Heat the saucepan, add the pulp along with the jaggery pwd and stir till the jaggery dissolves completely and the concoction simmers slightly..then season with the above mentioned ingredients. Cook for another 5-7mins. The concoction will thicken slightly. Turn off the gas and let the chutney cool down completely before you store it in a clean, dry glass jar. Set that aside for now.
Ingredients for the green chutney:
1/2 cup coriander leaves washed, dried & roughly chopped
1 no raw mango peeled & cubed
salt to taste
1 tbsp tamarind chutney
1-2 nos green chillies
6-7 nos cloves of garlic
Method for the green chutney:
Put all in the ingredients mentioned above in a blender with a little water and pulse for a couple of mins. The chutney will have a smooth texture. Store the chutney in a clean & dry glass jar.
Ingredients for the saffron infused curd dip:
1 cup thick curd
2 tbsp warm water
15-20 strands of saffron
Himalayan pink salt to taste
Method for the curd dip:
Dilute the saffron with the warm water for 20 mins or until it releases a rich yellow /ocher colour. Mix this yellow saffron water with the curd & the salt. Beat everything well and set aside I refrigerator to cool for 15-20 mins before using it.
For the plating & garnish you will need:
1 tsp roasted cumin pwd
1tsp red chilli pwd
Few pomegranate airels
2 tsp coriander leaves chopped finely
Plating:
Put 2-4 Wadas on a single skewer stick, drizzle some of the curd dip, tamarind chutney, green chutney. Sprinkle some roasted cumin and red chilli pwd. Add a few pomegranate seeds /jewels. And a final flourish of coriander leaves! Voilà! Do the rest in a similar way & serve right away.
Or just serve in platters like we usually do! ☺️
Click here for a direct link to detailed recipe of Dahi Wadas.
BANARASI SAMOSA

️Yield: 12 medium samosas
Equipment: a wok, a pan, rolling pin, measuring cups/ spoons, a slotted ladle, extra spoons & plates as needed, a pressure cooker.
Ingredients:
For the dough:
2 cup Maida (APF)
2 tbsp warm ghee
1 tsp ajwain (carrom seeds)
salt to taste
water as needed
Method:
Mix all the ingredients except the water in a bowl. Rub the ghee with the Maida for at least 10 mins as this gives very good, flaky samosa. The texture will resemble breadcrumbs. Then add little water at a time and make a semi-stiff dough. Let it sit let for a minimum of 30 mins.
For the stuffing:
3 nos. boiled and chopped potatoes
1 cup green peas
1/2 tsp hing
1 tbsp oil
1/2 tsp cumin seeds
2 tsp chopped coriander leaves
1 tsp each of coriander pwd, cumin pwd (Jeera pwd), red chilly pwd, Garam masala.
1/2 tsp amchur pwd (dry mango pwd)
A pinch of turmeric pwd
salt to taste
Method:
Heat oil in a pan, add hing & cumin seeds. Once they splatter, then add the potatoes and green peas. Sauté for 5 mins. Then add the dry masalas and season with salt. Cook for 5 mins. Turn off the flame. Add coriander leaves & mix well. Let the stuffing cool completely before proceeding ahead.
Assembling the samosa:
Make a lemon sized ball of the dough…divide the dough similarly. Now roll each ball to a thickness of about 3mm. Not more. Cut the the rolled dough into two half circles. Make a cone of each half. Seal it carefully. Add the stuffing into the cone…about 1 tbsp in each cone or little more.
Then close the third side of the cone well. Use some water to seal the dough well. Repeat for all the dough. Keep aside for 20 mins before frying them.
Next, heat enough oil in a wok to fry the samosas. Once the oil is hot enough, reduce the flame and drop 2-3 samosas into the oil. Deep fry them at low flame to get crispy & well cooked samosas.
Once done, remove from the oil & drain on some tissues. Serve them piping hot with dips/ chutney of your choice☺️
Click here for a direct link to detailed recipe of SAMOSA and also BANARASI SAMOSA CHAAT
KAJU KATLI

Yield: 15-17 katlis
Equipment: a non stick pan, a wooden spoon, measuring cups/ spoons, a knife, a plate, a rolling pin.
Ingredients:
1 cup cashew nuts
1/2 cup sugar
4 tbsp water
1 tsp ghee (for greasing)
Method:
Use a blender and dry grind the cashews to a fine texture. Make sure the cashews were at room temperature before grinding.
Heat the non stick pan, add the sugar & water. Melt the sugar into the water on a low flame. Keep stirring. Once the sugar has melted, cook for another 2-3 mins on low flame. To check if the sugar syrup is ready, take some water in a bowl and add a drop of the syrup. The drop should not mix in the water. This is one thread consistency (ek taar ki chashni). My syrup was ready in 5 mins approximately.
Once the syrup is ready, add the cashew powder & keep stirring constantly & cook on low flame for 5 mins, until you achieve a dough like consistency. To check the consistency of the Katli dough, take some mixture in your hands and make a ball, if the shape holds, it’s ready. Remove this dough like mixture on a greased plate and let it cool for 5 min. Grease your palms and knead this mixture carefully until it’s smooth.
Now, roll this dough with a rolling on the back of a greased plate. The thickness should be about 6mm or a bit more. Don’t roll it too thin. Set this plate in the refrigerator for 8-10 mins. They will set really quickly, once set, you can cut them in any shape as you prefer, however I prefer the traditional diamond shape for these katlis … That’s it! They are ready 😄 you can store them in an airtight container for 2-3 day in the refrigerator.
Click here for a direct link to detailed recipe of Kaju Katli
KARACHI BISCUITS/ TUTTY FRUTTI COOKIES

Yield: 24 medium cookies
Equipment: a large mixing bowl, a whisk (electric or manual), some cling wrap, a sharp knife, measuring cups/ spoons, baking tray, cooking rack.
Ingredients:
1 cup Maida/ APF
1/2 cup powdered sugar
7-8 tbsp softened butter (I used unsalted, if you are using salted butter then, increase the quantity of sugar by 1-2 tbsp)
1 tsp vanilla extract/ essence
1/2 cup of mixed tutti frutti
5 tbsp roughly chopped cashew nuts (optional)
1 tsp milk (optional, to be used only to make a smooth dough if you are unable to roll the dough)
Method:
Take butter and sugar in a mixing bowl, cream them together until they are fluffy and light. Then add the tutti frutti, cashews & vanilla extract. Mix it these well then add the flour. Mix them well with a light hand and bring them together to make a ball. Use 1 tsp of milk only if you are unable to make a round ball. The dough doesn’t need to be kneaded, just bring it together. The mixture is very soft and pliable.
Now, take the dough on some cling wrap and roll it well to give it the shape of a thick log. Wrap the log well and refrigerate for a minimum of 30-40 mins.
In the meantime, preheat your oven @180’C for about 10 mins. Line your baking tray with some parchment/ butter paper. Remove the chilled log of dough from the refrigerator and cut it in about 1/2″ slices. Place them slightly apart on the lined baking tray. Bake them for 15 mins @180’C using the upper and lower rods for the first 10 mins, then just the lower rod for the last 5 mins. Remove the tray from the oven & let it cool on the rack for about 15 mins. The cookies are soft when you remove them from the oven but crisp up as they cool down. You can store these in airtight containers for almost 1 week.
*Please note that baking time may vary as every oven is different, so time the oven accordingly. The cookies turn slightly golden around the edges as they are ready, so remove them from the oven as per the colour.
Click here for a direct link to detailed recipe of Karachi Cookies
FUDGE BARS

Yield: 10 bars or 20 squares (depending on how your cut them)
Equipment: a heavy bottom wok, measuring cups & spoons, a wired whisk, baking/ parchment, paper or aluminium foil sheet, a sharp knife.
Ingredients :
200 ml condensed milk
3+1/2 tbsp cocoa powder
5 tbsp castor sugar
1-2 drops vanilla extract/ essence
50 gms butter
1 tbsp APF (Maida)
1/2 cup roughly chopped walnuts (replace the walnuts with pecans, cashews, hazelnuts, dried cranberries or prunes, etc.)
Method:
Line the any container or a plate with the baking paper/ parchment paper/ aluminium foil.
In a wok, add all the ingredients except the vanilla extract & chopped walnuts.
Heat them on low flame and keep whisking simultaneously so that the mixture doesn’t burn or has any lumps.
Keep cooking and stirring until the mixture comes together and form a thick mass that moves with the whisk. Add the vanilla extract & walnuts at this stage and mix well.
Immediately pour the mixture on the prepared container or plate. Spread it with the help of a spatula.
Keep it in the refrigerator to set for a minimum of 2 hours. Once set, slice it into bars or squares & serve.
They last for 3-4 days under refrigeration.
Click here for a direct link to detailed recipe of FUDGE BARS
Do try these recipes…they are easy and absolutely delicious ☺️
Wishing you and your loved ones a happy and prosperous Diwali!! 🎉✨🎉🎊🎉✨🎉✨🎉🎊💥💥🎁
Love,
Shreya💗
Click here for Diwali Recipe Collection (take 1).